
Today's topic is all about configuring our iOS/iPadOS devices, we'll have a look at how to set up configuration profiles in MEM as well as compliance policies, how to integrate ABM/ASM to be able to push apps to devices without Apple IDs and adding apps from the App Store.
This is part three of this series covering management of iOS/iPadOS, you can find part one and two here:
Managing iOS/iPadOS Part 1: The basics
Managing iOS/iPadOS Part 2: Deployment methods
Table of contents for easy navigation
Configuration Profiles
To do a quick recap on configuration profiles, a configuration profile is what we configure in MEM to be able to automatically configure settings like restrictions and credentials. Payloads is what we add to the configuration profile, this is the settings we add to the configuration profile and that's applied to the device. Many of the payloads we can configure requires the device to be supervised as they are more intrusive for the user.
Settings requiring supervision include:
| Device Features | Device Restrictions |
|---|---|
| Home Screen Layout | Block App Store |
| App notifications | Block Installing apps using App Store |
| Lock Screen Message | Block automatic app downloads |
| Web Content Filter | Block playback of explicit music, podcast and iTunes U |
| Wallpaper | Block adding Game Center friends |
| Block Game Center | |
| Block multiplayer gaming | |
| Block access to network drive in Files app | |
| Single App Mode | |
| Block camera | |
| Block FaceTime | |
| Requie Siri profanity filter | |
| Block user-generated content in Siri | |
| Block Apple News | |
| Block Apple Books | |
| Block iMessage | |
| Block Podcasts | |
| Music service | |
| Block iTunes Radio | |
| Block iTunes store | |
| Block Find My iPhone | |
| Block Find My Friends | |
| Block user modification to the Find My Friends settings | |
| Block removal of system apps from device | |
| Block Safari | |
| Block Safari Autofill | |
| Block iCloud backup | |
| Block iCloud document and data sync | |
| Block iCloud Keychain sync | |
| Block AirDrop | |
| Block pairing with Apple Watch | |
| Block modifying bluetooth settings | |
| Block pairing with non-Configurator hosts | |
| Block AirPrint | |
| Block storage of AirPrint credentials in Keychain | |
| Require AirPrint to destinations with trusted certificates | |
| Block iBeacon discovery of AirPrint printers | |
| Block setting up new nearby devices | |
| Block access to USB drive in Files app | |
| Safari password domains | |
| Block modification of diagnostics settings | |
| Block remote AirPlay, view screen by Classroom app, and screen sharing | |
| Allow Classroom app to perform AirPlay and view screen without prompting | |
| Block modification of account settings | |
| Block Screen Time | |
| Block use of erase all content and settings | |
| Block modification of device name | |
| Block modification of notifications settings | |
| Block modification of Wallpaper | |
| Block configuration profile changes | |
| Allow activation lock | |
| Block removing apps | |
| Allow USB accessories while device is locked | |
| Force automatic date and time | |
| Require teacher permission to leave Classroom app unmanaged classes | |
| Allow Classroom to lock to an app and lock the device without prompting | |
| Allow students to automatically join Classroom classes without prompting | |
| Block VPN creation | |
| Block modification of eSIM settings | |
| Defer software updates | |
| Delay visibility of software updates | |
| Block word definition lookup | |
| Block predictive keyboards | |
| Block auto-correction | |
| Block spell check | |
| Block keyboard shortcuts | |
| Block dictation | |
| Block QuickPath | |
| Kiosk settings | |
| Block Wallet notifications in lock screen | |
| Block passcode modification | |
| Block modification of Touch ID fingerprints and Face ID faces | |
| Block password AutoFill | |
| Block password proximity requests | |
| Block password sharing | |
| Require Touch ID or Face ID authentication for AutoFill | |
| Restricted Apps | |
| Shared iPad | |
| Show or hide apps | |
| Block changes to app cellular data usage settings | |
| Block changes to cellular plan settings | |
| Block modification of personal hotspot | |
| Require joining Wi-Fi networks only using configuration profiles | |
| Require Wi-Fi always on |
As you can see from the table above, many of the restrictions are supported only on supervised devices. This list grows with new iOS updates, it is recommended to use supervision for company owned devices.
Creating a Configuration Profile in MEM
To create profiles in MEM, follow the steps below
- Go to the MEM console
- Navigate to Devices -> Configuration Profiles
- Click Create Profile
- For Platform, choose iOS/iPadOS
- Now you see all the several types of payloads we can configure for the devices. Options include:
- Custom
- Derived Credential
- Device Features
- Device Restrictions
- PKCS certificate
- PKCS imported certificate
- SCEP certificate
- Trusted certificate
- VPN
- Wi-Fi
- Choose the type of profile you want to configure and click Create. If you for example would like to set a passcode requirement, choose device restrictions
- Give the profile a Name and a Description, then click Next
- Configure the settings you want to apply to devices and then click Next
- Assign your profile to a group and click Next, then click Create
You have now created a profile that will be automatically applied to devices and the settings you picked will be configured on the device.
Look into the different profile types available to see what you can configure and what might apply to your specific use case. Some of the most common profiles include Passcode, Wi-Fi, VPN and Restrictions.
Compliance Policies
Compliance policies is an important part of every platform you wish to enroll to MEM. Using these policies, you can require the device to meet certain security measures before the user can access corporate data. For example, if a device does not have a passcode set or if the device has been jailbroken, you can set the device as noncompliant and block access to resources using conditional access policies.
Compliance also ties into Mobile Threat Defense (MTD) like Microsoft Defender For Endpoint which offers protection against phishing and unsafe network connections from apps, emails and websites. If a threat is detected on a device, the Defender app reports back to the Microsoft Defender Security Center where you define the threat level. You can then require the device to be at or under a certain threat level before allowing access. For devices managed by App Protection Policies (MAM) this would be under the Conditional Launch settings in the policy.
Configure a compliance policy,
- In the MEM console, navigate to Devices -> Compliance policies
- Click Create Policy and choose iOS/iPadOS for Platform, then click Create
- Give the compliance policy a Name and a Description, then click Next
- For Compliance settings we can configure the following
- Unable to set up email on the device
- A managed email account is required. If the user already has an email account on the device, the email account must be removed so Intune can set one up correctly. If no email account exists on the device, the user should contact the IT administrator to configure a managed email account.
- Device Health
- Jailbroken devices
- Allow or block devices detected as jailbroken
- Require the device to be at or under the Device Threat Level
- Select the maximum allowed device threat level for devices evaluated by your connected Threat Defense services. Devices which exceed this threat level get marked as noncompliant. (This compliance check is supported for devices with OS versions iOS 8.0 and above)
- Jailbroken devices
- Device Properties
- Minimum OS version
- Maximum OS version
- Minimum OS build version
- Maximum OS build version
- Microsoft Defender for Endpoint
- Select the maximum allowed machine risk score for devices evaluated by Microsoft Defender for Endpoint. Devices which exceed this score get marked as noncompliant.
- System Security
- Require a password to unlock mobile devices
- Device Security
- Add bundle IDs for apps that should be restricted. A device that has at least one app installed which is found on the restricted apps list will be marked as non-compliant.
- Select the settings that best fit your use case, at least you should require a passcode and block jailbroken devices, then click Next
- Unable to set up email on the device
- Under Actions for noncompliance you can configure what should happen if the device does not meet the compliance policy
| Action | Schedule (days after noncompliance) |
Message template | Additional recipients (via email) |
|---|---|---|---|
| The action to take if a device does not meet compliance |
Schedule what should happen after specified number of days noncompliant |
If you select to send an email to the end user, you can configure a message template of your own |
If send email is selected, choose if you want additional recipients such as an admin |
- Available actions
- Mark device as noncompliant
- Send email to end user
- Send push notification to end user
- Remotely lock the noncompliant device
- Retire the noncompliant device
- With these options you can easily build out a flow of what should happen if the device become noncompliant, in the example below I mark the device as noncompliant as soon as it is detected that the device is breaking a compliance rule, on day two I send both a push notification to the user and an email, if the device still fails compliance on day three I retire the device (enterprise wipe) and send an email to the user and an admin
admin) --- a2(Retire device) end subgraph Day2 b1(Send push notification
to device) --- b2(Send email to user) end subgraph Immediately c1(Mark device noncompliant) --- c2(Send email to user) end Immediately --> Day2 Day2 --> Day3
- When you have configured your actions for noncompliance, click Next
- Assign you compliance policy and click Next
- Review your settings and then click Create
Apps
There are different ways of deploying applications to devices from MEM. You can either add applications directly in the MEM console from the App Store if your organization does not use ABM/ASM, or, you can integrate ABM/ASM and distribute apps from these portals. The benefit of using ABM/ASM is that you can install applications on devices without requiring an Apple ID, you can get licenses for applications and revoke those licenses if a user leave the company.
When ABM/ASM is integrated and you get licenses for a free or paid app, the app inventory is synchronized to the MEM console. From here you're able to assign the apps to groups of users or devices, Apple then handles the installation of these apps. This way, you have a good overview within MEM on the usage of licenses for apps.
We'll walk through the steps necessary to integrate the apps section in ABM/ASM with MEM, as well as adding apps from the App Store and touching on how to handle Line of Business apps.
Integrating ABM/ASM apps with MEM
I will do these steps in ABM, the same steps apply to ASM.
- Sign into the ABM portal
- Navigate to Settings -> Apps and Books, under My server tokens, click on Download for your location
- Go to the MEM console
- Navigate to Tenant administration -> Connectors and tokens -> Apple VPP tokens and click on Create
- Provide a Name for the token, enter the Apple ID you used to download the token, upload the token you downloaded in step 2, then click Next
- Choose Country/region, specify the type of VPP account you have, Business or Education, select whether you want all apps associated with this token to be automatically updated or not, then check "I grant Microsoft permission to send both user and device information to Apple." and click Next
- If you are using scope tags add them now, otherwise click Next and then Create
Once above steps are completed you will see that Status is active.
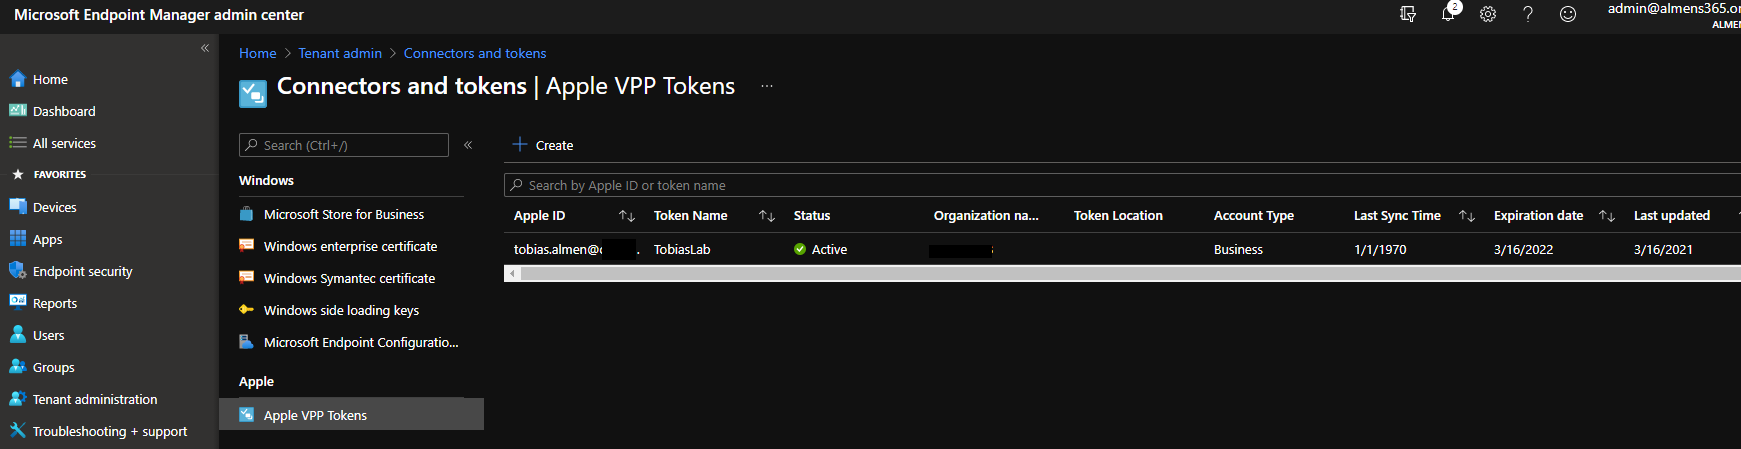
Note: This token must be renewed annually
Add apps to Volume Purchase Program (VPP)
Now that we have successfully integrated ABM to MEM, the next step is to add apps. Follow the steps below to add apps and synchronize them to MEM.
- Sign into the ABM portal
- Navigate to Apps and books
- At the top, search for the application you want and click on it
- Specify the location you wish to add the app for
- Enter the quantity of licenses needed
- Click Get
- The licenses will now be processed, depending on how many licenses you requested it might take a while
- When the licenses have been processed, the app will synchronize to MEM.
- If you don't see the app you can speed up the sync by clicking (...) to the right on Apple VPP tokens overview and click Sync
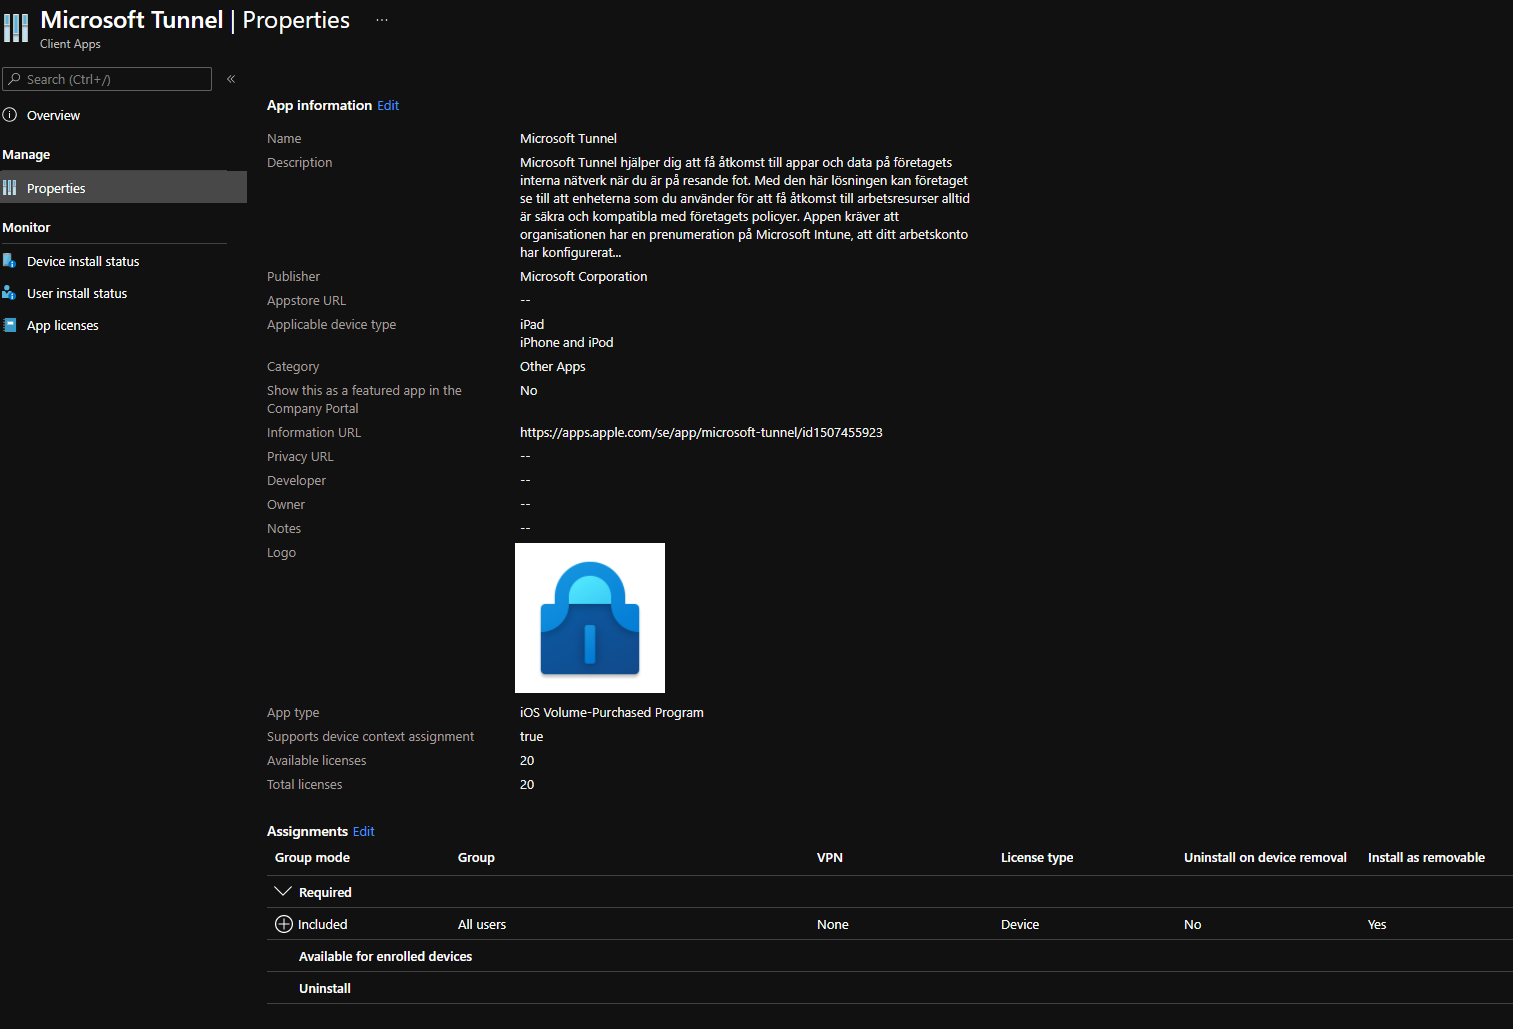
- In MEM, navigate to Apps -> iOS/iPadOS apps. The app should now be in the list with a type of iOS volume purchase program app
- Click on the newly synchronized app
- Click Properties
- Click Edit on Assignments
- Choose whether you want the app to be Required or Available for enrolled devices
- Add a group or All devices/users
- Once a group is added, click on User under License Type and switch to Device licensing, with this option enabled users won't need an Apple ID
- Uninstall on device removal allows you to specify if the app should be removed from the device if it unenrolls from MEM. By doing so, you're also reclaiming the license
- Install as removable allows you to specify if the user should be able to uninstall the app or not
- Once you're finished with the configuration, clock Ok -> Review + save -> Save
If you chose Required, the app will now be pushed to the users you assigned the app to. If the device is supervised, this process will happen in the background and the user won't be prompted to accept the installation.
Add apps via App Store
If you're not able to use the above method for whatever reason, you can still push apps from the App Store to your devices. This requires the user to be signed into an Apple ID on the device and accept the app installation. To add App Store apps, follow the steps below.
- In the MEM console, navigate to Apps -> iOS/iPadOS and click Add
- Choose iOS store app as the type and click Select
- Click Search the App Store, enter the name of the app you wish to add, click on the app, and then click Select
- Review the App information screen, then click Next
- Choose whether you want the app to be Required or Available for enrolled devices
- Add a group or All devices/users
- Click Next
- On the Review + create screen, click Create
If the app was added as a Required app, it will now start to push to devices and users will have to accept the installation.
Line of Business Apps
Uploading to MEM
If you have a line of business app developed in-house or by a third-party developer, you can upload the .ipa file to MEM and push the app to devices. When you use this method to deploy apps, a provisioning profile comes bundled with the app, this profile expires and must be renewed on an ongoing basis. A provisioning profile authorizes developers and devices to create and run Apple iOS applications. If this profile is not renewed the app will stop working.
Custom Apps
Instead of using the above method to upload in-house or third-party developer apps, I would recommend using Custom Apps in ABM. With this option you can use the same deployment method as for all other apps added using this service. You can also use TestFlight to push beta apps to users before they are pushed widely in the organization. Apple states that most enterprise customers should see this as the way forward.
Benefits of using Custom Apps,
- One program to manage all of your apps (internal and external)
- Apps don’t expire
- Apps are managed individually
- Apps can be distributed to much larger audiences
- Easier to work with third-party software vendors
- Additional App Store features
- TestFlight and App Store Connect tools
Wrapping up
We're reaching the end of this four part series of managing iOS/iPadOS in MEM. So far we've looked at the basics of iOS/iPadOS in MDM to get an understanding of the core concepts of management, different deployment methods available to handle both BYOD and corporate owned devices and today how we can configure our devices. Next time, and the last part, we'll look into managing identities. Specifically how we can create a good user experience with SSO and federation to handle managed Apple IDs.