
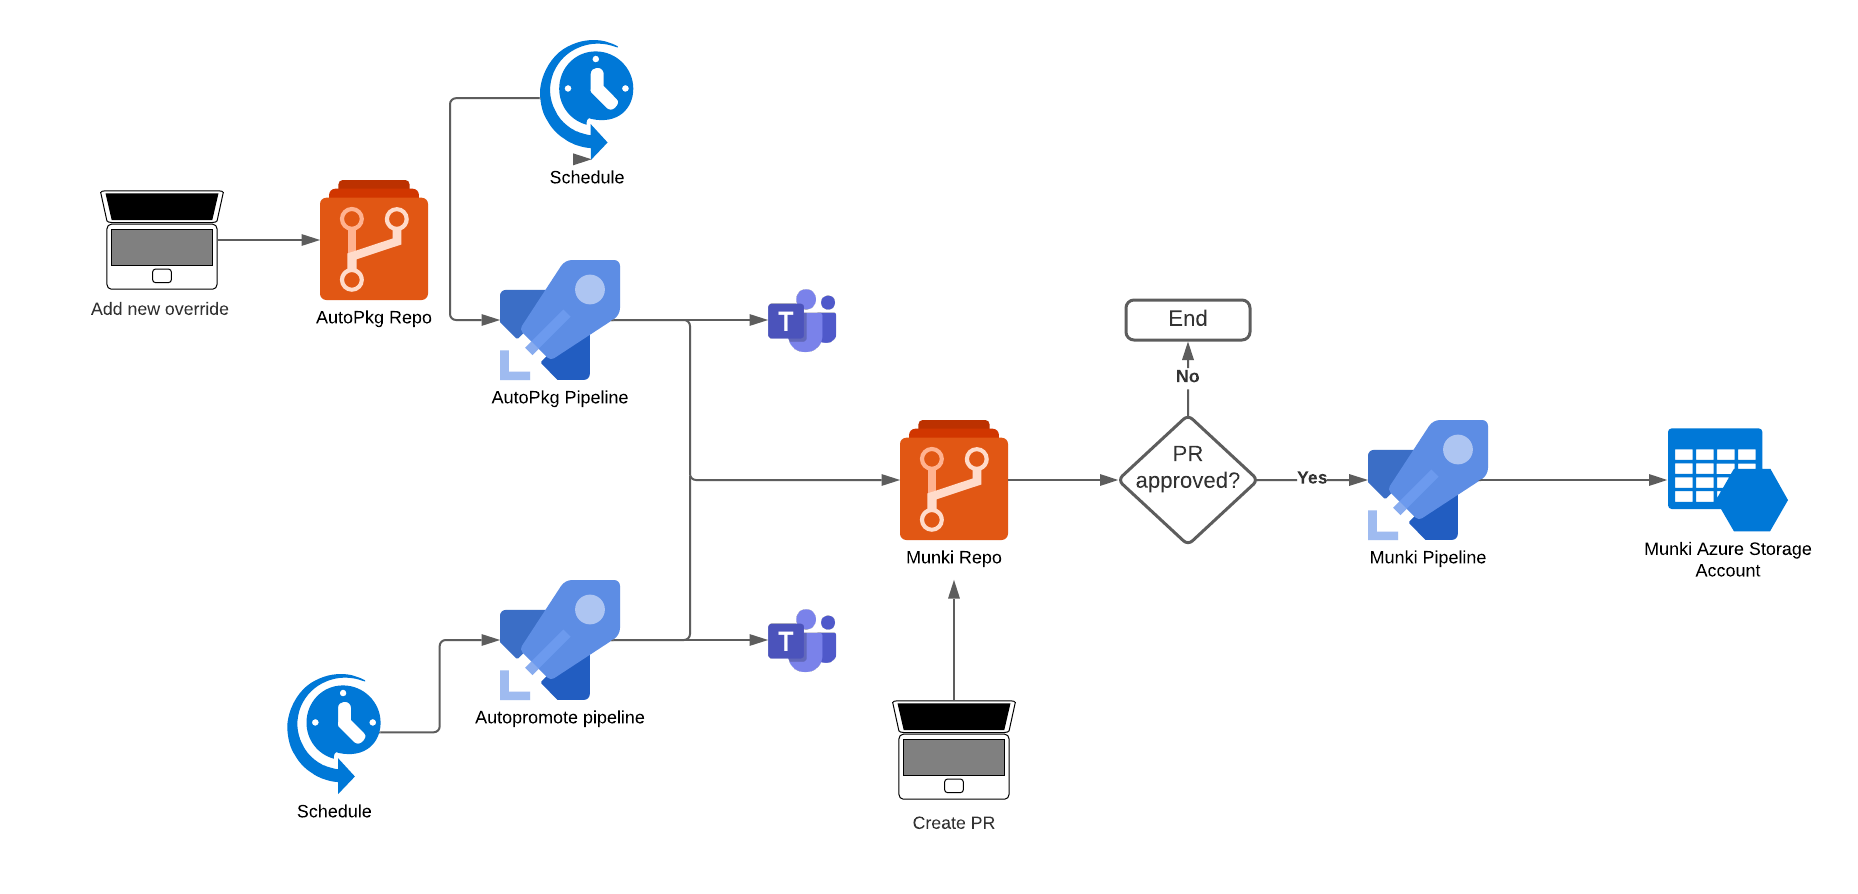
In the last post related to Munki, I promised we were going to look at auto promoting packages between catalogs to automate a "ring" type structure to use for package testing and validation. And today is the day!
This was not meant to be a series from the beginning but has turned into one. We have already seen how to integrate Munki with MEM, generate manifests for devices and how to automate app packaging/updating. In this post, we tie it all together to have a complete flow where a package is imported, automatically assigned to devices in the different "rings" and automatically moved between the "rings" on a schedule.
You can find links to the previous posts here:
- Deploy Munki with Microsoft Endpoint Manager
- Munki, what about manifests?
- Azure DevOps with Pipeline for Azure Storage Munki repo
- Automate app packaging, updating and distribution with Azure DevOps, AutoPkg and Munki
Again, this will be built using Azure DevOps and a pipeline. I recommend having a look at the previous posts if you are interested in this solution as we'll set everything up within the same project.
To get devices populated in the "rings" manifests, I'm using the Munki Manifest Generator to automatically add included manifests for devices that should be targeted by the testing catalogs. If you want to see the setup of this, look at the post Munki, what about manifests? above.
Just like with the automation around app packaging/updating, the script we'll use is created by Gusto's CPE team. I have modified a few things to run it in Azure DevOps instead of GitHub actions and push a message to Teams using a webhook instead of Slack.
Setting it up
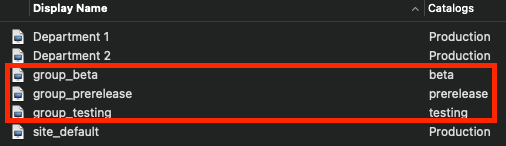
Let's start configuring all the pieces needed for this setup. To start with, I created three catalogs, "testing", "beta" and "prerelease" and also three manifests that have these catalogs included. The manifests will be added as included manifests for devices which are part of the Azure AD groups specified in "Department groups" in Munki manifest generator. Catalogs which do not contain a package is removed by default, I just have an empty placeholder package to keep the catalogs in place.
Munki manifests
Department groups
department_groups = {
    "Department1": {
        "id": "xxxxxxxx-xxxx-xxxx-xxxx-xxxxxxxxxxx",
        "name": "Department 1"
    },
    "Department2": {
        "id": "xxxxxxxx-xxxx-xxxx-xxxx-xxxxxxxxxxx",
        "name":"Department 2"
    },
    "group_testing": {
        "id": "xxxxxxxx-xxxx-xxxx-xxxx-xxxxxxxxxxx",
        "name":"group_testing"
    },
    "group_beta": {
        "id": "xxxxxxxx-xxxx-xxxx-xxxx-xxxxxxxxxxx",
        "name":"group_beta"
    },
    "group_prerelease": {
        "id": "xxxxxxxx-xxxx-xxxx-xxxx-xxxxxxxxxxx",
        "name":"group_prerelease"
    }
}
If you've read previous posts, you will recognize the steps below ;)
- Open the Azure DevOps portal and open your Munki project
- Browse to Repos in the left navigation bar
- At the top, click on your repo name, then click New repository
- Provide a Name and click Create
- Create a folder on your device that we'll push to Azure DevOps
- Open the Terminal app
- Clone my GitHub repo which contains all required files by running,
git clone https://github.com/almenscorner/autopromote-AzureDevOps.git
- Copy all files from the clone to the folder you created earlier
- Cd to the same folder
- Run the following commands,
git init
git remote add origin https://{AzureDevOpsOrgName}@dev.azure.com/{AzureDevOpsOrgName}/{AzureDevOpsPojectName}/_git/{AzureDevOpsRepoName}
git add --all
git commit -m 'initial commit'
git push origin HEAD:main # Here you must provide a personal access token
Let's create the Pipeline
- Browse to Pipelines and click New pipeline
- On Where is your code? choose Azure Repos Git and select your Autopromote repo, this should automatically find the YAML file
- Before you save, edit the variables and add your environments parameters. For reference, this is my config,
variables:
  MUNKI_DEVOPS_PROJECT: "Munki"
  MUNKI_DEVOPS_REPO_NAME: "Munki"
  AUTOPROMOTE_REPO_NAME: "Autopromote"
  MUNKI_REPO: $(Build.SourcesDirectory)/$(MUNKI_DEVOPS_REPO_NAME)/AzureBlob
  REPO_DIR: $(Build.SourcesDirectory)/$(AUTOPROMOTE_REPO_NAME)
- Once you've provided your paramters, save the pipeline
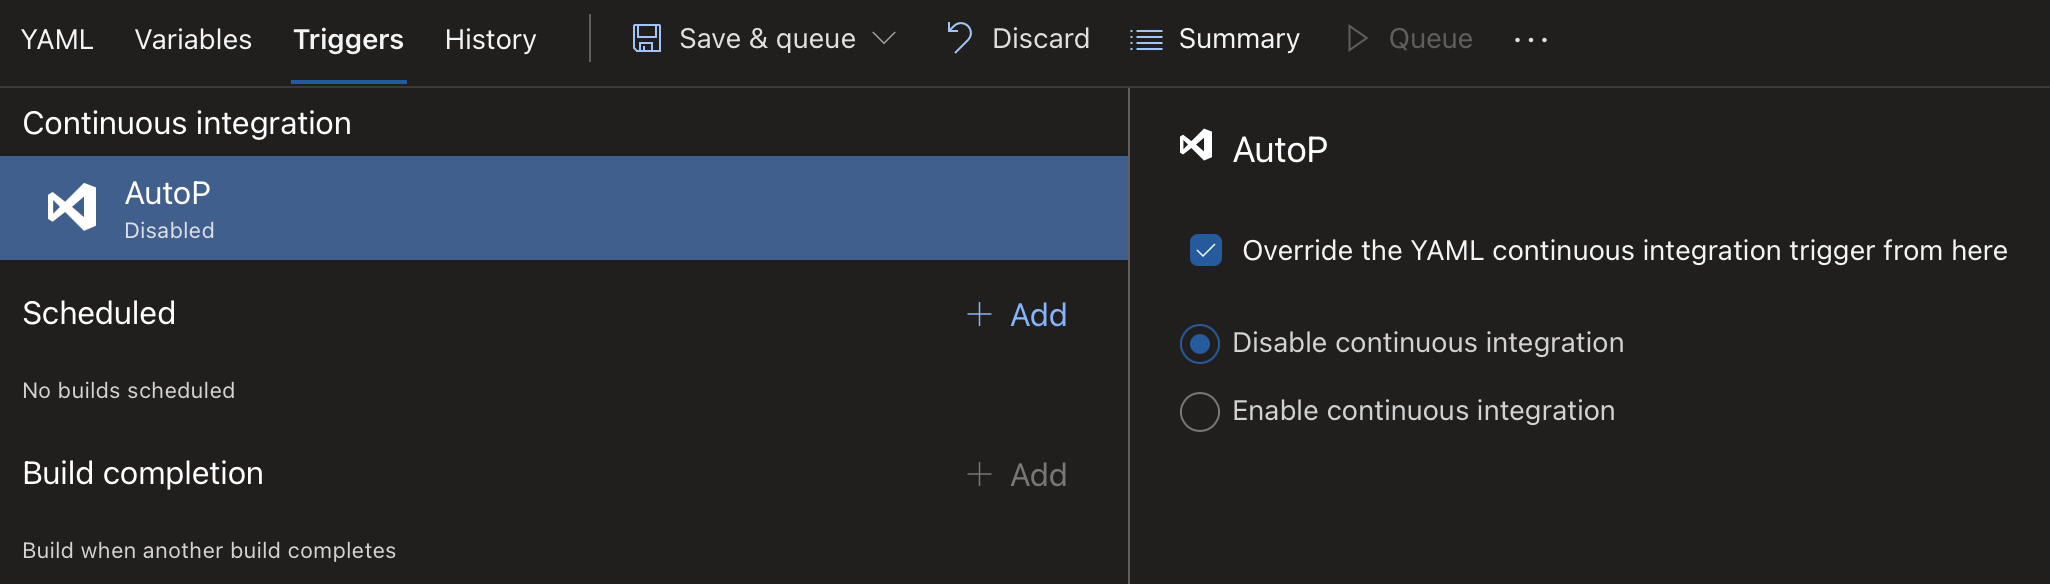
- If you don't want the pipeline to run every time main branch is updated, you have to turn off Continuous Integration as this is enabled by default
- The pipeline is configured to run on a schedule with cron, feel free to edit this to fit your needs,
schedules:
  - cron: '30 16 * * *'
    branches:
      include:
      - main
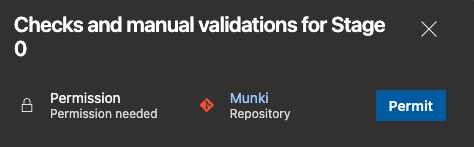
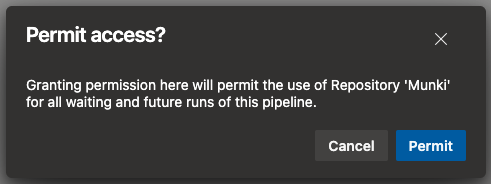
The first time this pipeline runs, you will have to give access to the Munki repository,
-
Click View

-
Click Permit and then Permit again
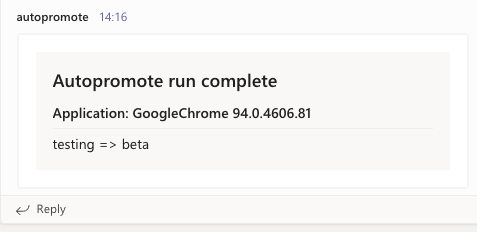
Now that the repo and pipeline are prepared, the next step is to edit the autopromote.json file. This file contains the configurations for the autopromote script. I have changed one config from Gusto's default file,
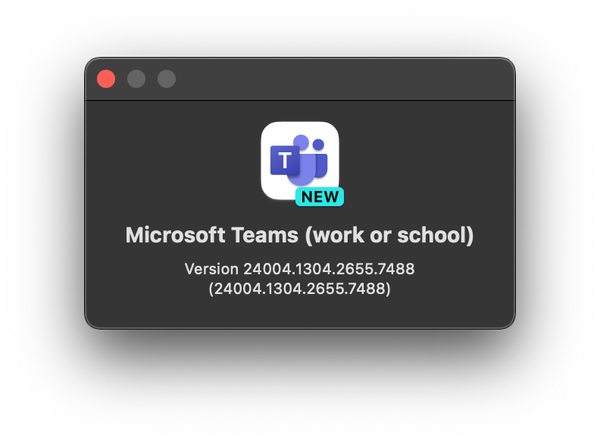
- notify_slack -> notify_teams
When set to true and if a incoming webhook to Teams is configured in the pipeline, a message will be sent to Teams when a package is moved to a new catalog. The result looks like below
Some configurations you might want to change are,
- catalogs
- denylist
- allowlist
- munki_repo
- fields_to_copy
- force_install_days
- force_install_time
You can find a complete overview of the configurations from Gusto here.
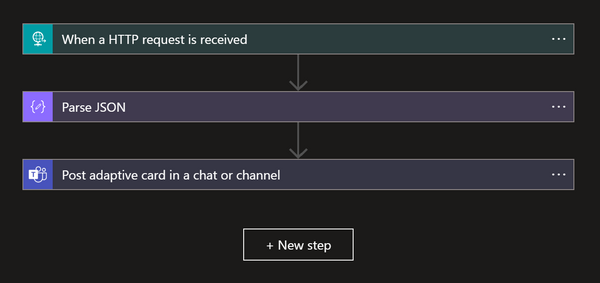
To setup an incoming webhook with Teams in the pipeline,
create a Webhook in Teams, and add it as a secret variable to your pipeline by,
- Browsing to Pipelines and click the three dots at the end of your Autopromote pipeline and choose Edit
- Click Variables at the top right, then click +
- Provide the name TEAMS_WEBHOOK, paste your webhook in the Value field, tick the box Keep this value secret and then click Ok

Run the pipeline
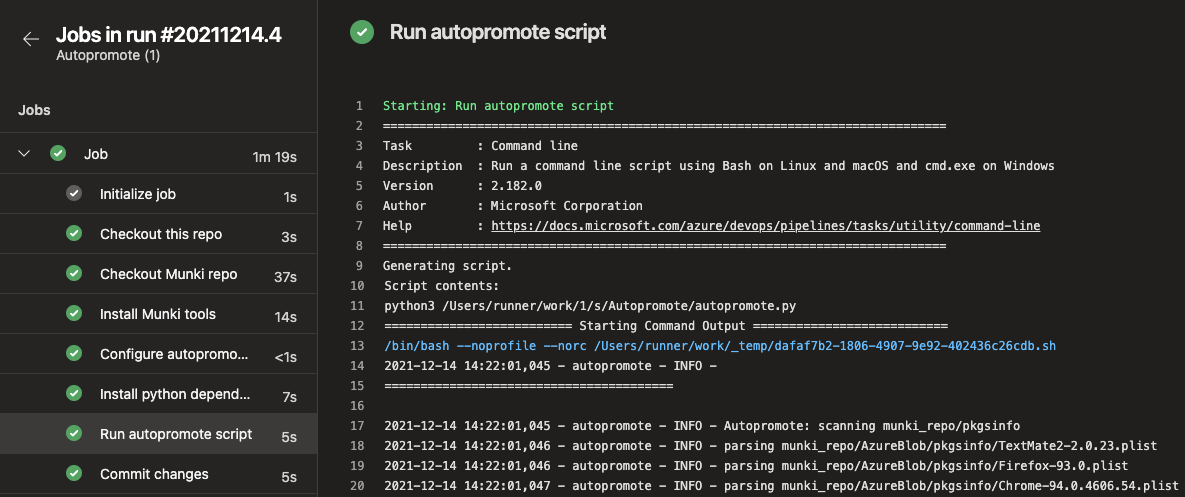
Let's do a manual run of the pipeline so we can check the output and see that packages are being moved.
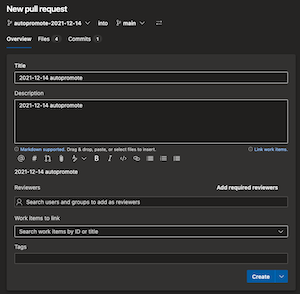
Start by opening the pipeline and click on Run pipeline at the top right. If any package should be moved to a new catalog, a new branch will be created with the name autopromote-YYYY-mm-dd. All you have to do is merge this into the main branch of the Munki repo to move the package to the new catalog.
Once the merge is complete and you have setup the Munki repo according to the previous posts, the Munki pipeline will kick off and sync the changes to the Azure Storage Account and make the package available for devices.
With this implemented, we now have a complete flow where packages can easily be imported with autopkg as well as updated, from autopkg they are put into the "testing" catalog. The autopromote pipeline then moves the packages between the catalogs until they reach production and the Munki pipeline syncs all merged changes to Azure Storage to make them available to the clients.
I hope you have enjoyed these posts as much as I enjoyed creating them. I'm sure more posts on these topics will come in the future as well, and if you have any requests to anything related to them, let me know!
Until next time!