

A hot topic while managing macOS devices in Microsoft Endpoint Manager is still how to handle distribution of applications. As I have mentioned before, there are many limitations when using the wrapping method that's provided by Microsoft. If you have an app which is not a .pkg you have to re-package it and that requires a Developer Account to sign the package, it must contain the correct version information, it uses the InstallEnterpriseApplication command which is using the MDM command and not an Agent. This creates a lot of extra work to keep track of and managing applications.
Over time there's been attempts made to help ease the process by Microsoft and the community. I for example, created a tool called macOSLOBAppTool that uses shell scripts to download and install packages hosted on an Azure Storage account. Microsoft provides a script that can curl applications from anywhere and install with some logging using a shell script. The problem with these solutions is that the installs are always forced.
With the above in mind, we're going to look at integrating and using Munki together with Microsoft Endpoint Manager. A fun part in this post is exploring how to manage a Munki repo with a Git and CI approach ☺️
Thank you, Oliver Kieselbach, for making it possible to use Azure Storage with Munki.
This is going to be a longer post so grab your coffee and let's get reading.
Table of contents
What is Munki?
Munki is an open-source project that's been around for many years created by Walt Disney Animation Studios. It can install packages in the .apk format and also supports Adobe CS3/CS4/CS5/CS6/CC deployment packages and drag-and-drop disk images as installer sources. It uses a webserver-based repository of packages and metadata to manage application installs. Since it's webserver-based it's up to you if you want to use an on-premise webserver or cloud hosted.
I trust this tool because it has a rich community, is used by large organizations all over the world and is even built into VMware's Workspace ONE.
We are going to use Azure Blob Storage to host our repository, thanks to Oliver Kieselbach who has created a Middelware feature for this, it's a quiet straightforward process to set up. If you use other cloud storage solutions, there are Middleware created for Google Cloud Storage and Amazon S3 and CloudFront.
Munki overview
Pieces of Munki
- Installer items
The PKGs or DMGs that should be installed on the devices. In most cases you can just import the packages as is without having to modify them - Catalogs
Lists of available apps with metadata about the installer - Manifests
A manifest is essentially a list of what software should be installed on or removed from a given machine. You could have a different manifest for every machine, or one manifest for all of your machines. Manifests can include the contents of other manifests, allowing you to group software for easy addition to client manifests. - Pkgsinfo
Metadata about a package, you can find a detailed overview here
Munki repository structure
Root
 - catalogs
 - icons
 - manifests
 - pkgs
 - pkgsinfo
Pre-requisites
To follow along there are a few pre-requisites to keep in mind,
- Permission to create an Azure Blob Storage
- Permission to create shell scripts and configurations in Intune
- An active subscription in Azure
- A macOS device
Let's get going with the fun stuff!
Deploy Munki with Microsoft Endpoint Manager
Create an Azure Blob Storage
The first step is to prepare our Azure Blob Storage.
- Sign into the Azure portal
- Search for Storage Accounts in resources and click on "Storage Accounts"
- Click create to create a new Storage Account
- Choose your subscription and resource group, if you don't have a resource group, choose to create a new and name it something related to macOS and/or Munki
- Complete the following configurations,
- Storage Account Name
- Region
- Performance
- Redundancy
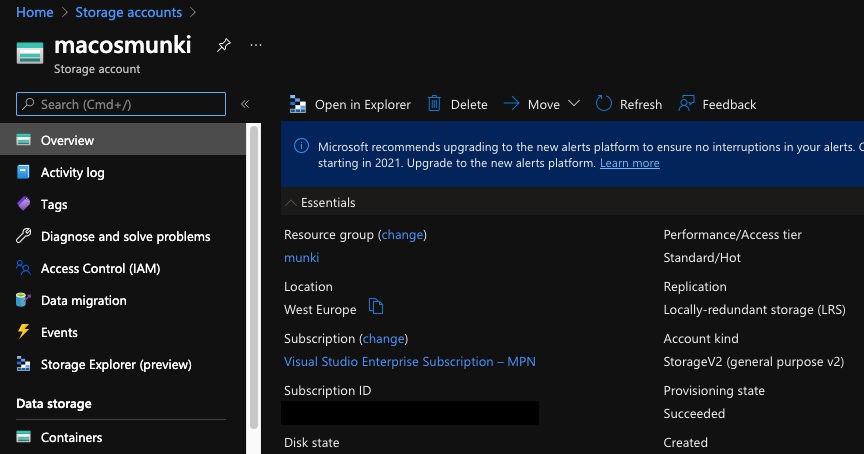
- For the Advanced, Networking, Data protection configurations I used the default values. Go through each configuration and change if needed. Once done, click Review + create and then Create. You will end up with something like this,
Prepare containers
To take care of provisioning the Munki tools to devices we're going to create one container that is public and another container that is private to host our Munki repository. The Middleware will take care of authenticating to the private container.
- Open your Storage account and go to Containers
- Click + Container
- For name, type public and choose Blob (anonymous read access for blobs only) for Public access level
- Click Create
- Repeat the same process and name the new container munki and set Public access level to Private (no anonymous access)
This is what your containers should look like,

Prepare package, scripts and profile
To install the Munki tools on devices, Oliver has created a shell script which will take care of downloading and installing munkitools-x.x.x.xxxx.pkg and middleware_azure.py
- Download the latest Munki tools here, at the time of writing that is 5.5.0.4362
- Download Olivers install shell script here
- Download Olivers Middleware here
- Upload middleware_azure.py and munkitools-5.5.0.4362.pkg to your public container
- Modify the following lines in installMunki.sh to point to your public container
weburl="https://XXXX.blob.core.windows.net/public/munkitools-5.5.0.4362.pkg"
weburl_middleware="https://XXXX.blob.core.windows.net/public/middleware_azure.py"
Once all of the above is done, next step is to prepare a .mobileconfig which configures values that the Middleware looks for, these settings are,
SoftwareRepoURLSharedAccessSignature
Copy the profile below and save it as munki.mobileconfig, edit the following keys to point to your Azure blob and Shared access signature. To get your Shared access signature, open your storage account, go to Containers, munki, Shared access tokens, choose read permission, select start and end date then click Generate SAS token and URL and then copy Blob SAS token. Next we need to escape the token string for it to be used in the .mobileconfig,
If you are on a Windows device, run the following:
[Security.SecurityElement]::Escape("SAS TOKEN")
On macOS run this in Terminal
echo "SAS TOKEN" | sed -e $'s/&/\&/g'
Note: When this token expires a new one will have to be generated and the .mobileconfig needs to be updated.
<key>SoftwareRepoURL</key>
<string>http://{STORAGEACCOUNT}.blob.core.windows.net/munki</string>
<key>SharedAccessSignature</key>
<string>{SAS TOKEN}</string>
<?xml version="1.0" encoding="utf-8"?>
<!DOCTYPE plist PUBLIC "-//Apple//DTD PLIST 1.0//EN" "http://www.apple.com/DTDs/PropertyList-1.0.dtd">
<plist version="1.0">
	<dict>
		<key>PayloadContent</key>
		<array>
			<dict>
				<key>PayloadDisplayName</key>
				<string>Munki</string>
				<key>PayloadIdentifier</key>
				<string>ManagedInstalls</string>
				<key>PayloadType</key>
				<string>ManagedInstalls</string>
				<key>PayloadUUID</key>
				<string>ca4afc37-7b1f-4a02-ae25-ccad258c253b</string>
				<key>PayloadVersion</key>
				<integer>1</integer>
				<key>SoftwareRepoURL</key>
				<string>https://{STORAGEACCOUNT}.blob.core.windows.net/munki</string>
				<key>SharedAccessSignature</key>
				<string>{SAS TOKEN}</string>
			</dict>
		</array>
		<key>PayloadIdentifier</key>
		<string>82A2ED21-27DA-428E-8516-446A52169C71</string>
		<key>PayloadType</key>
		<string>Configuration</string>
		<key>PayloadUUID</key>
		<string>41bd4632-0b83-404f-a68d-6ac1a2ac1eea</string>
		<key>PayloadVersion</key>
		<integer>1</integer>
	</dict>
</plist>
Prepare repository structure
The easiest way to do this is to use Munki admin, it's a great tool to not only create the initial repository but also to manage your applications.
- Install the Munki tools on your mac
- Download Munki admin here
- Open Munki admin and click File, New Repository, give it a name and click Save
Create a package
Now that the structure is prepared, lets create a package
- Open Munki admin and click File -> New Manifest, name the file site_default and make sure it's saved in the manifests folder
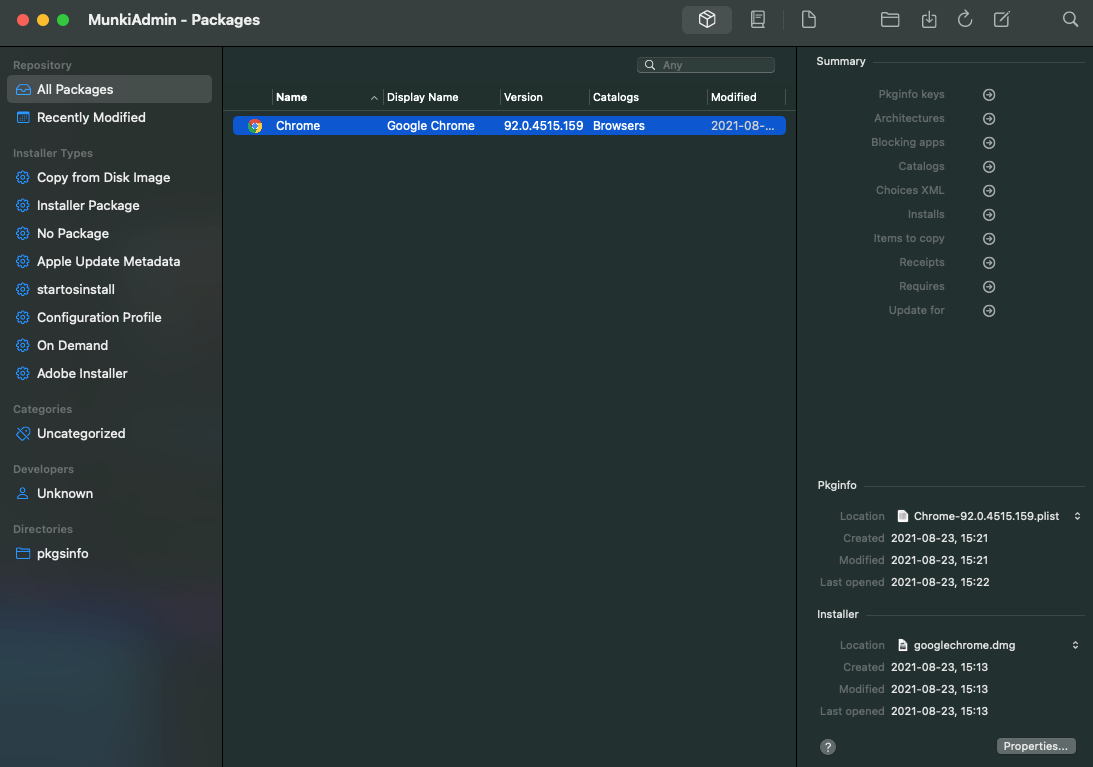
- I'm going to add Google chrome to the repository but feel free to add whatever you want, drag & drop the .pkg or .dmg of the package you want to deploy to Munki admin
- If you want the package icon you can just right click the package and choose Icons -> Batch extract icons...
- Double click on the package in the list and you'll be presented with a whole range of settings for the package, familiarize yourself with the settings, the only thing I changed was the Display Name but you can for example add post/pre-install scripts and choose whether the app is removeable or not
- Continue to the next section in the tool which is Catalogs by clicking the catalog icon at the top
- Create a new catalog by right clicking in the menu to the left and choose New catalog... Name it for example production and include your package by choosing your new catalog a selecting the package
- Continue to the next section, that is Manifests
- Double-click on site_default, here you specify packages that should be automatically installed/uninstalled (managed) or available as an optional package. I added Google Chrome as a featured and optional package
- When you have your package, catalog and manifest ready, hit CMD+S to save the repository
Upload repository to Azure Blob storage
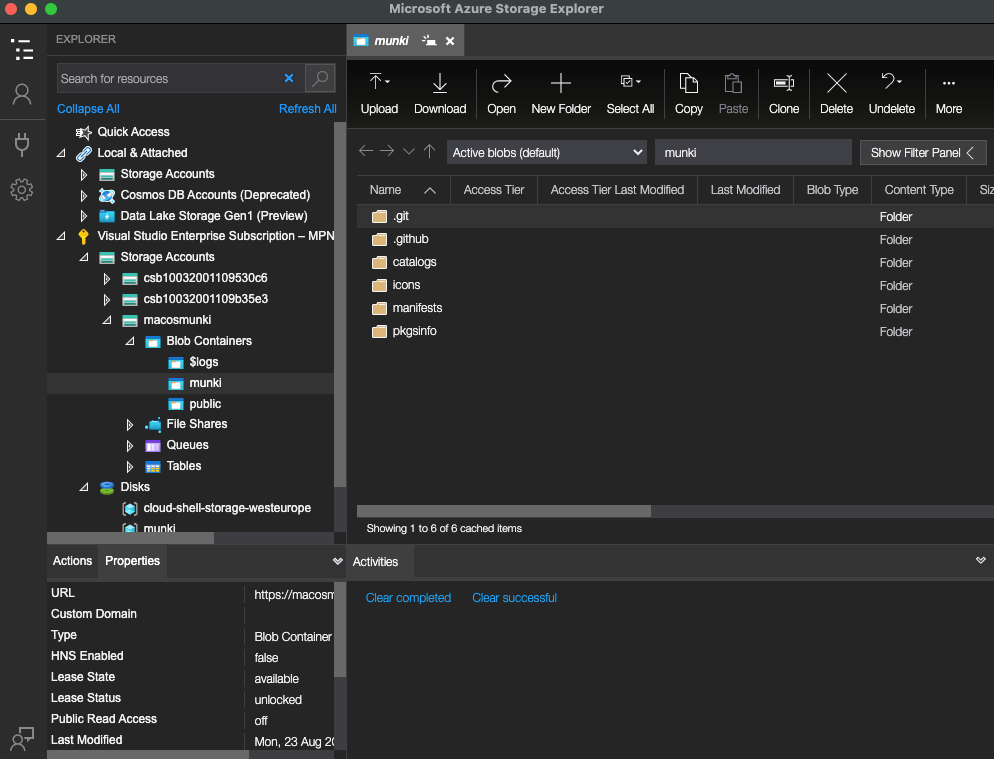
To make it easy to upload everything, I used Azure Storage Explorer which you can find here.
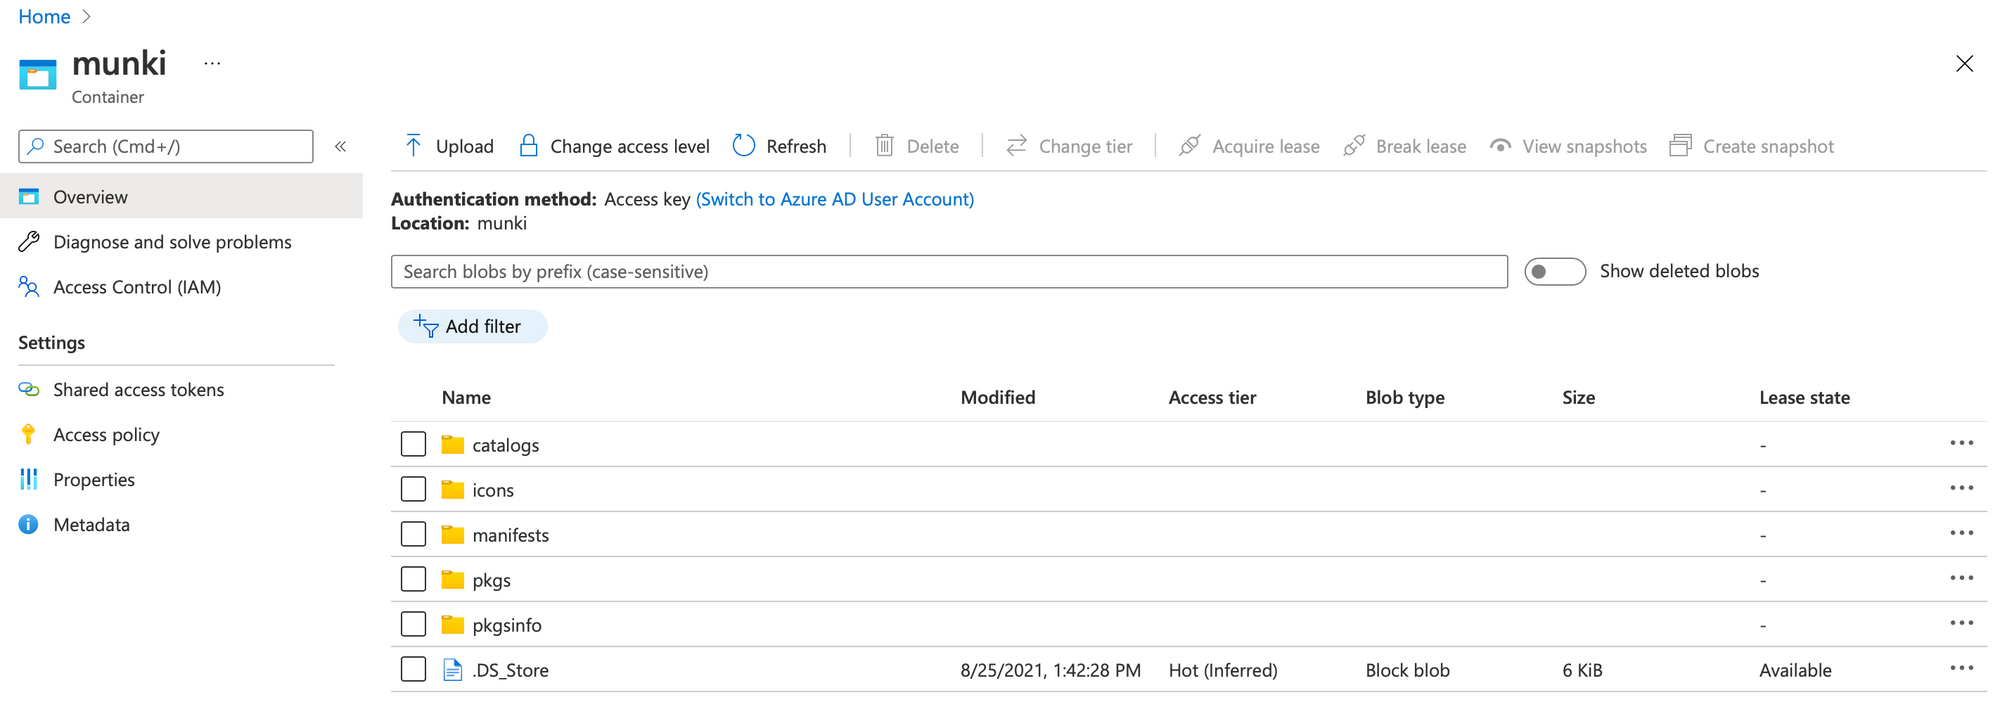
- In Azure Storage Explorer, open your Munki container
- Click Upload, Upload Folder... and upload each folder in the repository
While this is a perfectly viable way of managing your repository it's not the most dynamic. Each time you create a new package you'd have to upload all files which have been modified like the package, manifest, pkgsinfo, icons and so on. Below we instead look at using Git to upload and commit changes done to the repository.
Manage repository with Git - Optional
Instead of manually uploading all changes to the repository we're going to implement a CI (Continuous Integration) flow where we do our changes to the repository locally using Munki Admin and then use Git to commit and push our changes. This way you can have a team working with the same repository and keep it updated. Other benefits include getting a history of who made changes and what changes were made, ability to roll back if a change brake anything. You can also configure different branches if you for example want to push new configurations to a dev branch before merging with main.
To accomplish this, I'm going to configure a GitHub repo where the Munki repo will be pushed, when a change is pushed to the main branch, a GitHub action will be triggered that uploads everything to our Azure Blob container. You could use another Git repo like Azure DevOps if you'd like.
This is how it will work at a high level,
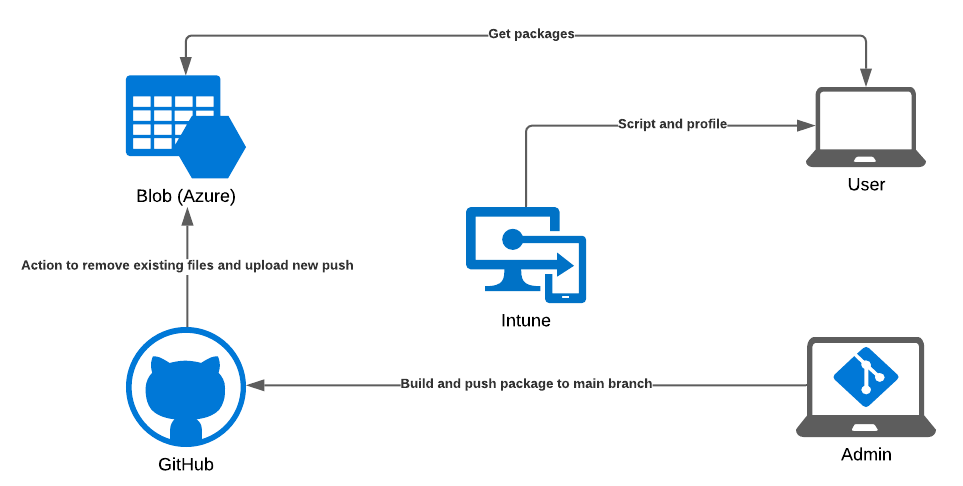
It is important that you follow the process below to the tee or it won't work to upload large files to your GitHub repo. There is a limit to uploading files bigger than 100MB using Git, to work around this we'll be using Git Large File Storage (LFS).
GitHub quotas
When using a LFS repo on GitHub you have 1GB of storage and 1GB of bandwidth for free. If more is needed you can buy a data pack for 5$/month which gives you an additional 50GB of storage and bandwidth. The maximum file size for GitHub free is 2GB. So how is this usage calculated?
- If you push a 500 MB file to Git LFS, you'll use 500 MB of your allotted storage and none of your bandwidth. If you make a 1 byte change and push the file again, you'll use another 500 MB of storage and no bandwidth, bringing your total usage for these two pushes to 1 GB of storage and zero bandwidth.
- If you download a 500 MB file that's tracked with LFS, you'll use 500 MB of the repository owner's allotted bandwidth. If a collaborator pushes a change to the file and you pull the new version to your local repository, you'll use another 500 MB of bandwidth, bringing the total usage for these two downloads to 1 GB of bandwidth.
Now that we understand the benefits of using Git and quotas when using GitHub, let's get started setting this all up!
- Sign into your GitHub account
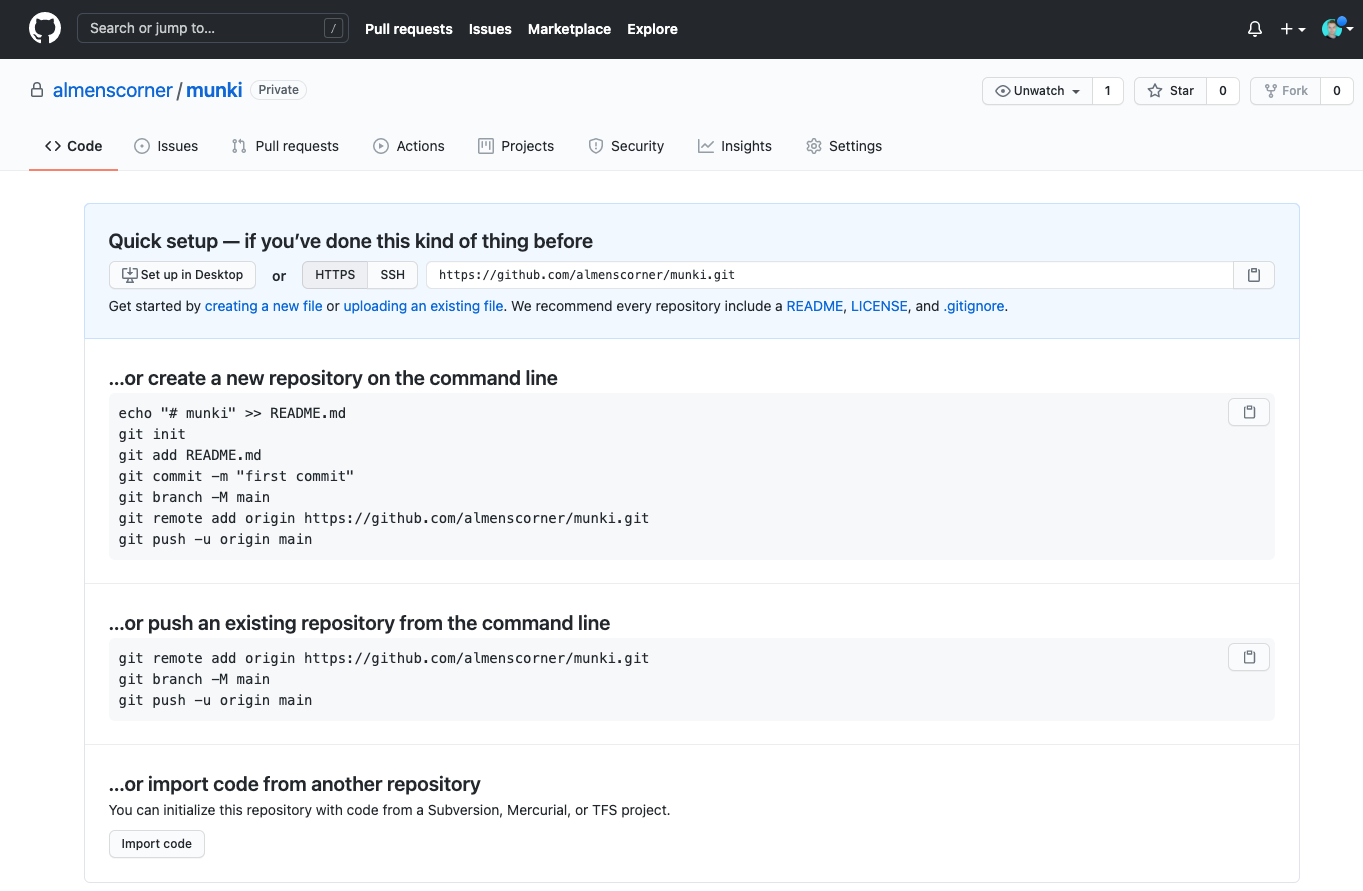
- On the home view, click New at the top left beside Repositories to create a new repo
- For repository name, enter munki and choose Private, then click Create repository
Now that the repo is created, we need to generate an access token to authenticate with when using Git.
- Click on your account at the top right and then click Settings
- In the menu to the left, click on Developer settings
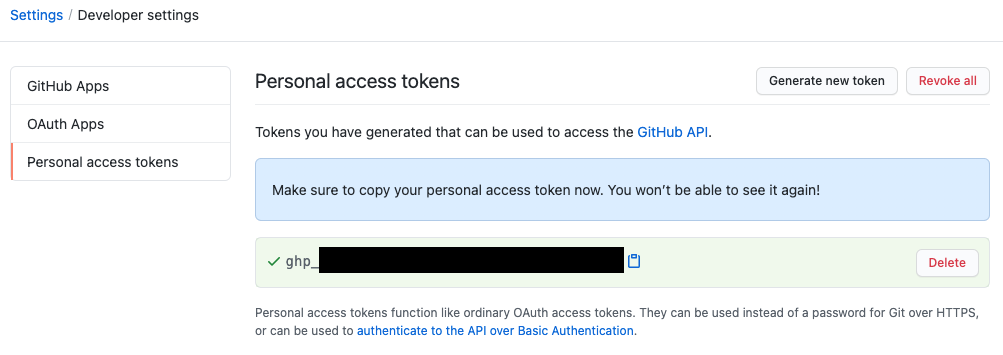
- Click on Personal access tokens and then Generate new token
- Enter a note so you know what it's for, for example "munki", choose the Expiration or leave it at the default of 30 days, under Select scopes I went for full control over private repositories, but you can lock it down if you want. Once happy with the configuration click Generate token at the bottom
- Copy the token and save it in a safe place
We are done with GitHub for a bit, lets install Git on our mac.
I use Homebrew for installation as it makes the process quite easy. If you don't have Homebrew installed, run this command in the Terminal,
/bin/bash -c "$(curl -fsSL https://raw.githubusercontent.com/Homebrew/install/HEAD/install.sh)"
- Install Git by running this command
brew install git - Install Git LFS by running this command
brew install git-lfs - Initialize Git LFS by running this command
git lfs install
Great, now we have all pieces in place to create our repo with LFS. Next step is to create a repo locally which we then will push to GitHub. This only needs to be done while setting up the repo, it should only be done on a new repo as LFS otherwise might not work or you might mess up history when migrating the repo to LFS.
- Create a folder on your mac called Munki
- Open Munki Admin, choose File, New Repository, browse to the folder created in the prevoious step and save the repository as AzureBlob. Inside /Munki/AzureBlob you now have the Munki repo structure
- Open terminal and cd to path/Munki
- Run command
git init - Run command
git lfs track "AzureBlob/pkgs/*", this will track all files in pkgs as large file storage files. If you need to track other directories that might contain files bigger than 100MB, run the same command and change the target folder - Run command
git add .gitattributes - Run command
git commit -m 'Initial commit' - Run command
git remote add origin https://github.com/{yourGitHubName}/munki.git - Run command
git push origin HEAD:main, now you will have to enter your GitHub username and the access token you copied earlier
The repo is now prepared for adding packages, add a new package as desribed in the section Create a package above, then follow this process,
- Open terminal and cd to path/Munki
- Run command
git add --all - Run command
git lfs ls-files, this will show you all files tracked by LFS. Make sure the package you added in Munki Admin is listed here - Run command
git commit -m 'upload package' - Run command
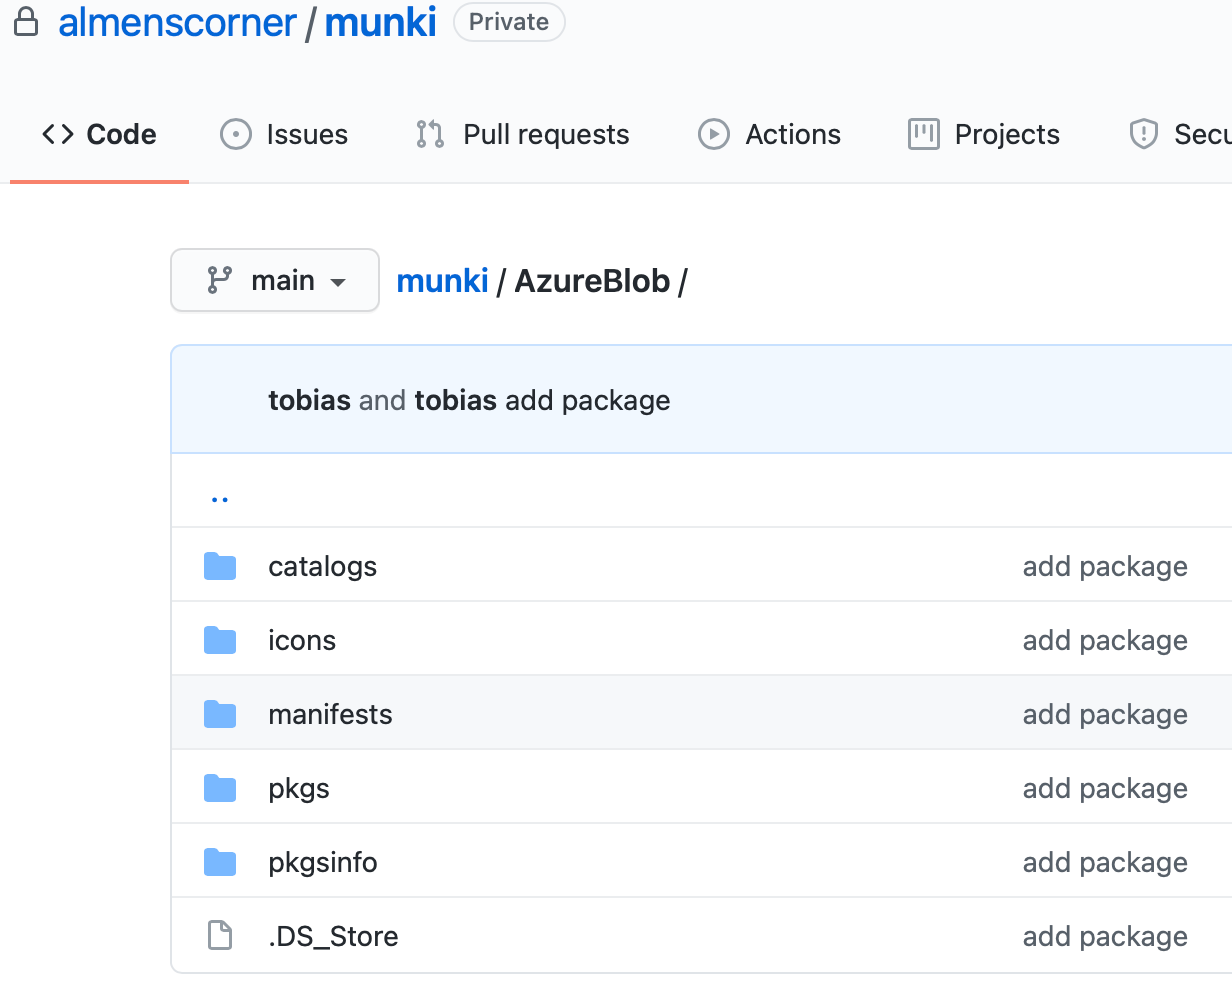
git push origin HEAD:main
The changes you made to the repo locally will now be pushed to the main branch on GitHub, you'll have a structure like this,
Awesome, we now have a functioning repo which we can pull down to other macs and push changes to, but how are we going to publish this to the Azure Blob to which the macs connect to get their software?
Create a pipeline (action)
As mentioned earlier we're going to use GitHub actions, this is the place where we can setup CI/CD pipelines in GitHub. The YAML I'm using is a slightly modified version of Microsofts example to deploy a static website using GitHub actions, the main thing I changed is that each time a new commit is done to the main brach, all the files in the container is replaced so that it's always up to date with your GitHub repo. I'm not saying that this is the absolute best way of doing it but works good for the purpose of demonstrating the functionality.
To complete the steps below, you first need to set up a Service Principal in Azure, to do so, run the command below in the Azure CLI, change the following,
- name, replace
{myStaticSite}with munki - subscription id, replace
{subscription-idwith the id of the subscription you use for your Azure Storage account - resource group, replace
{resource-groupwith the name of the resource group for your Azure Storage account
az ad sp create-for-rbac --name {myStaticSite} --role contributor --scopes /subscriptions/{subscription-id}/resourceGroups/{resource-group} --sdk-auth
This will output a JSON like the one below, copy this object as we'll need it later.
  {
    "clientId": "<GUID>",
    "clientSecret": "<GUID>",
    "subscriptionId": "<GUID>",
    "tenantId": "<GUID>",
    (...)
  }
Now we can continue to create the action in GitHub!
- Browse to GitHub and open your Munki repo
- Click on Settings at the top and then on Secrets in the menu to the left
- Click on New repository secret, name the secret azure_auth and paste the entire JSON object as the value, then, click Add secret
- Click on Actions in the top menu, choose set up a workflow yourself
- Enter azureupload.yml as the name, delete all text in the file, copy the code below and replace
az storage blob delete-batch -s {containerName} --account-name {StorageAccName}andaz storage blob upload-batch --account-name {StorageAccName -d '{containerName}' -s .to match your names. Then click Start commit -> Commit new file. Note that this will kick off the action.
name: Upload munki repo
on:
    push:
        branches: [ main ]
jobs:
  build:
    runs-on: ubuntu-latest
    steps:
    - uses: actions/checkout@v2
      with:
        lfs: true
        fetch-depth: 1
    - uses: azure/login@v1
      with:
          creds: ${{ secrets.azure_auth }}

    - name: Remove existing files
      uses: azure/CLI@v1
      with:
        inlineScript: |
           az storage blob delete-batch -s {containerName} --account-name {StorageAccName}
    - name: Upload to blob storage
      uses: azure/CLI@v1
      with:
        inlineScript: |
            az storage blob upload-batch --account-name {StorageAccName -d '{containerName}' -s AzureBlob
  # Azure logout
    - name: logout
      run: |
            az logout
      if: always()
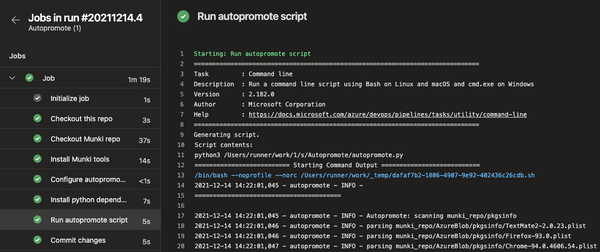
Once the action finishes the run, the AzureBlob folder has been published to your Azure Blob container. Each push towards the main branch will trigger this action and automatically push everything to the Azure Blob. Pretty cool 😎
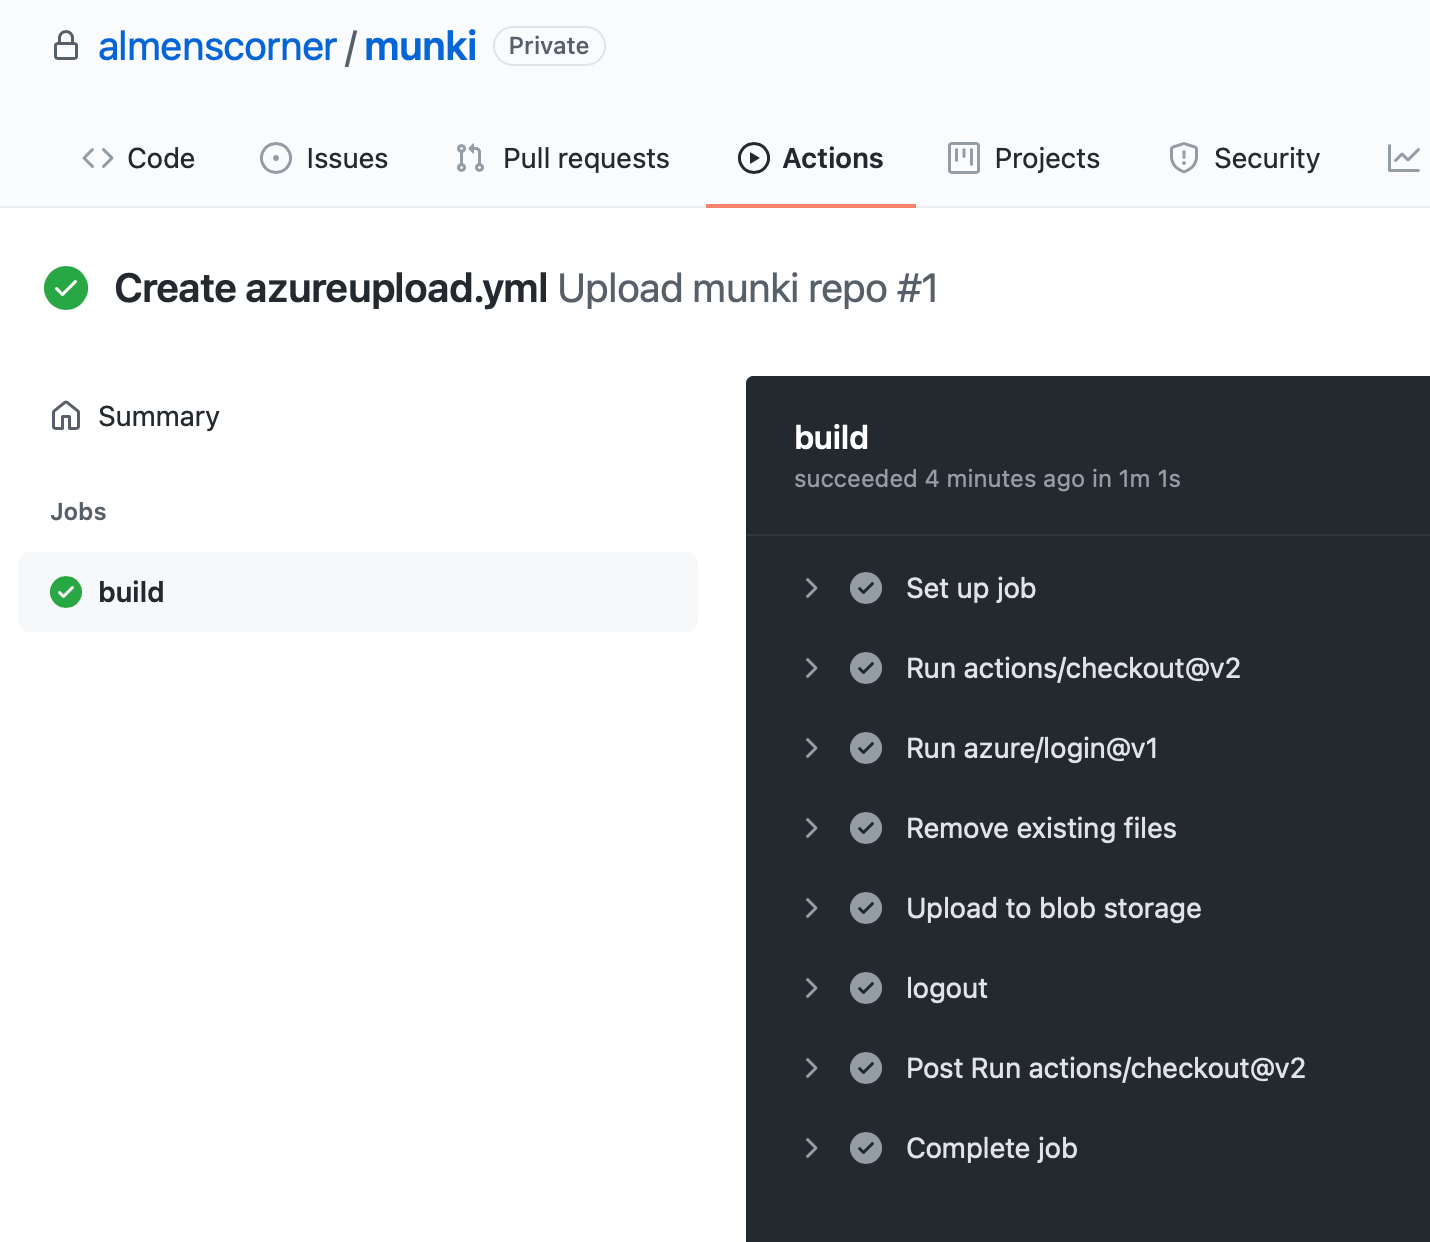
Since the repo is now set up, all you have to do is add new packages in Munki Admin and then push the changes to GitHub. To make it easier for myself I created a very simple script so that I dont have to type all the commands everytime. Just put this script in the repo root /Munki, and run it with the Terminal. You'll be promted to enter a commit message with the changes you've made, then it will continue to push to the main branch.
#bin/bash

git add --all
echo "Enter message for commit"
read message
git commit -m "${message}" > /dev/null 2>&1
git push origin HEAD:main
Deploy to macs
Finally, we're here. It's time to deploy the script, package and profile we prepared to our macs.
Let's start with the profile!
- Sign in to the MEM console
- Go to Devices -> Configuration profiles, click on Create choose macOS as platform and profile type Templates -> Custom then click Create
- Give your profile a Name and click Next
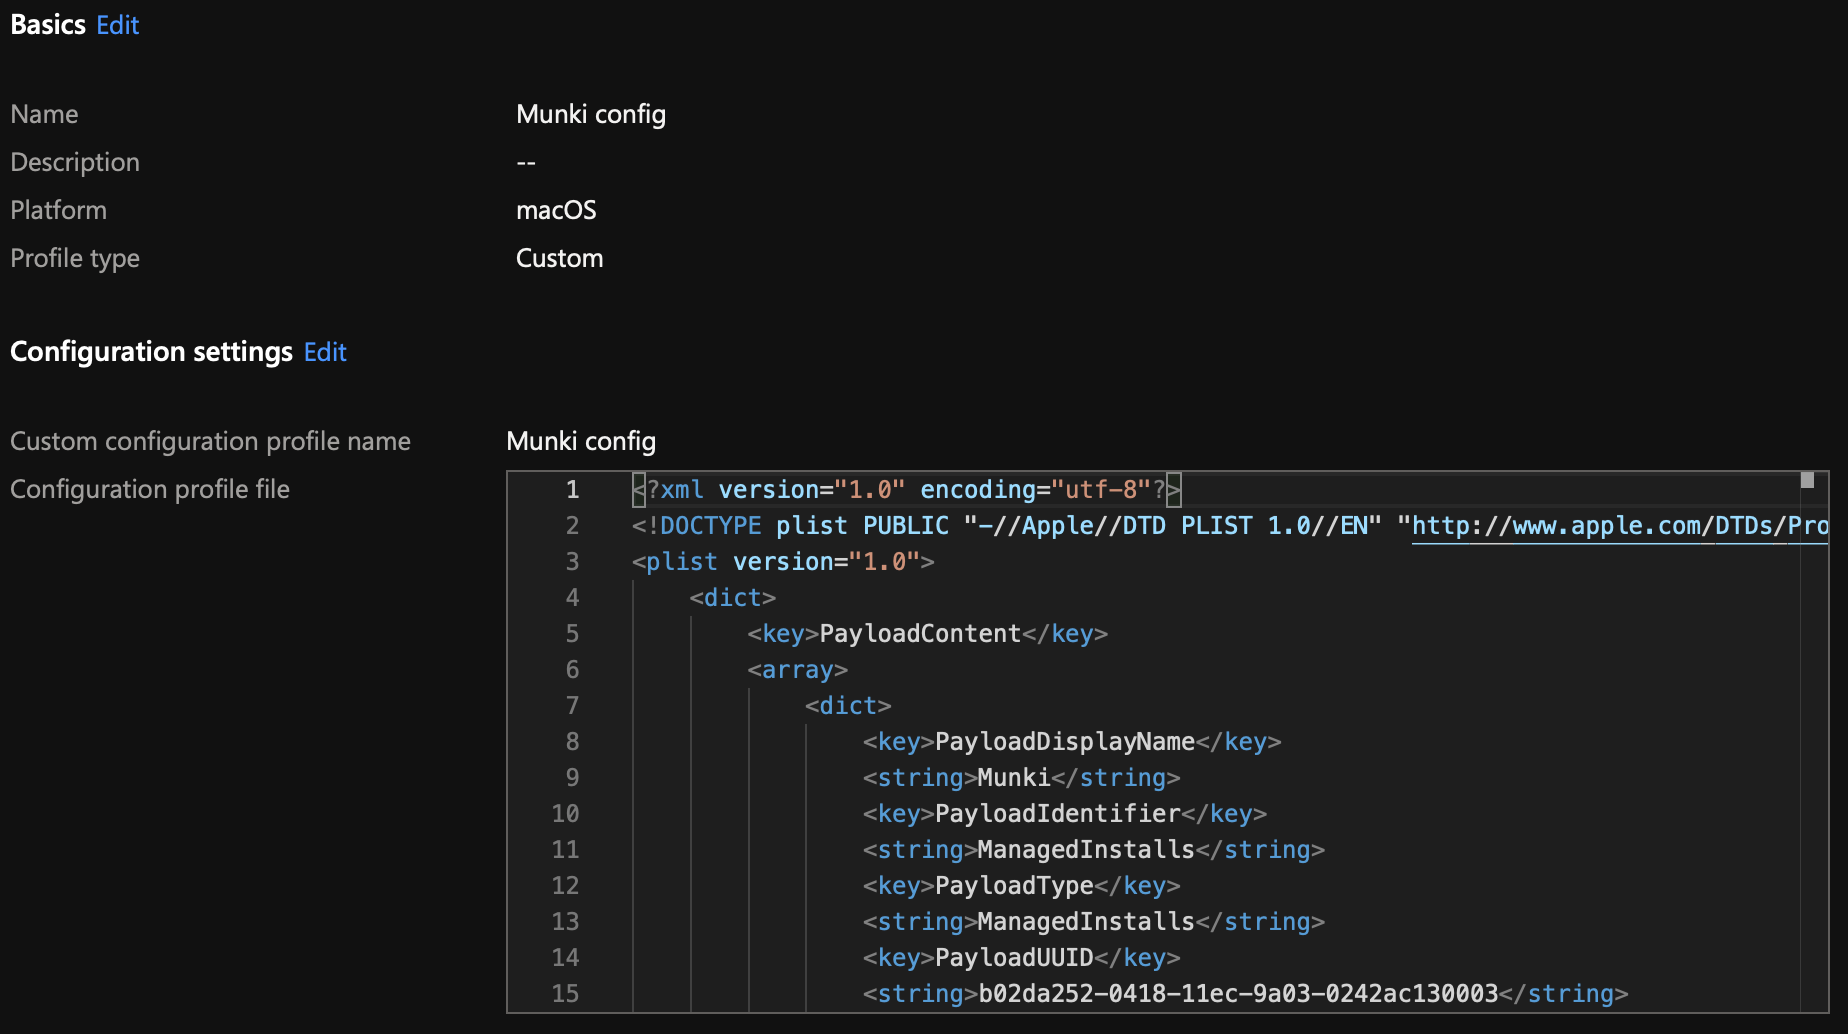
- Set Custom configuration profile name to for example Munki Config
- Upload the prepared .mobileconfig and click Next
- Assign the profile then click Next, finally click Create
The profile is now done.
Next up is to deploy the script!
- In the MEM console, go to Devices -> macOS -> Shell scritps
- Click Add, give the script a Name and click Next
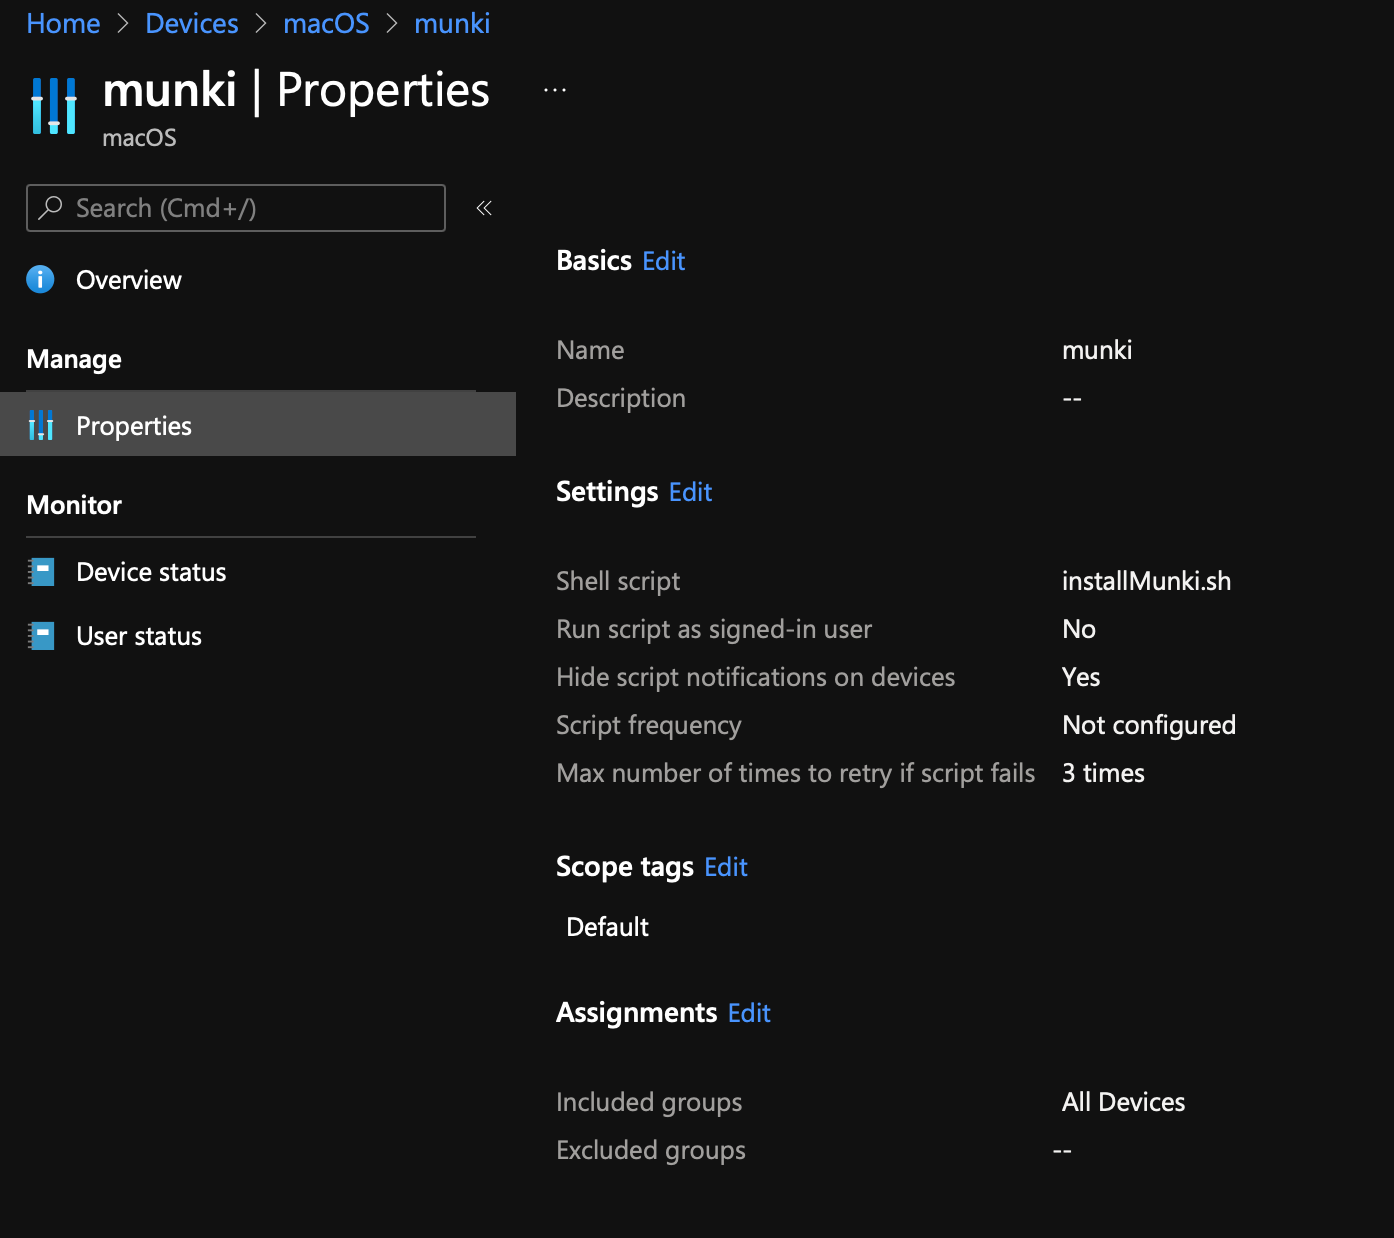
- Upload the prepared shell script and use the following configuration,
Run script as signed-in user: No,Hide script notifications on devices: Yes,Script frequency: Not configured,Max number of times to retry if script fails: 3 times, click Next - Assign the script then click Next, finally click Add
End user experience
With all the above steps complete, Munki is now deployed to macs managed in Microsoft Endpoint Manager. All that's required from the user is to open Managed Software Centre and install the applications they want.
I hope this post has been helpful in getting you going with deploying Munki with Microsoft Endpoint Manager!