

Onboarding a user on a macOS device is a straightforward process when using Apple Business Manager, but what about when the user is done with the enrollment part and just sitting there on the home screen wondering what's happening?
Users being confused if anything's being installed or configured is something I've seen in many cases when the device is finished with enrolling through Automated Enrollment, there's no indication that applications are being installed. This is not a good user experience; we want them to feel welcome and give some tips the first time a user starts their brand-new mac.
Today we're going to look at how we can improve the onboarding process for macOS devices.
Available options
This is not an exhaustive list but some of the onboarding apps I've seen and worked with in the past.
- DEPNotify
- A lightweight notification app that let's your users know what's going on during an Automated Enrollment. Built in support Jamf and Filewave but if you are using Munki you can also read the Munki log to show progress.
- Splashbuddy
- An app whose aim is to provide a elegant and secure onboarding process. You can for example show install progress and display important information. Built in support for Jamf Pro, Munki and VPP
- Octory
- An onboarding app that's very customizable. Built in support for Jamf, Workspace ONE, munki and apps installed via VPP. The VPP option in this case lets us monitor apps that's pushed via VPP in MEM.
In this post we'll focus on configuring and deploying Octory. If you want to check out DEPNotify you can find it here, or Splashbuddy here
Octory overview
Octory comes as a free and a paid version, I'm going to configure and deploy the free version but let's have a look at the feature list,
As you can see from the list there's a lot that can be done with the free version but if you have more complex scenarios you wish to include as part of the onboarding process, I encourage you to have a look at the Pro version.
Interface
The user interface is built on Slides, Containers, Components and Navigation controlled via a .plist file. In my case, I have one slide with two containers, multiple components and a quit button as seen below,
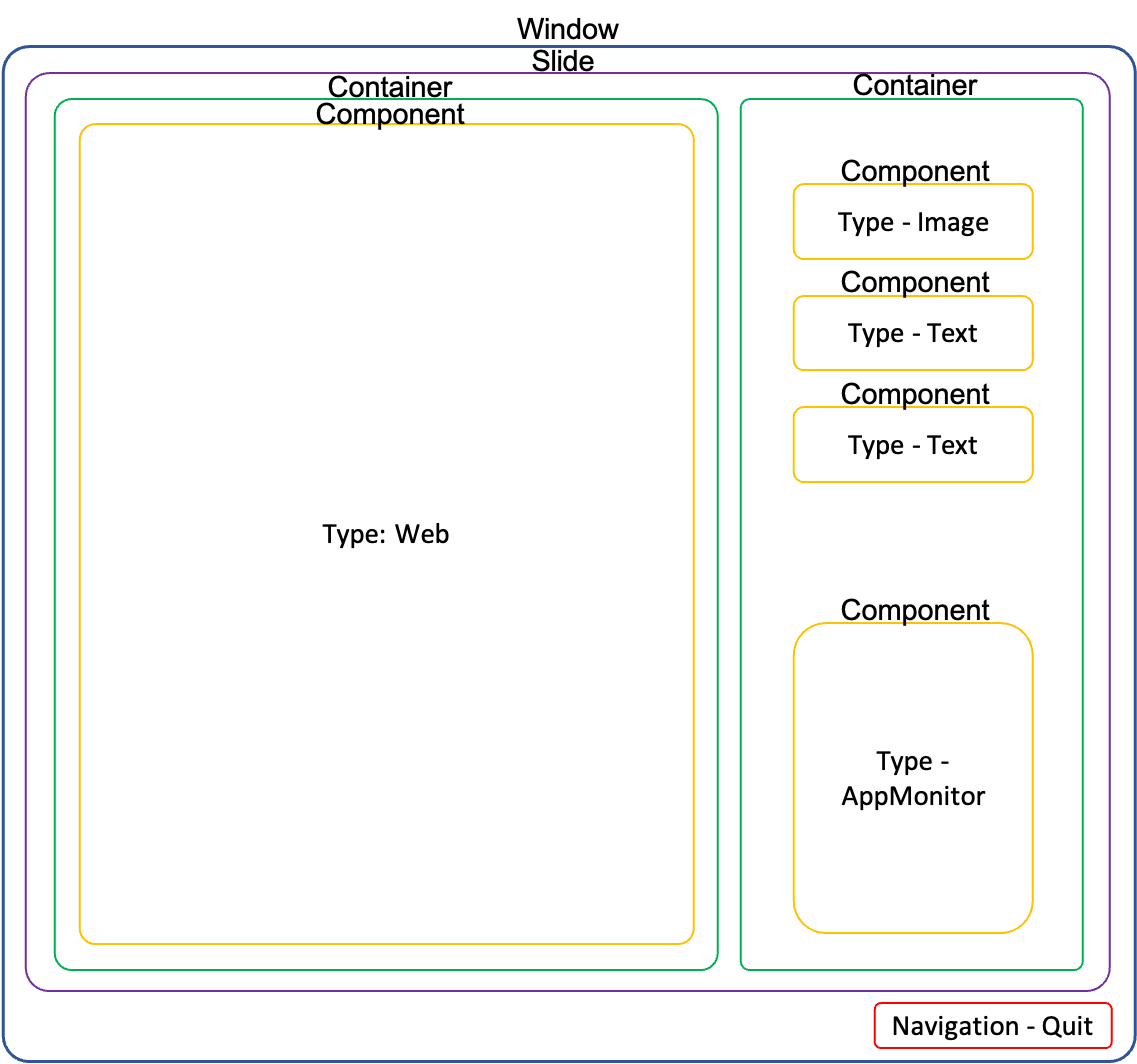
This draws a window where the user is presented with a slide with some text that welcomes the user, a getting started webpage where the user can find information on how to use the mac and a AppMonitor where I specified applications installed with VPP to give the user a visual indication that applications are installing. You can also set up multiple slides with Next/Previous buttons and display content based on images, PDF or video.
Configuration
Octory is configured with a .plist file, there are too many configurations to include them all in this post, so I'll zoom in on the ones I used. To make editing of this file easier I used Xcode to get a GUI based editing experience.
Let's dig into some of the keys!
- Variables
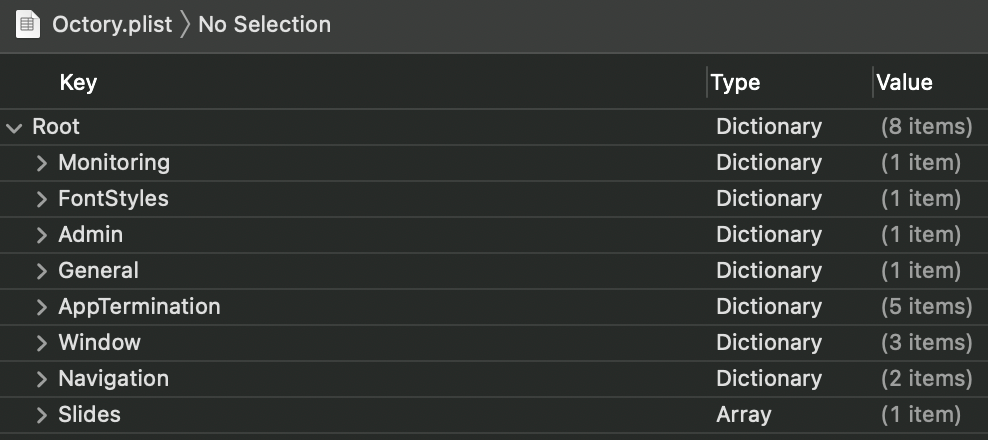
- Can be used to for example specify paths to folders or the name of your company
- Can be used to for example specify paths to folders or the name of your company
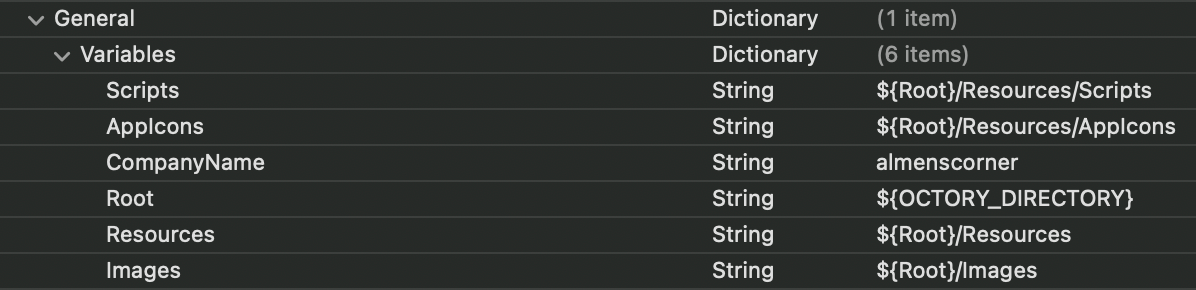
- Monitoring
- All apps to monitor for install status. If you want to monitor VPP installs you must specify
Systemunder theInstallerkey, Example:
- All apps to monitor for install status. If you want to monitor VPP installs you must specify
- AppTermination
- Used to configure what should happen when the Octory app is quit. I used it to execute a termination script that removes Octory from the device. When the app terminates a done file is created in ~/Library/Preferences/.OctoryDone

- Used to configure what should happen when the Octory app is quit. I used it to execute a termination script that removes Octory from the device. When the app terminates a done file is created in ~/Library/Preferences/.OctoryDone
- Window
- Configures how the Octory window will appear. I used
OnScreenset toBlurredBackgroundto get the users attention

- Configures how the Octory window will appear. I used
- Navigation
- Let's you customize some properties relative to the navigation view. I set
UserCanQuitIfInstallationIsIncompletetotrueas I don't want to force the user to stay in the app until all VPP apps are installed. I also changed theQuitButtonTextto "Let's go!"

- Let's you customize some properties relative to the navigation view. I set
- Slides
- Here is the part where you configure what you want to display to the user, in the image below you can see that I set one container to be large with
IsLargeand the components
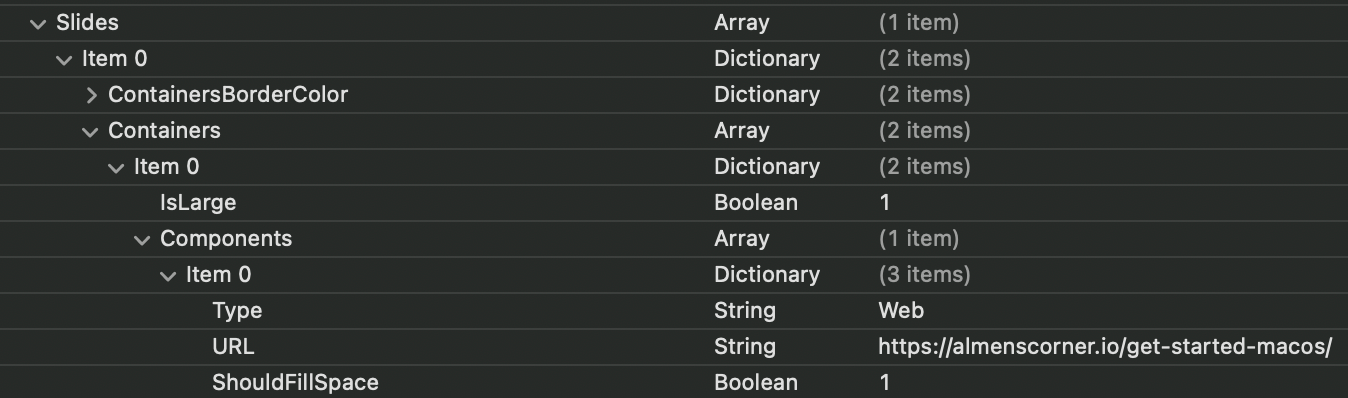
- Here is the part where you configure what you want to display to the user, in the image below you can see that I set one container to be large with
You can find an exhaustive list of everything you can customize here.
If you want to test the application locally Octory provides presets that you can download. To use them you must first download the application from the Octory website, it requires you to create an account to download. To find guidance on how to use the presets, see this link.
Package
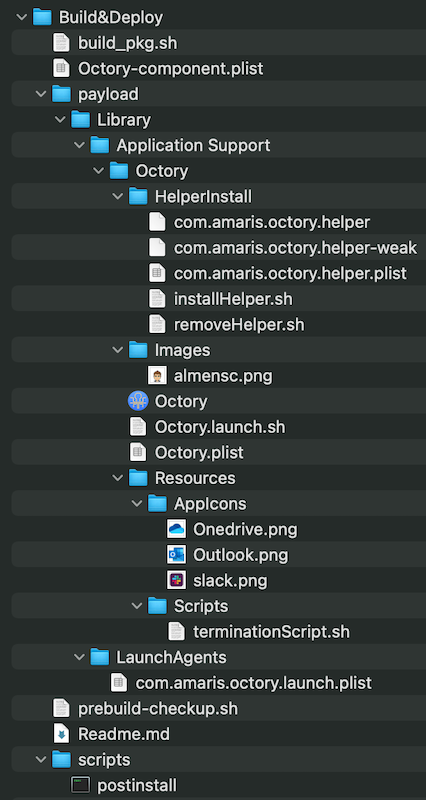
To deploy Octory, you create a package that contains everything from the app to the scripts that you want to run. As you can see in the image below, all folders I referenced in the .plist is here like ${Root}/Resources/AppIcons and ${Root}/Resources/Scripts.
Helper
The helper allows you to execute actions like running scripts in a Root context. I used it to run my terminationScript to completely remove Octory once the user hits the quit button.
The app will try to install the Helper with an admin authorization panel if it has to execute an action with root rights (like ExecuteCommand) although the Helper is not installed and ready to run. But - and it is an important “but” - it will require a user with admin rights to install the Helper. Thus, when you deploy the app, the user will be asked to enter the admin credentials to install the Helper. This is the reason why the Helper is provided separately so that you can install it when deploying Octory with your root privileges.
Deploying Octory with Microsoft Endpoint Manager
Now that you're familiar with the basic structure of Octory, let's see what you need to do to deploy Octory in MEM.
Configure Octory.plist
The first thing you need to do is to prepare your Octory.plist. If you want to create your own look, have a look at the presets mentioned above and play around with it. If you just want to test the deployment you can copy my configuration below. It will monitor installation of Outlook, Onedrive and Slack using VPP. To use it, copy the text and save it as Octory.plist
<?xml version="1.0" encoding="UTF-8"?>
<!DOCTYPE plist PUBLIC "-//Apple//DTD PLIST 1.0//EN" "http://www.apple.com/DTDs/PropertyList-1.0.dtd">
<plist version="1.0">
<dict>
<key>Monitoring</key>
<dict>
<key>Monitors</key>
<array>
<dict>
<key>Identifier</key>
<string>com.microsoft.Outlook</string>
<key>IconURL</key>
<string>${AppIcons}/Outlook.png</string>
<key>Installer</key>
<string>System</string>
<key>Detail</key>
<string>Best email client in the world</string>
<key>DisplayName</key>
<string>Outlook</string>
<key>Name</key>
<string>Outlook</string>
<key>Type</key>
<string>Application</string>
</dict>
<dict>
<key>IconURL</key>
<string>${AppIcons}/slack.png</string>
<key>Installer</key>
<string>System</string>
<key>Detail</key>
<string> #octory is awesome</string>
<key>DisplayName</key>
<string>Slack</string>
<key>Name</key>
<string>Slack</string>
<key>Type</key>
<string>Application</string>
</dict>
<dict>
<key>Identifier</key>
<string>com.microsoft.OneDrive</string>
<key>IconURL</key>
<string>${AppIcons}/Onedrive.png</string>
<key>Installer</key>
<string>System</string>
<key>Detail</key>
<string>Easily store, sync and share your files</string>
<key>DisplayName</key>
<string>Onedrive</string>
<key>Name</key>
<string>Onedrive</string>
<key>Type</key>
<string>Application</string>
</dict>
</array>
</dict>
<key>FontStyles</key>
<dict>
<key>Subtitle</key>
<dict>
<key>SystemFontWeight</key>
<string>Semibold</string>
<key>TextAlignment</key>
<string>Center</string>
<key>Size</key>
<integer>20</integer>
</dict>
</dict>
<key>Admin</key>
<dict>
<key>IsAdminModeEnabled</key>
<false/>
</dict>
<key>General</key>
<dict>
<key>Variables</key>
<dict>
<key>Scripts</key>
<string>${Root}/Resources/Scripts</string>
<key>AppIcons</key>
<string>${Root}/Resources/AppIcons</string>
<key>CompanyName</key>
<string>almenscorner</string>
<key>Root</key>
<string>${OCTORY_DIRECTORY}</string>
<key>Resources</key>
<string>${Root}/Resources</string>
<key>Images</key>
<string>${Root}/Images</string>
</dict>
</dict>
<key>AppTermination</key>
<dict>
<key>ForceQuitShortcutKey</key>
<string>H</string>
<key>QuitShortcutIsEnabled</key>
<true/>
<key>ExecuteAsRoot</key>
<true/>
<key>CompleteInstallationScriptPath</key>
<string>${Scripts}/terminationScript.sh</string>
<key>IncompleteInstallationScriptPath</key>
<string>${Scripts}/terminationScript.sh</string>
</dict>
<key>Window</key>
<dict>
<key>MinimumSize</key>
<dict>
<key>Height</key>
<integer>750</integer>
<key>Width</key>
<integer>1250</integer>
</dict>
<key>MaximumSize</key>
<dict>
<key>Height</key>
<integer>800</integer>
<key>Width</key>
<integer>1280</integer>
</dict>
<key>OnScreen</key>
<string>BlurredBackground</string>
</dict>
<key>Navigation</key>
<dict>
<key>UserCanQuitIfInstallationIsIncomplete</key>
<true/>
<key>QuitButtonText</key>
<string>Let's go!</string>
</dict>
<key>Slides</key>
<array>
<dict>
<key>ContainersBorderColor</key>
<dict>
<key>LightMode</key>
<string>#FFFFFF00</string>
<key>DarkMode</key>
<string>#1E1E1E</string>
</dict>
<key>Containers</key>
<array>
<dict>
<key>IsLarge</key>
<true/>
<key>Components</key>
<array>
<dict>
<key>Type</key>
<string>Web</string>
<key>URL</key>
<string>https://almenscorner.io/get-started-macos/</string>
<key>ShouldFillSpace</key>
<true/>
</dict>
</array>
</dict>
<dict>
<key>Components</key>
<array>
<dict>
<key>Type</key>
<string>Image</string>
<key>URL</key>
<string>${Images}/almensc.png</string>
</dict>
<dict>
<key>Type</key>
<string>Text</string>
<key>Text</key>
<string>Welcome to ${CompanyName}, we're glad to have you here ${USER_FIRST_NAME}</string>
<key>TextFontConfiguration</key>
<string>Subtitle</string>
<key>Margins</key>
<dict>
<key>Left</key>
<integer>20</integer>
<key>Right</key>
<integer>20</integer>
<key>Bottom</key>
<integer>30</integer>
</dict>
</dict>
<dict>
<key>Type</key>
<string>Text</string>
<key>Text</key>
<string> You're mac is being prepared for use. While we install commonly used applications, please have a look at getting started to the left. Once you are ready, just click "Let's go" at the bottom. Enjoy your new mac, we think you'll love the experience!</string>
<key>Margins</key>
<dict>
<key>Bottom</key>
<integer>30</integer>
<key>Left</key>
<integer>20</integer>
<key>Right</key>
<integer>20</integer>
</dict>
<key>TextFontConfiguration</key>
<dict>
<key>Size</key>
<integer>15</integer>
<key>TextAlignment</key>
<string>Center</string>
</dict>
</dict>
<dict>
<key>Type</key>
<string>AppMonitor</string>
</dict>
</array>
</dict>
</array>
</dict>
</array>
</dict>
</plist>
Prepare the package
After the configurations have been made, next step is to prepare the source folder for the package.
If you are using my Octory.plist, remember to create the following folders once you have downloaded the Build&Deploy folder.
- Build&Deploy/payload/Library/Application Support/Octory/Images
- Build&Deploy/payload/Library/Application Support/Octory/Resources
- Build&Deploy/payload/Library/Application Support/Octory/Resources/AppIcons
- Build&Deploy/payload/Library/Application Support/Octory/Resources/Scripts
I also edited the terminationScript.sh to remove Octory once the user quits the app. If you use my .plist and script, it must be located in Build&Deploy/payload/Library/Application Support/Octory/Resources/Scripts. You can find the AppIcons and Images I used here.
#!/bin/bash
# to be executed when Octory has just succesfully completed

#Unload and remove LaunchAgent

launchctl unload /Library/LaunchAgents/com.amaris.octory.launch.plist
rm /Library/LaunchAgents/com.amaris.octory.launch.plist

#Unload and remove helper

launchctl unload /Library/LaunchDaemons/com.amaris.octory.helper.plist
rm /Library/LaunchDaemons/com.amaris.octory.helper.plist
rm /Library/PrivilegedHelperTools/com.amaris.octory.helper

#Remove Octory

rm -r /Library/Application\ Support/Octory

#Write OctoryDone file

loggedInUser=$( echo "show State:/Users/ConsoleUser" | scutil | awk '/Name :/ && ! /loginwindow/ { print $3 }' )

touch "/Users/$loggedInUser/Library/Preferences/.OctoryDone"
- Download the Build&Deploy folder from Octory materials
- Download the latest application from the downloads page (requires you to sign in) and place it in /Build&Deploy/payload/Library/Application Support/Octory
- Place your Octory.plist in /Build&Deploy/payload/Library/Application Support/Octory
- Download the helper from the downloads page and place the folder in /Build&Deploy/payload/Library/Application Support/Octory
- To include the postinstall script it has to be renamed
a. Open Terminal.app
b. cd to /Build&Deploy/scripts
c. Run this commandmv postinstall.sh postinstall - Edit the postinstall script to install the helper, I had issues with app connection checks, so I had to use
./installHelper --weak. If you want the helper to check the apps conncetion, add these lines to end end of the postinstall script,
cd "/Library/Application Support/Octory/HelperInstall"
./installHelper.sh
- This is what your postinstall now should look like,
   #!/bin/bash
    # Load the LaunchAgent which makes Octory re-appear when terminated by the user

    loggedInUser=$( echo "show State:/Users/ConsoleUser" | scutil | awk '/Name :/ && ! /loginwindow/ { print $3 }' )
    loggedInUID=`id -u ${loggedInUser}`

    if [[ ${loggedInUID} -gt 500 ]]; then
        echo "Launching Octory for user ${loggedInUID}…"
        sudo -u \#${loggedInUID} launchctl enable gui/${loggedInUID}/com.amaris.octory.launch
        sudo -u \#${loggedInUID} launchctl bootstrap gui/${loggedInUID}/ /Library/LaunchAgents/com.amaris.octory.launch.plist
        sudo -u \#${loggedInUID} launchctl kickstart gui/${loggedInUID}/com.amaris.octory.launch
    fi

    cd "/Library/Application Support/Octory/HelperInstall"
    ./installHelper.sh
- Next you must apply the right permissions before the app is packaged. Run the following commands in Terminal,
sudo chown -R root:wheel Build&Deploy
sudo chmod -R 755 Build&Deploy
sudo chmod 644 Build&Deploy/payload/Library/Application\ Support/Octory/Octory.plist
We are now ready to build the package
- Open Terminal.app
- cd to your Build&Deploy folder
- Run this command
sudo ./build_pkg.sh
A PKG file will be created in the root of the folder with the name OctoryInstaller-yyyymmddhhmm.pkg.
If you have a requirement to sign the package you will need an Apple Developer certificate to do so, this is required for PreStage enrollment installation for example, which is something that's not supported in MEM at the time of writing.
Deploy the package in MEM
To deploy the package, we're going to use Microsofts script for installing packages which you can find here.
- Upload your package to a location where you can curl it, I used GitHub but you can use a webserver, Azure Storage Blob or whatever you have available
- Download the script from the link above and save it as installOctory.sh
- Edit lines 20-27 to look like this,
# User Defined variables
weburl="{YOUR URL}"
appname="Octory"
app="Octory.app"
logandmetadir="/Library/Logs/Microsoft/IntuneScripts/installOctory"
processpath="/Library/Application\ Support/Octory/Octory.app/Contents/MacOS/Octory"
autoupdate=”false”
- Save the script
- Open the MEM console
- Go to Devices -> macOS -> Shell scripts and click Add
a. Enter a name and click Next
b. Upload the installOctory.sh script
c. Set Run script as signed-in user to No
d. Set Hide script notification on devices to Yes
e. Set Max number of times to retry if script fails to 3 times
f. Click Next - Assign the script and click Next
- Click Add
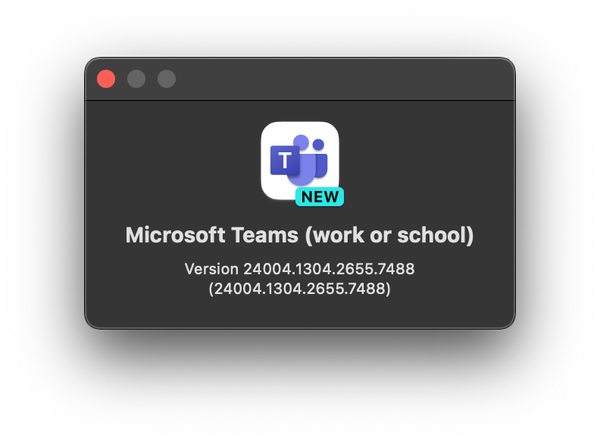
When the script runs on the device, you will see something like below if you used my configuration. You can quit the app even if all applications are not installed because I configured the key UserCanQuitIfInstallationIsIncomplete set to true. The termination script I used will also completely remove Octory from the device as I only use it as an onboarding app.

Final words
I really like this because it brings value to the end user and improves the experience when they enroll. The only thing I miss is the ability to push it as a bootstrap package, to make sure it's always installed during the PreStage enrollment, so the user is presented with this app when they reach the home screen. Installing it with a script it might take a minute or two before it pops up.