
A couple of weeks ago we looked at deploying Munki with MEM which works great for deploying software to macOS devices. But what about monitoring the software we deploy to make sure everything is running smoothly? The reporting capabilities we have for macs is.. well, it needs some polishing, let's leave it at that. For Windows devices we have good capabilities in the form of Desktop Analytics where we can get information on updates, applications running on devices etc., this is something we mac admins in MEM really miss out on.
This is what todays post is all about!
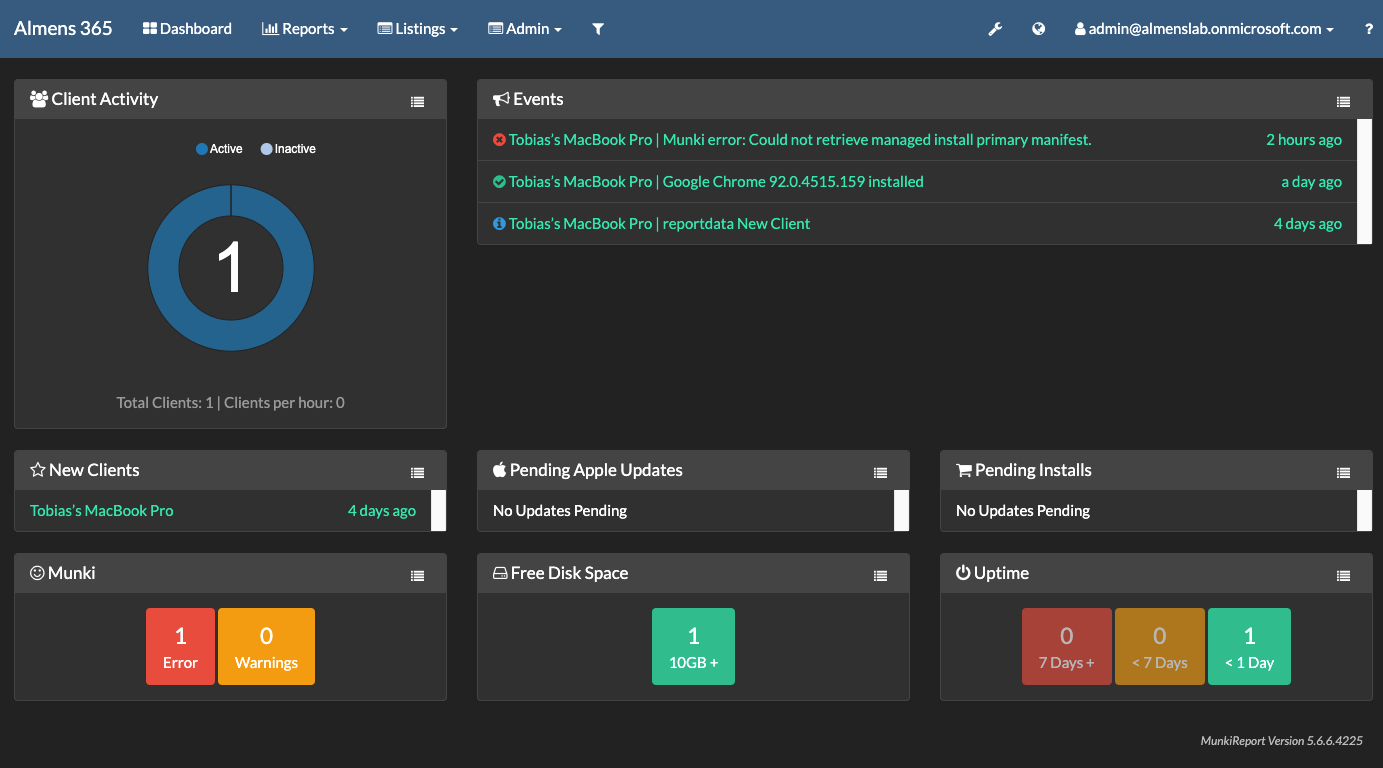
We are looking at deploying a tool called MunkiReport, the infrastructure part is going to be handled by Azure App Service and Azure Database for MySQL, we'll then use Microsoft Endpoint Manager to configure and install the needed parts to be able to collect information. The end result will be something like below,
What makes this tool interesting to me is that you don't even have to use Munki to get reports on your macOS fleet, it can now be run in stand-alone mode if you do not use Munki for software deployment, which I think you should ;)
MunkiReport overview
Features
- Quick overview of your Mac fleet with a dashboard
- Get reports on many features (hardware types, disk usage, etc)
- Lightweight: only sends reports when facts have changed
- Modular: add your own reporting items without hacking the core
- Datatables serverside processing: short loading times for tables, no large memory allocations on the client
Let's dig into the "Modular" part, the are a lot of things you can get reports on in this tool, have a look here.
You can even build your own modules and hook them into MunkiReport. The recommended settings for modules are as follows,
MODULES='applications, ard, bluetooth, caching, certificate, disk_report, displays_info, extensions, filevault_status, findmymac, firewall, gpu, ibridge, inventory, mdm_status, munkireport, munkireportinfo, network, network_shares, power, printer, profile, security, softwareupdate, supported_os, timemachine, usb, users, user_sessions, warranty, wifi, event, managedinstalls, munki_facts, munkiinfo'

### Large DB Modules: add these if you want specific insights into these categories
appusage, fan_temps, fonts, installhistory, usage_stats

### Munki Specific Modules: these can be removed if you are not using Munki
appusage, event, managedinstalls, munki_facts, munkiinfo, manifests

### Developer Specific Modules: related to supporting developer machines
devtools, homebrew, homebrew_info

### Escrow Tools: These tools escrow security information into MunkiReport
filevault_escrow, firmware_escrow, laps

### App Specific Modules: These modules are built for specific apps,
### or have other requirements
backup2go, crashplan, detectx, directory_service, homebrew, homebrew_info, laps, location, mbbr_status, sccm_status, sentinelone, sentinelonequarantine, sophos, crowdstrike, geekbench, jamf, ms_office, snowagent, ms_defender, nomad```
Client reporting
When installed on a client, a LaunchDaemon is installed that will run on a random interval of 1-2 hours so that the server is not overloaded.
The LaunchDaemon will run /usr/local/munkireport/munkireport-runner, if you wish to have more control over then this happens you will need to either setup your own LaunchDaemon (or other recurring task) that will either touch /Users/Shared/.com.github.munkireport.run or setup a new LaunchDaemon to simply run the runner.
Server side requirements
- A webserver (runs fine with Apache, IIS and nginx)
- php version 7.2.5 or higher with pdo-sqlite3 and libxml
To follow along and deploy this you will need a subscription and access to deploy an Azure App Service as well as a Azure Database for MySQL. I'm going to do this from a mac but it could just as well be done on Windows. We will setup Business Units to assign mac devices to different parts of our organisation where managers can sign in to get reports on their devices and use SAML with Azure AD for authentication.
Okay, enough blabbering, let's get started!
Deploy MunkiReport in Azure
First things first, install Homebrew on your mac if not already installed,
/bin/bash -c "$(curl -fsSL https://raw.githubusercontent.com/Homebrew/install/HEAD/install.sh)"
Then, install MySQL and Azure CLI using Homebrew,
brew install mysql
brew update && brew install azure-cli
Great, now we have the pieces in place to connect to our resources once created. So lets create our App Service and database.
Create App Service and database
- Sign in to the Azure Portal
- Search for App Services and click on the resource, then click Create
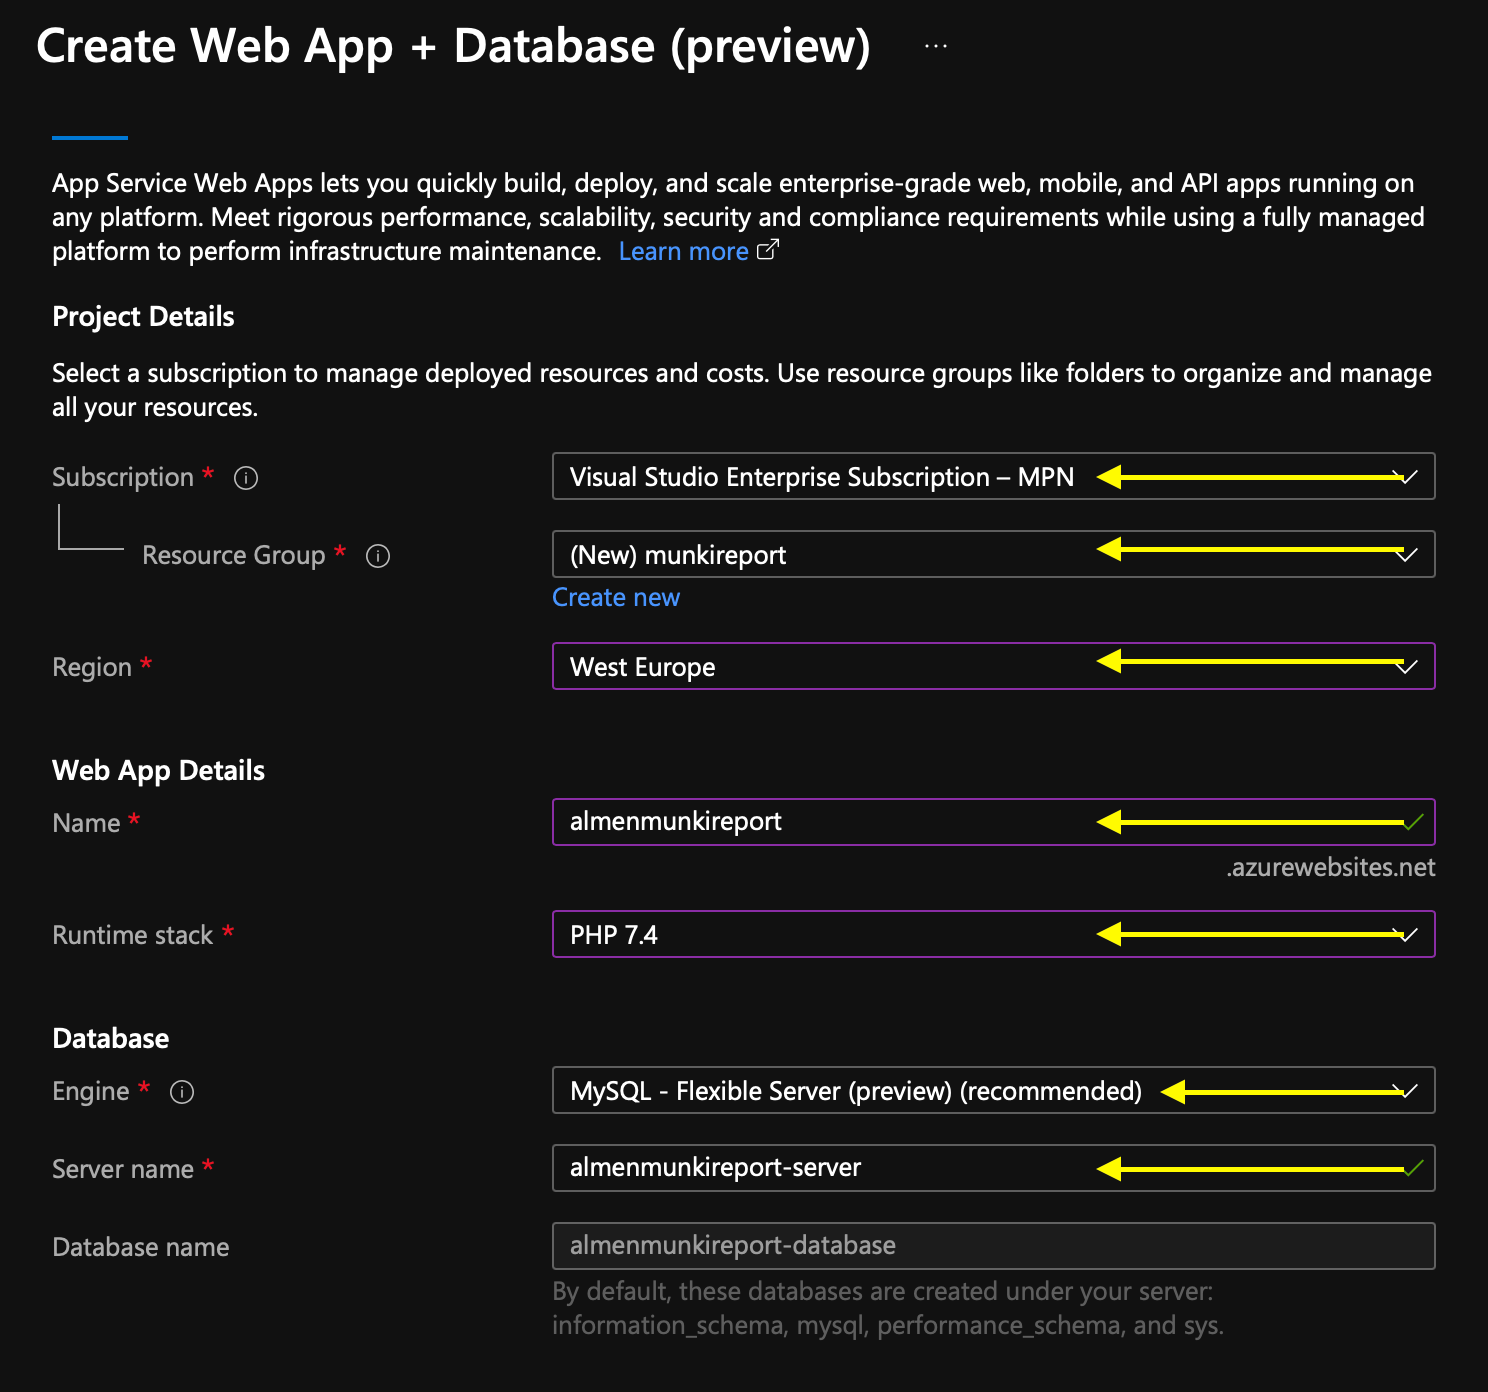
- Under Instance Details, click on Try the new Web + Database experience
- Choose your Subscription, select a Resource Group or create a new one, select your Region, Runtime Stack -> PHP 7.4, Engine -> MySQL Flexible server, leave default name for Server Name and click Review + Create, note your DB admin username and password then click Create
- In the Azure Portal, open Azure Database for MySQL Servers and click on your newly created server
- Navigate to Networking and click Allow public access from any Azure service, then, click Add current client IP Adress, now click Save
- Open Terminal on your mac and run the following, enter the password when prompted
mysql -u <admin-user> -h <mysql-server-name>.mysql.database.azure.com -P 3306 -p
- Once connected, run the following,
CREATE DATABASE munkireportdb;
CREATE USER 'munkireportadmin' IDENTIFIED BY 'YourPassword';
GRANT ALL PRIVILEGES ON munkireportdb.* TO 'munkireportadmin';
- Then quit by typing
quit
So, we have our database and web app prepared, now we can go ahead and configure MunkiReport on our App Service
Install MunkiReport
We are going to use ssh from our mac to connect to our server and install MunkiReport. To connect with ssh, open Terminal and follow the below steps. If it fails to create a remote connection, try opening the web ssh first on your app by going to your app, under Development Tools click SSH and Go.
- In Terminal, execute the following line,
az webapp create-remote-connection --subscription <subscription-id> --resource-group <resource-group-name> -n <app-name> &
- The output will be something like this,
Port 21382 is open
SSH is available { username: root, password: Docker! }
Start your favorite client and connect to port 21382
- To connect run the following and enter the password "Docker!" when promted,
ssh root@127.0.0.1 -p <port>
We're now connected with ssh to our web app, the default folder you should see now is "home", under this we have the following structure,
home
 - site
 - wwwroot
I'll be putting my MunkiTools folder in home/site
- Install Git,
apt install git
- Cd to home/site
- Clone the MunkiReport repository by executing,
git clone https://github.com/munkireport/munkireport-php ./munkireport
- Cd into /home/site/munkireport
- Next we need to install composer, to do this run the following,
php -r "copy('https://getcomposer.org/installer', 'composer-setup.php');"
php -r "if (hash_file('sha384', 'composer-setup.php') === '906a84df04cea2aa72f40b5f787e49f22d4c2f19492ac310e8cba5b96ac8b64115ac402c8cd292b8a03482574915d1a8') { echo 'Installer verified'; } else { echo 'Installer corrupt'; unlink('composer-setup.php'); } echo PHP_EOL;"
php composer-setup.php
php -r "unlink('composer-setup.php');"
- MunkiReport includes default modules which you can see in
composer.json, there's one module that will fail and that we need to change. This is"hautelook/phpass:" "^1.1". To change this, opencomposer.jsonusing vi, press I to enter edit mode, change"hautelook/phpass:" "^1.1"to"ekinhbayar/hautelook-phpass": "1.1.0", press escape and enter :wq to write the changes - To connect to our database, we'll need the certificate to complete an SSL connection, in your munkireport folder, create a folder called ssl by running
mkdir ssl, cd into the newly created folder and runwget https://www.digicert.com/CACerts/BaltimoreCyberTrustRoot.crt.pem
Now it's time to configure our .env file which contains all the information about database connection, modules to use etc. MunkiReport provides an example, ".env.example" that I used to configure my .env file, you can either build of this example or use my configuration below. Change DATABASE parameters to point to your MySQL server in Azure. We'll look at configuring SAML and a couple of other things later. Have a look at the Modules list at the top, if you don't use SentinelOne for example, remove it from the list along with all other things you don't want reporting on.
# --------------------------------------------------------------
# munkireport-php phpdotenv configuration file.
#
# Module specific variables should contain the module prefix.
# --------------------------------------------------------------

#Modules
#-------
MODULES="applications, appusage, ard, backup2go, bluetooth, caching, crashplan, detectx, devtools, directory_service, disk_report, displays_info, extensions, fan_temps, filevault_status, findmymac, firewall, gpu, homebrew, homebrew_info, ibridge, installhistory, inventory, managedinstalls, mbbr_status, mdm_status, munki_facts, munkiinfo, munkireport, munkireportinfo, network, network_shares, power, printer, profile, sccm_status, security, sentinelone, sentinelonequarantine, smart_stats, softwareupdate, supported_os, timemachine, usage_stats, usb, user_sessions, warranty, wifi"

# DATABASE
# --------

CONNECTION_DRIVER="mysql"
CONNECTION_HOST="{YOUR SERVER}.mysql.database.azure.com"
CONNECTION_PORT=3306
CONNECTION_DATABASE="munkireportdb"
CONNECTION_CHARSET="utf8mb4"
CONNECTION_USERNAME="munkireportadmin"
CONNECTION_PASSWORD="YourPassword"
CONNECTION_COLLATION="utf8mb4_unicode_ci"
CONNECTION_STRICT=TRUE
CONNECTION_ENGINE="InnoDB"

# SSL
# ------
CONNECTION_SSL_ENABLED=TRUE
CONNECTION_SSL_CERT='home/site/munkireport/ssl/BaltimoreCyberTrustRoot.crt.pem'


# INDEX_PAGE
# ----------
# Default is index.php? which is the most compatible form.
# You can leave it blank if you want nicer looking urls.
# You will need a server which honors .htaccess (apache) or
# figure out how to rewrite urls in the server of your choice.

INDEX_PAGE="index.php?"

# URI_PROTOCOL
# ------------
# $_SERVER variable that contains the correct request path,
# e.g. 'REQUEST_URI', 'QUERY_STRING', 'PATH_INFO', etc.
# defaults to AUTO

URI_PROTOCOL="AUTO"

# SITENAME
# --------
# Will appear in the title bar of your browser and as heading on each webpage
SITENAME="MunkiReport"

#Client passphrase
#------------------
#CLIENT_PASSPHRASES=""

# AUTHENTICATION
# --------------

# SAML
#-----
AUTH_METHODS="NOAUTH"
#AUTH_SAML_SP_NAME_ID_FORMAT=""
#AUTH_SAML_IDP_ENTITY_ID=""
#AUTH_SAML_IDP_SSO_URL=""
#AUTH_SAML_IDP_SLO_URL=""
#AUTH_SAML_IDP_X509CERT="-----BEGIN CERTIFICATE-----
#YOUR CERT
#-----END CERTIFICATE-----"
#AUTH_SAML_USER_ATTR="http://schemas.xmlsoap.org/ws/2005/05/identity/claims/name"

# ROLES
# -----
# Add users or groups to the appropriate roles array.
#ROLES_ADMIN=""

# Set to TRUE to enable Business Units
# For more information, see docs/business_units.md
ENABLE_BUSINESS_UNITS=TRUE

# Force secure connection when authenticating
#
# Set this value to TRUE to force https when logging in.
# This is useful for sites that serve MR both via http and https
AUTH_SECURE=TRUE

# Define path to the curl binary and add options
# this is used by the installer script.
# Override to use custom path and add or remove options, some environments
# may need to add "--insecure" if the servercertificate is not to be
# checked.
CURL_CMD="/usr/bin/curl, --fail, --silent, --show-error"
- Create a new .env file by running
touch .envin home/site/munkireport - Edit the file by running
vi .env, press I to enter edit mode and paste my example above, changeDATABASEparameters, once done press escape and :, type wq and press enter to save - Now we need to run the composer, run
./composer.phar install --no-dev --no-suggest - When the composer has finished running, manually migrate the database by running
./please migrate - Since our index.php is not in wwwroot, we need to create a symbolic link that points to MunkiReport, to do so, run
ln -s /home/site/munkireport/public /home/site/wwwroot/report
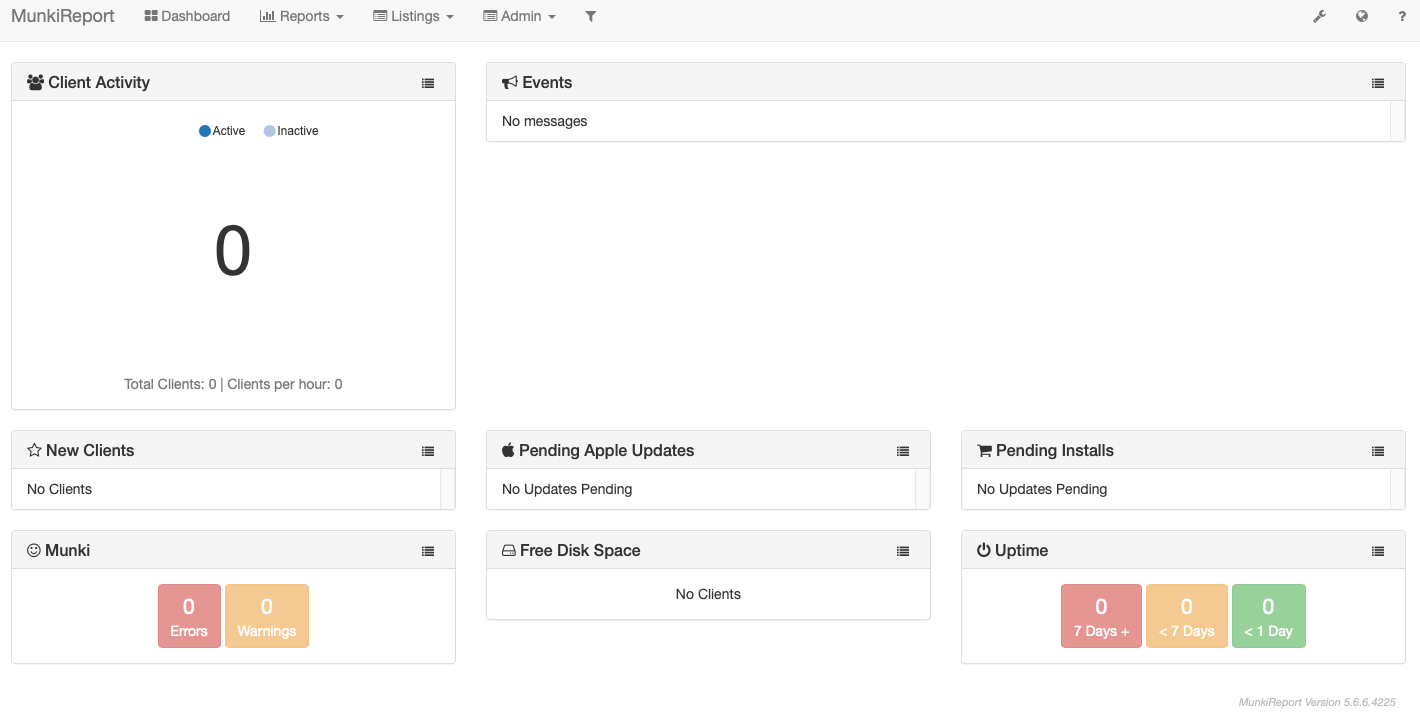
You should now be able to access your MunkiReport instance by navigating to https://{APPNAME}.azurewebsites.net/report
Configure SAML
By default in the .env provided above, authentication method is set to "NOAUTH" which means this console is accessible by anyone. Of course we don't want that so lets setup SAML with Azure AD. Other authentication methods you can use are LDAP and network authentication.
- Go to Azure Portal
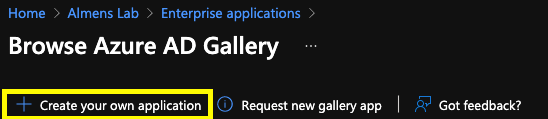
- Create a new app by navigating to Azure Active Directory -> Enterprise Applications and click New application, choose Create your own application
- Give your app a Name and click Create
- Navigate to Single sign-on and choose SAML
- Under Basic SAML Configuration, enter the following
- Identifier (Entity ID): https://{APPNAME}.azurewebsites.net/report/index.php?/auth/saml/metadata
- Reply URL (Assertion Consumer Service URL): https://{APPNAME}.azurewebsites.net/report/index.php?/auth/saml/acs
- Logout Url: https://{APPNAME}.azurewebsites.net/report/index.php?/auth/saml/sls
- Under Setup "AppName", note the following values,
- Login URL
- Azure AD Identifier
- Logout URL
- Download your Federation Metadata XML by clicking Download
- Add your user to the app under Users and groups
- Back in the ssh session, edit the following lines in .env (remove # from each line to uncomment). Open your Federation Metadata XML in a text editor and copy the value between
<X509Certificate>and</X509Certificate>
AUTH_METHODS=SAML
AUTH_SAML_SP_NAME_ID_FORMAT=urn:oasis:names:tc:SAML:1.1:nameid-format:emailAddress
AUTH_SAML_IDP_ENTITY_ID="<Azure AD Identifier from your Azure application>"
AUTH_SAML_IDP_SSO_URL="<Login URL from your Azure application>"
AUTH_SAML_IDP_SLO_URL="<Logout URL from your Azure application>"
AUTH_SAML_IDP_X509CERT="-----BEGIN CERTIFICATE-----
YOUR CERT
-----END CERTIFICATE-----"
AUTH_SAML_USER_ATTR="http://schemas.xmlsoap.org/ws/2005/05/identity/claims/name"
Now when you browse to https://{APPNAME}.azurewebsites.net/report, you will be prompted to sign in with your Azure AD account.
Optional: Create business units
If you have a requirement to give managers for different units across your organisation access to reports we can configure something called Business Units in MunkiReport. This allows you to specify which macs a specific user in MunkiAdmin is able to see. To do this, we'll create the business units in the MunkiReport console, create groups to which we will add devices and create a configuration profile that we push from MEM to add them to a specific business unit.
- Browse to your MunkiReport console
- Navigate to Admin -> Manage Business Units, click +, enter a name for the business unit and adress/link if applicable then click Save
- Repeat above steps for the business units you want
- Under your Business Unit - Machine Groups, click edit type a name for a new group then click + and Save
- Repeat above steps for the groups you want
When you've done above steps, you will have something like this,
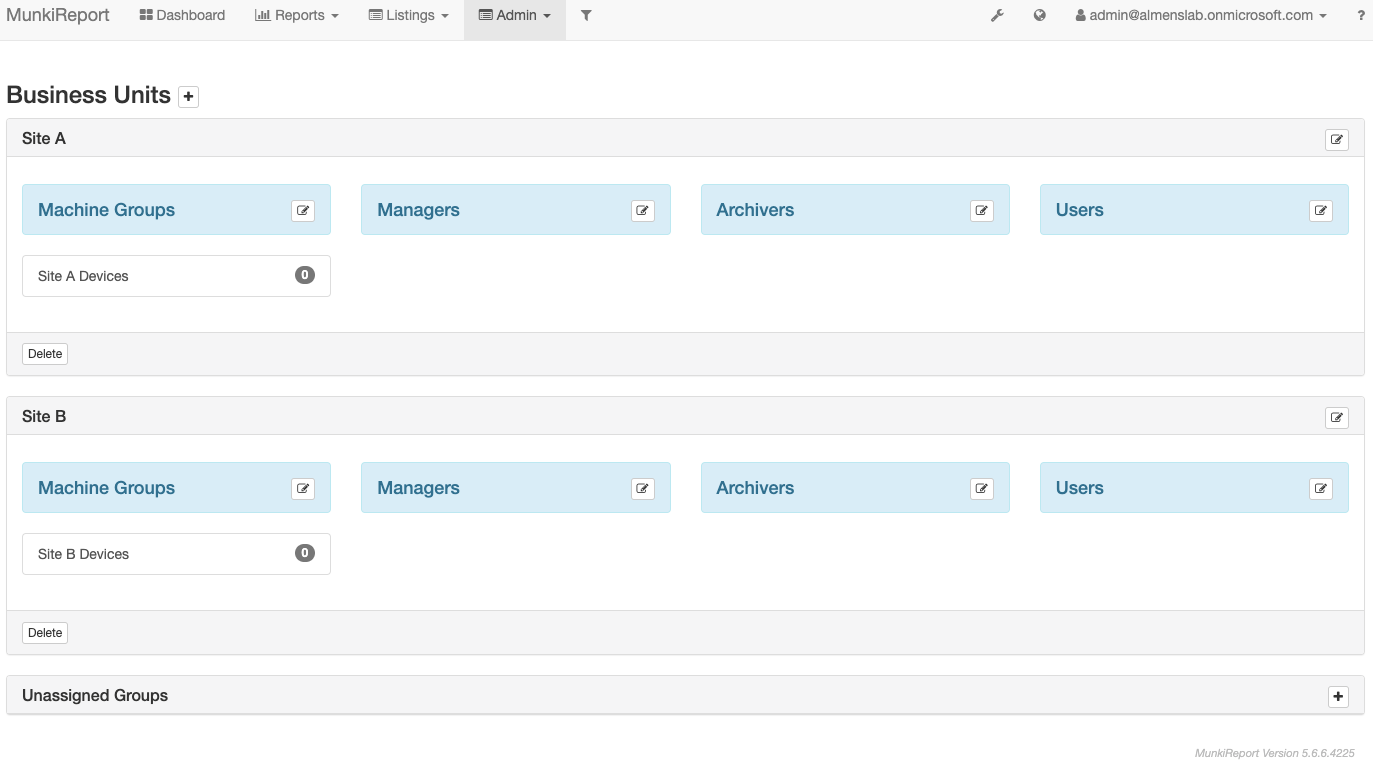
- Click on each group and copy the Machine Key, this is the key we'll specify on the profile in MEM to target a device to a business unit

- Edit the below .mobileconfig to include your Machine Key, do this for each business unit
<?xml version="1.0" encoding="UTF-8"?>
<!DOCTYPE plist PUBLIC "-//Apple//DTD PLIST 1.0//EN" "http://www.apple.com/DTDs/PropertyList-1.0.dtd">
<plist version="1.0">
<dict>
	<key>PayloadIdentifier</key>
	<string>A979DD74-19F6-11EC-9621-0242AC130002</string>
	<key>PayloadRemovalDisallowed</key>
	<true/>
	<key>PayloadScope</key>
	<string>System</string>
	<key>PayloadType</key>
	<string>Configuration</string>
	<key>PayloadUUID</key>
	<string>A979DD74-19F6-11EC-9621-0242AC130002</string>
	<key>PayloadContent</key>
	<array>
		<dict>
            <key>Passphrase</key>
            <string>{YOUR MACHINE KEY}</string>
			<key>PayloadDisplayName</key>
			<string>MunkiReport config</string>
			<key>PayloadEnabled</key>
			<true/>
			<key>PayloadIdentifier</key>
			<string>9C0F6032-19F6-11EC-9621-0242AC130002</string>
			<key>PayloadOrganization</key>
			<string>DemoOrg</string>
			<key>PayloadType</key>
			<string>MunkiReport</string>
			<key>PayloadUUID</key>
			<string>9C0F6032-19F6-11EC-9621-0242AC130002</string>
			<key>PayloadVersion</key>
			<integer>1</integer>
		</dict>
	</array>
</dict>
</plist>
- In the ssh session edit the following line in .env and add all your Machine Keys separated by "," (remove # to uncomment)
CLIENT_PASSPHRASES=""
- Add your email adress to the following line then save the .env file
ROLES_ADMIN=""
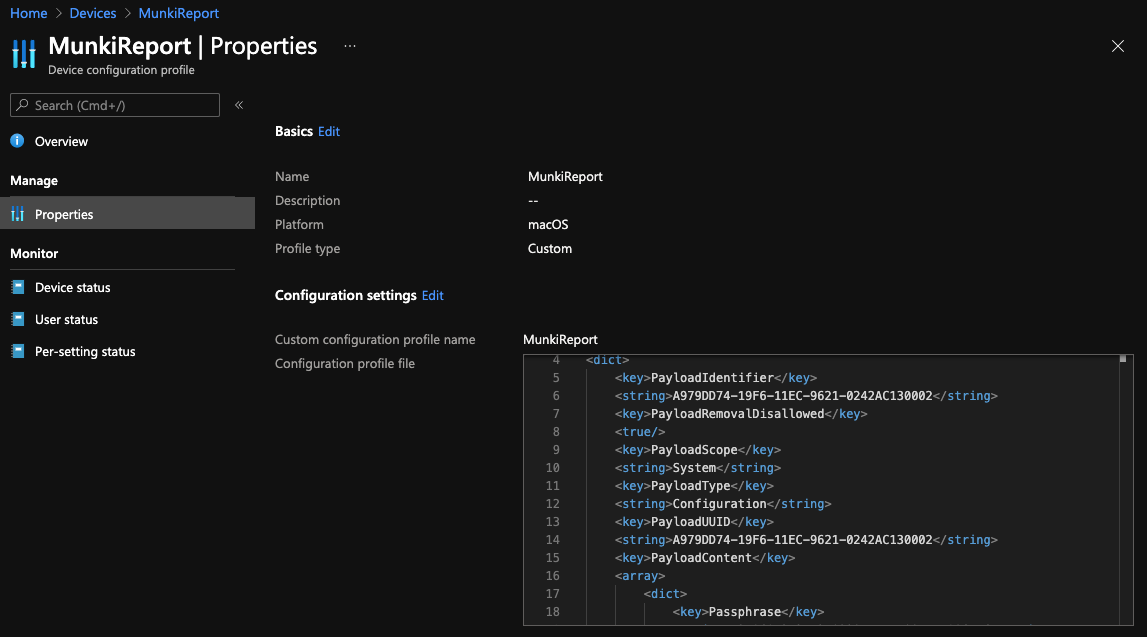
- Sign in to the MEM console
- Navigate to Devices -> Configuration profiles and click Create profile
- For Platform choose macOS, Profile type: Templates and Template name: Custom, click Create
- Give the profile a Name then click Next
- Provide Custom configuration profile name, upload the prepared profile then click Next
- Assign the profile to a group which contains the devices from the business unit, then click Next and finally Create
Create one profile per business unit. The next step is to assign managers by editing Managers for each business unit and adding their email adress. You also need to add them to the application in Azure AD.
Onboard macOS devices
Now it's time to onboard our devices. If you created business units you can skip the step of creating a client passphrase as this has already been done.
Create passphrase
- Edit the below .mobileconfig to include a passphrase of your choosing
<?xml version="1.0" encoding="UTF-8"?>
<!DOCTYPE plist PUBLIC "-//Apple//DTD PLIST 1.0//EN" "http://www.apple.com/DTDs/PropertyList-1.0.dtd">
<plist version="1.0">
<dict>
	<key>PayloadIdentifier</key>
	<string>A979DD74-19F6-11EC-9621-0242AC130002</string>
	<key>PayloadRemovalDisallowed</key>
	<true/>
	<key>PayloadScope</key>
	<string>System</string>
	<key>PayloadType</key>
	<string>Configuration</string>
	<key>PayloadUUID</key>
	<string>A979DD74-19F6-11EC-9621-0242AC130002</string>
	<key>PayloadContent</key>
	<array>
		<dict>
            <key>Passphrase</key>
            <string>{YOUR MACHINE KEY}</string>
			<key>PayloadDisplayName</key>
			<string>MunkiReport config</string>
			<key>PayloadEnabled</key>
			<true/>
			<key>PayloadIdentifier</key>
			<string>9C0F6032-19F6-11EC-9621-0242AC130002</string>
			<key>PayloadOrganization</key>
			<string>DemoOrg</string>
			<key>PayloadType</key>
			<string>MunkiReport</string>
			<key>PayloadUUID</key>
			<string>9C0F6032-19F6-11EC-9621-0242AC130002</string>
			<key>PayloadVersion</key>
			<integer>1</integer>
		</dict>
	</array>
</dict>
</plist>
- In the ssh session edit the following line in .env and add the passphrase the macs use when they connect to MunkiReport (remove # to uncomment) then save the file
CLIENT_PASSPHRASES=""
- Sign in to the MEM console
- Navigate to Devices -> Configuration profiles and click Create profile
- For Platform choose macOS, Profile type: Templates and Template name: Custom, click Create
- Give the profile a Name then click Next
- Provide Custom configuration profile name, upload the prepared profile then click Next
- Assign the profile to your macs, then click Next and finally Create
Create package
To create a .pkg used for installation, run this command in your Terminal, this will create a .pkg on your desktop /bin/bash -c "$(curl 'https://{APP NAME}.azurewebsites.net/report/index.php?/install')" bash -i ~/Desktop
To deploy the package to mac devices in MEM, we're using a shell script. You need to upload the package to a web server from which the macs can curl the package, for example Azure Storage.
When you have the package ready, edit this script to point to your package location on line 21, then save it as installMunkiReport.sh
When the script is ready, we can now deploy the package to mac devices in MEM.
- In the MEM console, go to Devices -> macOS -> Shell scritps
- Click Add, give the script a Name and click Next
- Upload the prepared shell script and use the following configuration,
Run script as signed-in user: No,Hide script notifications on devices: Yes,Script frequency: Not configured,Max number of times to retry if script fails: 3 times, click Next - Assign the script then click Next, finally click Add

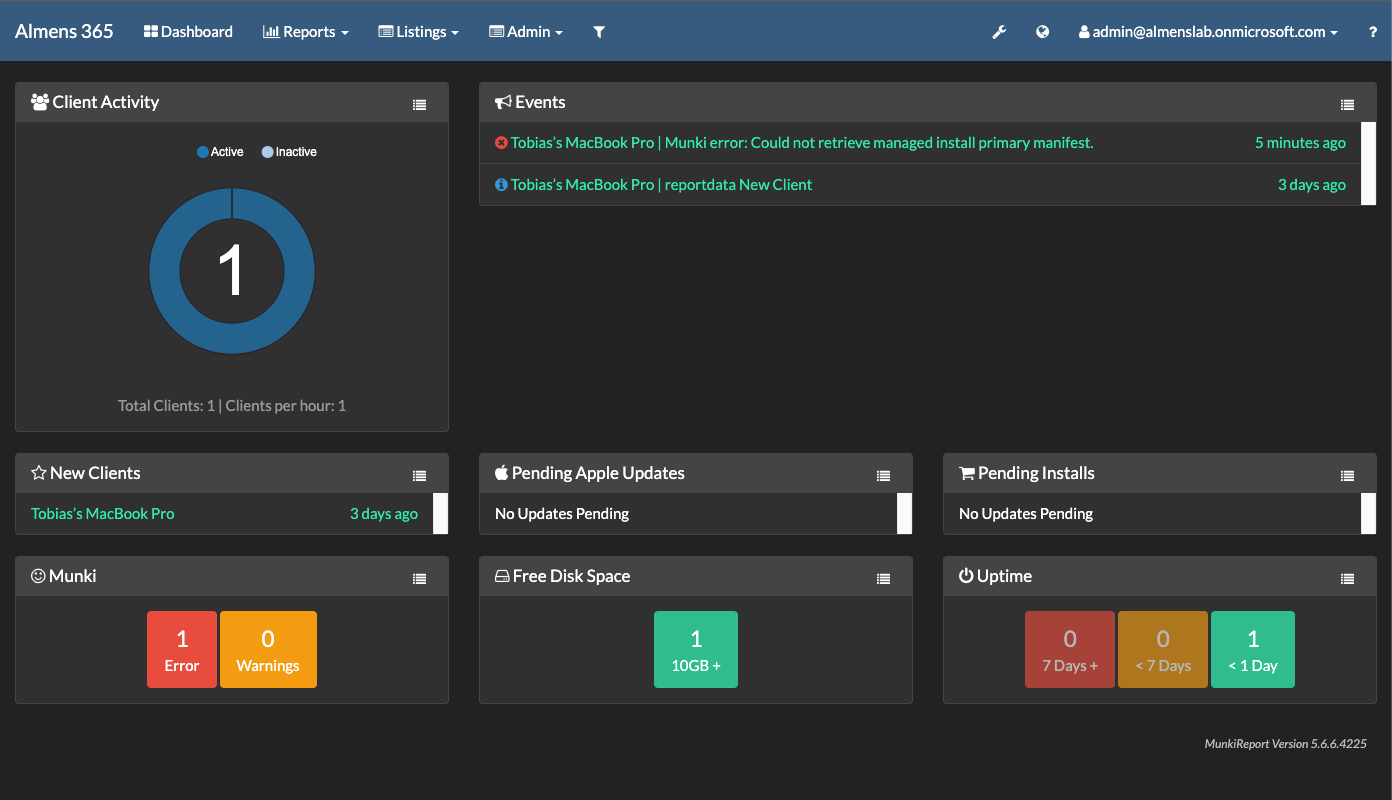
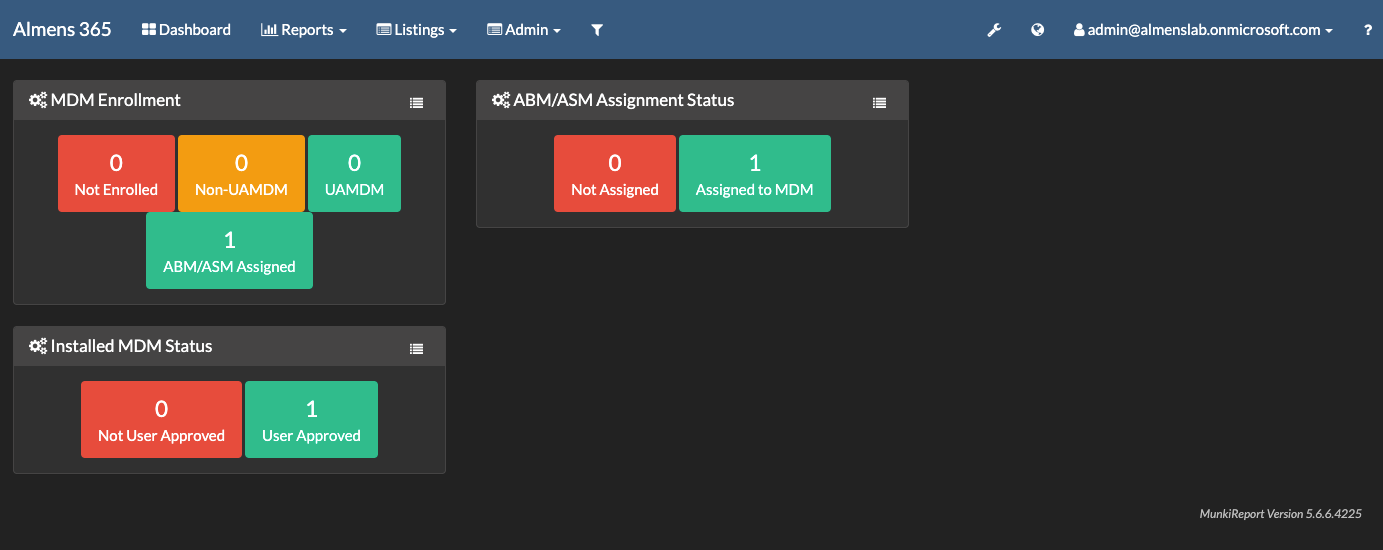
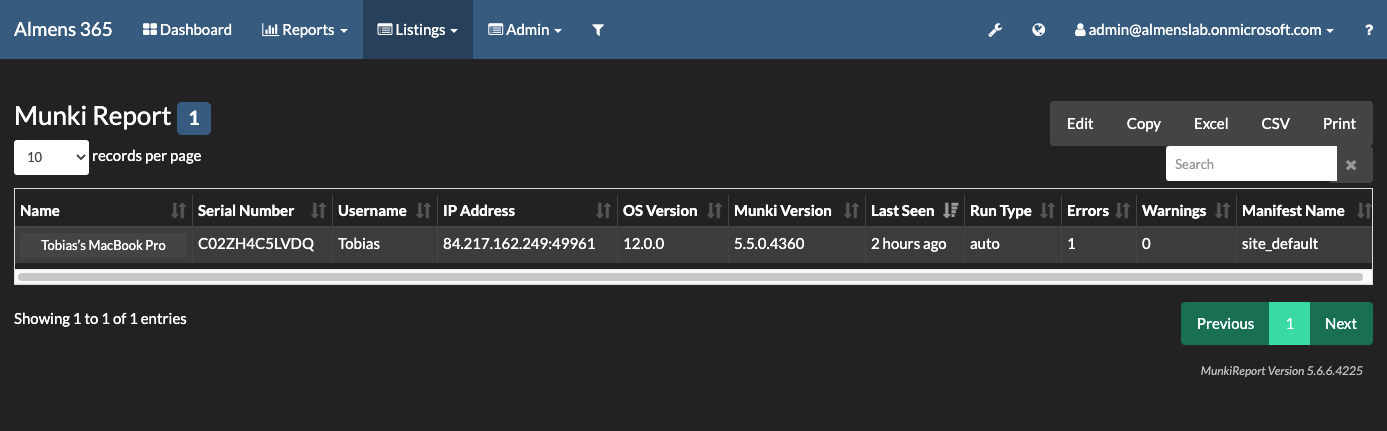
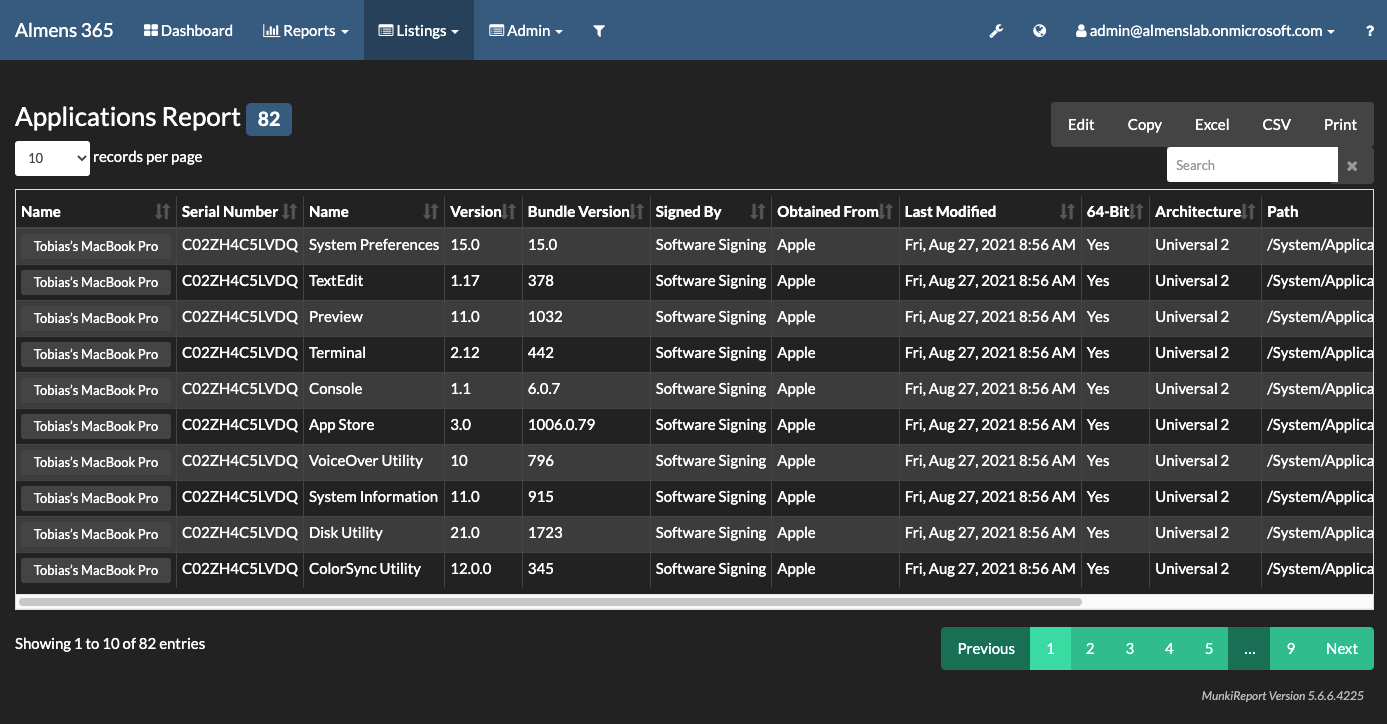
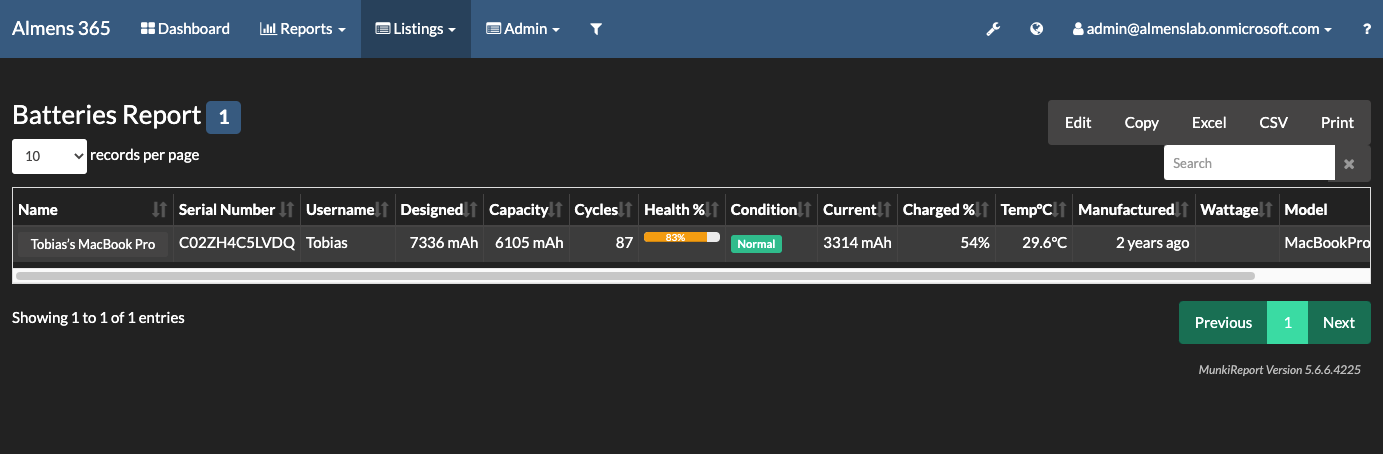
Reporting in MunkiReport
Devices to which you deployed the package will now start to report data back to MunkiReport, below you can see some screenshots from my environment.

Final words
I'm really impressed with this tool, there's so many things you can get reports on, not only the status of your Munki packages but also things like battery health, updates pending, storage etc. so you can be proactive. There's also good customisation support, I encourage you to have a look at MunkiReport documentation. The examples I provided for .env, .mobileconfig and install script is available on my GitHub.