

Good evening, morning, afternoon, wherever you are, hello!
It’s been some time since I updated this blog, during this time I’ve started a new job and been trying to balance life and work in the strange times we live in. Hopefully, moving forward, I’ll have more time to dedicate here.
This will be a series of blogs covering management of iOS/iPadOS using Mobile Device Management, specifically Microsoft Endpoint Manager (MEM). We will go on a journey where we’ll cover the following areas:
- The basics in MDM for iOS/iPadOS
- The different deployment options
- Distributing payloads and apps
- Managing Identity
Overall, we’re looking at four parts. If you’re new to managing iOS/iPadOS, welcome to the world of MDM. If you’ve been doing it for a long time, there still might be something to learn or you’ve forgotten. I still talk to a lot of people who’s been handed the responsibility of taking care of the iOS/iPadOS management but has never heard of supervision, Apple Business Manager/Apple School Manager, payloads etc. I hope this series will bring some clarification to the concept of Mobile Device Management and managing iOS/iPadOS devices using such a service.
Let’s get started!
Mobile Device Management (MDM)
For some time now we have had the ability to enrol iOS/iPadOS devices into Mobile Device Management systems such as Microsoft Endpoint Manager. When I first started working with managing iOS/iPadOS, all we really did was install an email profile and gasp at the awesomeness of not having to do it manually for users anymore. Since then, Mobile Device Management has evolved at lightning speed and nowadays we can configure just about any aspect of the device. For example, how apps can share data, if a user can backup to iCloud, configuring home screen layout, certificates, Wi-Fi, VPN etc. the list goes on.
Whether the device is corporate owned or personally owned you can enrol the devices to manage them securely and remotely or allow them to access data using Mobile Application Management. There are several deployment options you can choose from and we’ll cover them in part two.
When a device is enrolled to Mobile Device Management, an enrolment profile is installed on the device. This is a profile which includes a payload that enrols the device to the specified Mobile Device Management service. With this installed you can then send commands, configuration profiles and query certain information about the device. If a user removes the enrolment profile, all managed settings and apps connected to that enrolment profile is removed. Note that you can only have one of these installed on a device which means the device cannot be managed by multiple Mobile Device Management solutions simultaneously. This profile can be enforced and locked using Apple Business Manager or Apple School Manager.
Note: Only one enrolment profile can be installed on a single device
Apple Push Notification Service (APNs)
This is the most important part of managing iOS/iPadOS in Mobile Device Management, without this you won’t be able to enrol and configure your devices. The APNs certificate is used to maintain the communication with your devices across all networks, private and public.
Besides APNs Mobile Device Management require an SSL certificate and a certificate to sign configuration profiles, though this is not something you have to provide when using Microsoft Endpoint Manager as Microsoft has already configured this.
This is the flow when a Mobile Device Management command is sent from Microsoft Endpoint Manager, to APNs and the device
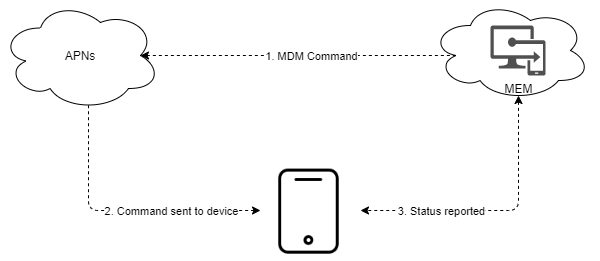
- Command initiated and APNs message sent
- Status = SENT
- Command sent to device
- On success
- Status = PUSH
- Device can’t perform command
- Status = NOTNOW
- On success
- Status reported
- Device fetches command from MDM, if success
- Status = ACKNOLWEGED
- If unsuccessful
- Status = ERROR
- Device fetches command from MDM, if success
Important: APNs certificates must be renewed annually. If the certificates expire you will lose communication with your devices until it is renewed.
Requirements for APNs
- TCP port 443 is used during device activation, and afterwards for fallback if devices can’t reach APNs on port 5223.
- TCP port 5223 to communicate with APNs.
- TCP port 443 or 2197 to send notifications to APNs.
In iOS/iPadOS 13.4 or later, APNs can use a web proxy when it’s specified in a PAC file.
Creating and uploading APNs in Microsoft Endpoint Manger
To create an APNs certificate, the first thing you’ll need is an Apple ID. I strongly advise you not to use your own Apple ID as multiple people might need access to renew this certificate annually. If you need to create an Apple ID, you can do so here.
Once you have a non-personal Apple ID, follow this process:
- Log in to the MEM console
- Navigate to Devices -> iOS/iPadOS -> iOS/iPadOS enrollment -> Apple MDM Push Certificate
- Grant Microsoft permission to send user and device information to Apple
- Click on Download your CSR (keep the MEM console open, you will need it later)
- Navigate to the Apple APNs portal and sign in with your Apple ID
- Click on Create a Certificate
- Add a note, for example which MDM service you’re using and if it’s production or test. This will help you if you need multiple APNs certs when renewing
- Upload the CSR you downloaded in step 4, and then click Upload
- Download you APNs certificate by clicking Download (note the expiration date)
- Go back to the MEM console and enter the Apple ID you used to generate your certificate
- Browse to the certificate you downloaded in step 9 and then click Upload
Once the above steps are completed, this is what you’ll see
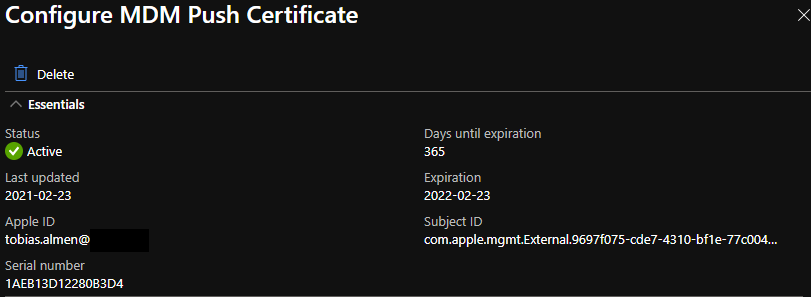
With this step completed you can begin enrolling devices to Microsoft Endpoint Manager, but before you do, you might want to configure additional things such as profiles and apps.
Configuration Profiles
A configuration profile is an XML file that has the .mobileconfig ending. When you create a new configuration profile in Microsoft Endpoint Manager, this file is created in the background and delivered by the Mobile Device Management server to the devices. Using configuration profiles, you can automatically configure:
- Settings
- Accounts
- Restrictions
- Credentials
It is also possible to manually create a configuration profile and push it to devices using the custom profile type within Microsoft Endpoint Manager.
Configuration profile example:
<?xml version="1.0" encoding="UTF-8"?>
<!DOCTYPE plist PUBLIC "-//Apple//DTD PLIST 1.0//EN" "http://www.apple.com/DTDs/PropertyList-1.0.dtd">
<plist version="1.0">
<dict>
	<key>HasRemovalPasscode</key>
	<false/>
	<key>PayloadContent</key>
	<array>
		<dict>
			<key>PayloadDescription</key>
			<string>Configures passcode settings</string>
			<key>PayloadDisplayName</key>
			<string>Passcode</string>
			<key>PayloadIdentifier</key>
			<string>com.apple.mobiledevice.passwordpolicy.FE28626A-FFB6-4CDC-961A-CAB580723C27</string>
			<key>PayloadType</key>
			<string>com.apple.mobiledevice.passwordpolicy</string>
			<key>PayloadUUID</key>
			<string>FE28626A-FFB6-4CDC-961A-CAB580723C27</string>
			<key>PayloadVersion</key>
			<integer>1</integer>
			<key>allowSimple</key>
			<false/>
			<key>forcePIN</key>
			<true/>
			<key>minLength</key>
			<integer>6</integer>
			<key>requireAlphanumeric</key>
			<false/>
		</dict>
	</array>
	<key>PayloadDescription</key>
	<string>This is an example</string>
	<key>PayloadDisplayName</key>
	<string>Example</string>
	<key>PayloadIdentifier</key>
	<string>com.example</string>
	<key>PayloadOrganization</key>
	<string>almenscorner</string>
	<key>PayloadRemovalDisallowed</key>
	<true/>
	<key>PayloadType</key>
	<string>Configuration</string>
	<key>PayloadUUID</key>
	<string>737A6037-0287-44ED-A5F3-DE8507BB9D6F</string>
	<key>PayloadVersion</key>
	<integer>1</integer>
</dict>
</plist>
In the example profile above we configure the following:
- Require passcode = TRUE
- Allow simple value = FALSE
- Minimum passcode length = 6
- Require alphanumeric = FALSE
- Payload removal allowed = FALSE
If installed on a device, this profile would force the user to set a six-digit complex passcode and the user would not be able to delete the profile from the device. The above is what is generated when you create a configuration profile in Microsoft Endpoint Manager. You probably won’t have to create your own custom profiles, but I wanted to give you a sense of what’s going on behind the scenes.
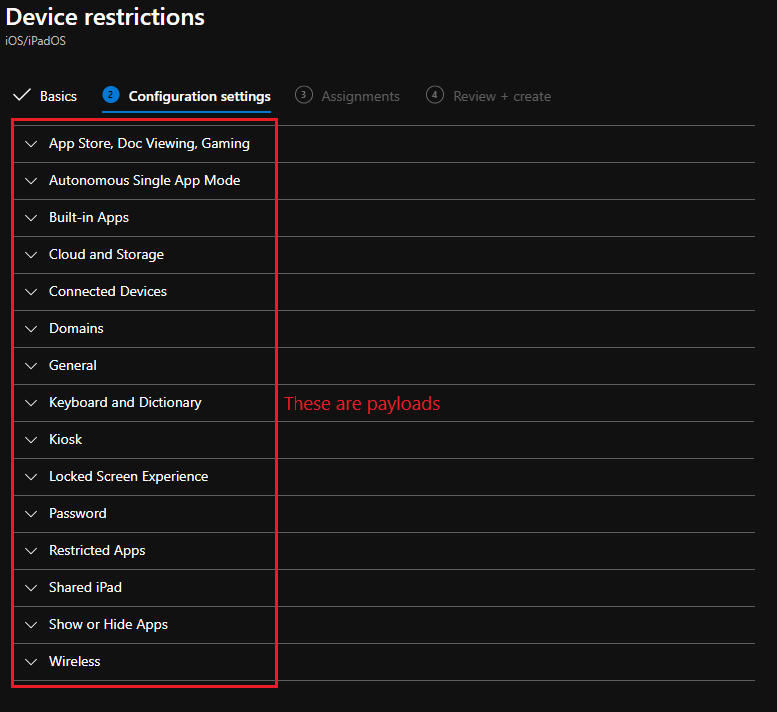
Payloads
Payloads is what you configure in the configuration profile, this is the settings that will be applied on the device when the profile is installed. When you create a new configuration profile in Microsoft Endpoint Manager, you can choose the payloads you want to add, like setting a passcode or configuring email.
Payloads are defined by:
- The operating system or systems that the payload supports
- The channel that does the payload work
- Whether the payload requires the Apple device to be supervised
- Whether the payload is exclusive or whether it can be combined with other payloads of the same type
- Whether the payload can have duplicates
When planning your payload setup, keep the following in mind:
- A configuration profile can have more than one payload.
- A device can have more than one configuration profile.
- On a Mac, you can combine user configuration profiles with device configuration profiles.
- If you have multiple configuration profiles containing similar payloads with different settings, the resulting behaviour is undefined. On an iPhone or iPad, if there are conflicting restrictions, the more restrictive restriction wins.
- Some payloads can have more than one unique payload. For example, a Certificates payload often involves more than one certificate, and a VPN payload may involve more than one VPN setting.
Although it is possible to have more than one payload in a configuration profile, I usually divide them into multiple separate configuration profiles. I do this because when you change one setting and save the profile, the whole profile is re-installed on the targeted devices.
Supervision
With supervision on iOS/iPadOS you as an organization can have greater control over company owned devices. When a device is supervised it’s “tagged” as a device that an organization owns. When this “tag” is applied you can configure more restrictive settings on a device.
iOS/iPadOS version 5 and later can be supervised by:
- Using Apple Configurator 2 to supervise the device. During this process, the device is erased, and all data is lost.
- Enrolling the device in an MDM solution and selecting supervision as part of the enrolment process
Devices that are iOS/iPadOS 13 or later can be automatically supervised by using Apple Business Manager or Apple School Manager. Later, in this series we’ll cover how to enrol devices as supervised by using Apple Business Manager.
Wrapping up
Great, now we understand some of the core concepts of managing iOS/iPadOS using Mobile Device Management. With this foundation we can begin talking about the different modes of management, how to distribute apps and profiles and managing the identities. Stay tuned for the next part.