
Welcome to part two of Managing iOS/iPadOS. Today we’ll be exploring the different deployment methods we can choose from when planning an enrollment strategy for iOS/iPadOS. There’s a lot of options depending on if you’re in need of management for Bring Your Own Device (BYOD)/company owned devices or both. The options include:
- Automated Enrolment: Apple Business Manager (ABM)/Apple School Manager (ASM) – Company owned
- User enrollment – BYOD
- Device enrollment – Company owned
- App Protection Policies – BYOD/Company owned
These are the methods we’ll be exploring today. I will also walk you through adding devices to ABM using Apple Configurator 2 (the same method applies to ASM). This is a great option if you have bought devices from a reseller that’s not authorized to add devices to these services.
If you have not read part one of this series, please do before continuing as that will give you a good understanding of the basics of iOS/iPadOS management. You can find part one here:
Managing iOS/iPadOS Part 1: The basics
Automated Enrollment
If you’re not familiar with Automated Enrollment, it’s a part of ABM/ASM. It’s a service which lets a company deploy Apple devices bought through an Apple Authorized reseller. With this deployment option, you can configure what screens the users see on setup assistant when they start the device for the first time, during an Automated Enrollment the devices can also be supervised. The benefit here is that you can send out a device shrink wrapped directly to the user and have them sign in with corporate credentials to enroll the device with no Apple ID required. It’s also possible to lock the enrollment profile so that the user is not able to un-enroll from MDM. For all this to work you must integrate ABM/ASM with the MDM of your choosing, when this integration is made, devices are synchronized from ABM/ASM to the MDM service. We’ll walk through configuring this integration and creating the enrollment profile in Microsoft Endpoint Manager, where you for example can decide which setup assistant screens should be visible to the user.
Apple Business Manager consists of three parts:
- Devices – Automated Enrollment (the focus today)
- Apps – Volume Purchase Program
- Identities – Managed Apple IDs
Apps and identities are out of scope for this post, but we’ll cover these in part three and four.
Pre-requisites
- Company has registered for ABM
- If you’re not registered, you can register here
- Located in a country where ABM is supported
- List of supported countries can be found here
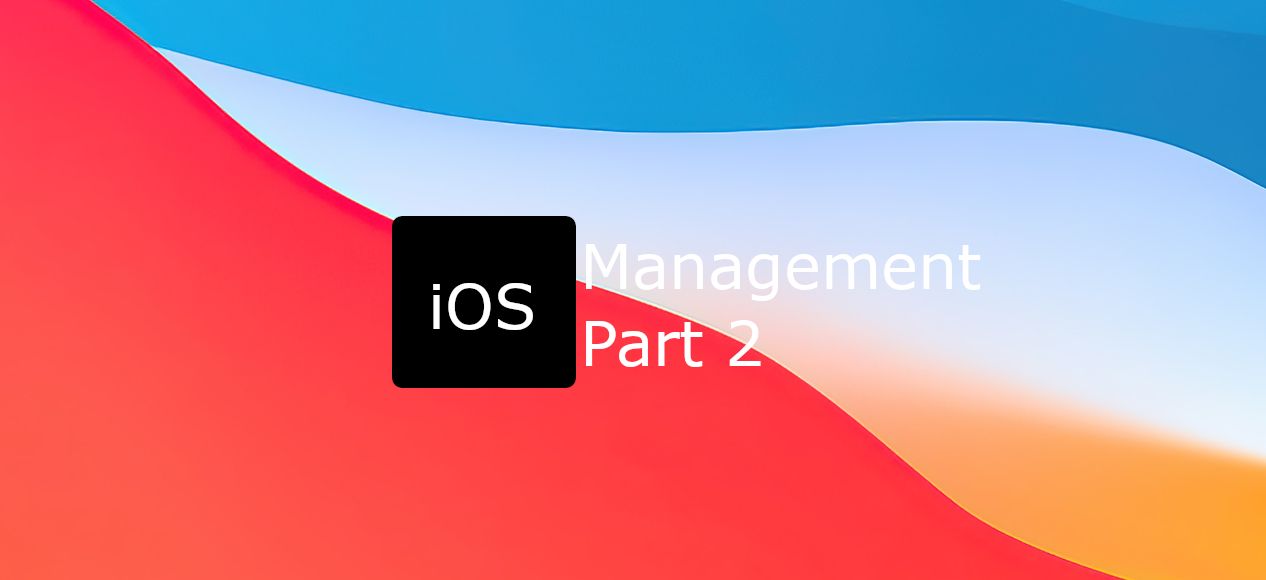
High level overview:
- Admin
- Configures MDM server in ABM/ASM as well as adds authorized resellers or devices via Apple Configurator
- Uploads token to MEM to integrate ABM/ASM and creates enrollment profile
- Reseller
- Uploads devices to customers ABM/ASM
- Sync
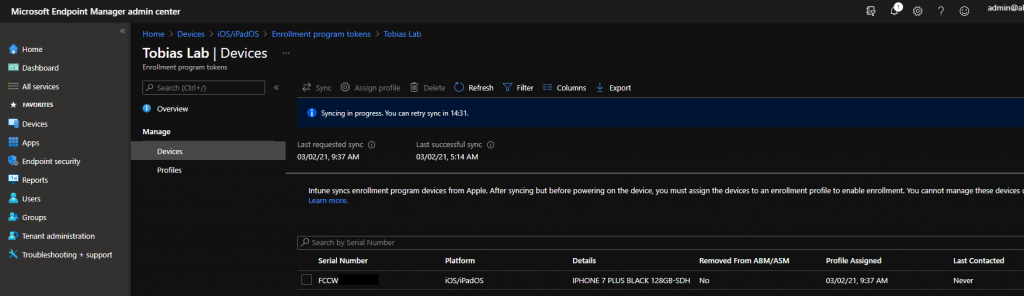
- Devices are synchronised from ABM to MEM
- Enrollment profile synchronized from MEM to ABM
- Device is shipped from the reseller directly to the end user
- User boots device and enrolls to MDM
Integrating Automated Enrollment in Microsoft Endpoint Manager
To complete the integration between ABM and MEM, you need to have at least the Intune Service Administrator Role in MEM and the Device Enrollment Manager role in ABM. Follow the steps below to complete this integration.
1. Sign-in to the MEM console
2. Go to Devices -> iOS/iPadOS -> iOS/iPadOS Enrollment -> Enrollment Program Tokens
3. On the Enrollment Program Tokens page, select Add
4. On the basics page:
- Click I Agree on “I grant Microsoft permission to send both user and device information to Apple”
- Download your Public Key and keep this page open
5. Sign-in to Apple Business Manager
6. Click on Settings -> Device Management Settings -> Add MDM server, then:
- Provide a name for your server
- Under MDM Server Settings, click on Choose File and upload the public key you downloaded in step 4, then, click on Save
- After above steps has been completed, you can now download your token, to do so, click on Download Token
7. Go back to the page from step 4 and provide the following:
- The Apple ID you signed into ABM with when creating your token
- Upload the token you downloaded in step 6
- Click Next and then Create
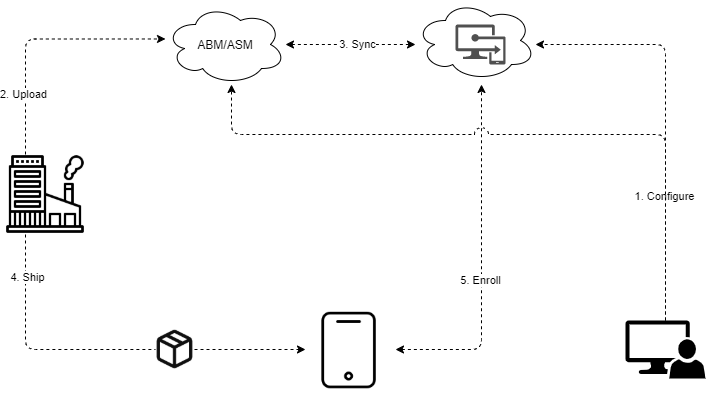
Once above steps has been completed you can now see that ABM has been successfully integrated and is active. Keep the Overview page open for the next part.
Note: Just like the APNs Certificate, this token must be renewed annually.
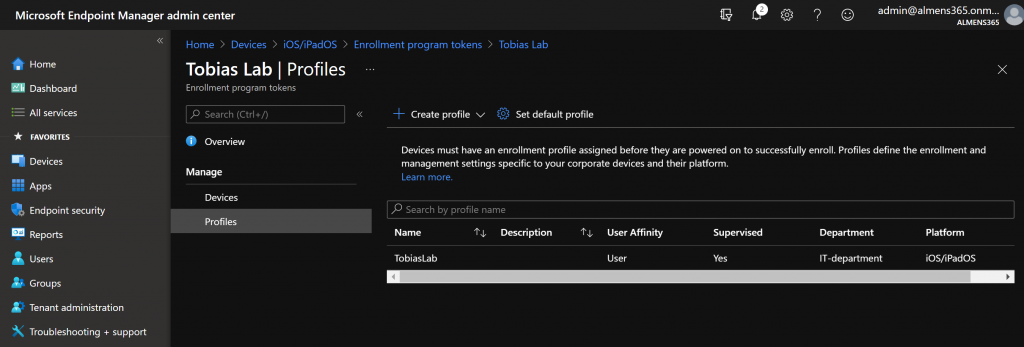
Create the enrollment profile
Now that we have integrated ABM to MEM, the next thing we must do before devices can start to enroll is to create an Enrollment Profile. In this profile we will decide what screens will be shown in setup assistant, if the user must provide credentials, if we want to use a device naming template and some other settings. We will go through all of them below.
1. From the Overview page, click on Profiles
2. Click on Create Profile and choose iOS/iPadOS, then, give the profile a name and click Next
3. On the Management Settings page, we have a lot of options to choose from, let’s walk through them step by step. Choose the options that best fit your use case
- User Affinity & Authentication Method
- Enroll with user affinity
- When you choose this option, the device will be enrolled and associated with a specific user. This is the preferred option when devices are enrolled as single user devices. Authentication is required with this option.
- Select where users must authenticate
- Company Portal
- With this option, users go through the setup assistant without having to authenticate. Instead, they must authenticate in the company portal when they have finished configuring their device. One reason you might want to do this is because you require MFA challenges when enrolling devices or registering to Azure AD. Keep in mind that the user will have to open Company Portal and authenticate manually. There is an option to set Company Portal to Single App Mode until the user has successfully authenticated, but I have seen this cause issues with multiple customers and I would not advise to use this feature.
- Setup Assistant
- The most common option. Here the user authenticates in Setup Assistant with their Azure AD credentials. This option does not support MFA challenge, but Intune Enrollment can be excluded in Conditional Access policies.
- Company Portal
- Install Company Portal with VPP
- If VPP is integrated with MEM, Company Portal can be automatically installed upon enrollment. This is the preferred method, and we’ll cover how to integrate VPP in the next part.
- Select where users must authenticate
- When you choose this option, the device will be enrolled and associated with a specific user. This is the preferred option when devices are enrolled as single user devices. Authentication is required with this option.
- Enroll without user affinity
- Devices being enrolled for kiosk use typically does not require it to be tied to a specific user, therefore this is a good option for those types of devices where they should be able to enroll without authentication
- Enroll with user affinity
- Management Options
- Supervised
- If set to Yes, devices will be supervised automatically upon enrollment. If you remember from part one, this gives you greater control over an iOS/iPadOS device. Preferred is to set this to Yes.
- Locked Enrollment
- If set to Yes, Users won’t be able to manually remove the management profile from their device and thereby un-enrolling their device. Preferred is to set this to Yes.
- Sync With Computers
- Specifies whether a device can be synchronized with All computers, No computers, or a computer with Apple Configurator 2. To use the Apple Configurator option, you must upload a certificate. Usually leave this to All Computers.
- Supervised
- Device Name
- Allows you to set a naming template for devices. I usually set this to be able to easily find a device when it’s enrolled to MEM. You can use variables to set the name of a device to, for example, Company-SERIAL by using Company-{{SERIAL}}. Supported variables are: {{SERIAL}}, {{DEVICETYPE}}
- When happy with the configuration, click on Next
4. On the Setup Assistant page, we can configure which screens the user will see when the device is being setup. In my case, I will only show the Location Services screen and hide all the others. If you want your users to setup their own Apple ID, iMessage etc. you can leave those enabled. Let’s go through the settings
- Department
- Allows you to configure a department that the user sees on the About Configuration Screen. I usually set this to something like “IT-department”.
- Department Phone
- Same as above but instead set this to for example a support number.
- Toggle All
- Allows you to hide all screens with one button. If needed, you can still enable the specific screens you want the users to see.
- When you’re done with the configurations click on Next and then Create
We have now successfully created an Enrollment Profile. Recommended is to set a default profile so that you do not have to manually assign the profile to newly synced devices. You can do this by clicking Set Default Profile and under iOS/iPadOS Enrollment Profile choosing your profile.
Adding devices to ABM using Apple Configurator 2
Note: To be able to add devices to ABM using Apple Configurator 2, you must have access to a macOS device, signed in with an Apple ID to macOS App Store and installed Apple Configurator 2
Adding devices to ABM this way might be an option if you have bought devices from a non-authorized reseller, it’s possible to do it in bulk or a per device basis. The device you wish to add must be connected with a cable to the mac running Apple Configurator.
We’re going to create a WIFI profile that will be used for the device to be able to activate.
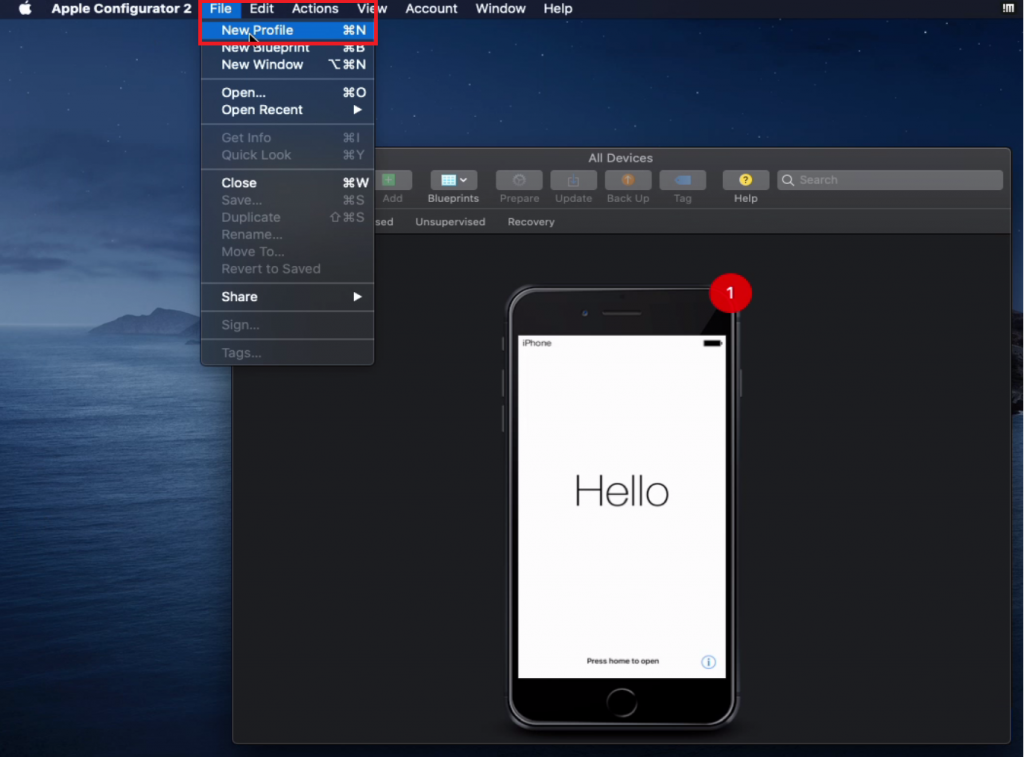
1. Once you have Apple Configurator 2 open on your mac, go to File -> New Profile
2. Give your profile a name and then click on Wi-Fi to left in the payload section, then click Configure
3. Provide details for the WIFI you want the device to connect to
4. Once you’ve provided network details, click on File -> Save -> Save
5. In Apple Configurator, go to Blueprints -> Edit Blueprints -> New
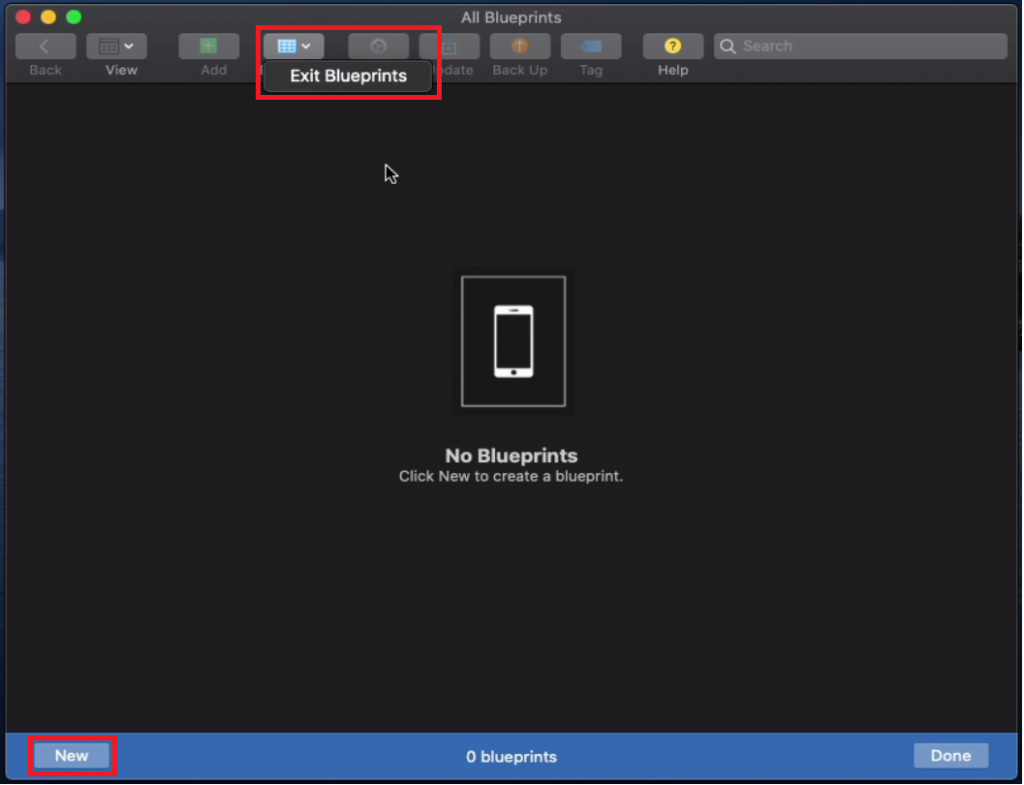
6. Give the blueprint a name, then right-click the blueprint and choose Prepare
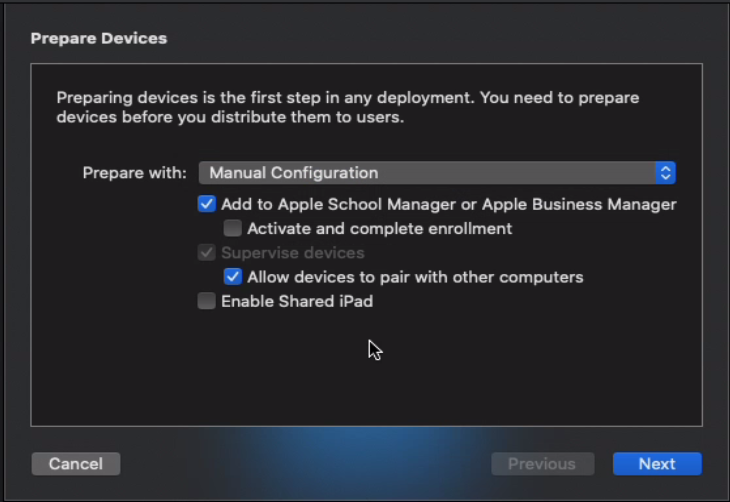
7. For Prepare Devices, choose the following
- Prepare with
- Manual Configuration
- Add to Apple School Manager or Apple Business Manager
- Allow devices to pair with other computers
- Then Click Next
8. Choose New Server… and click Next
- Give the server a name, we don’t have to specify an MDM server Host Name or URL as we’re not going to enroll devices at this stage. Leave it to default and click Next. You will get a timeout error, ignore it and click Next
- On Trust Anchor Certificate, click Next
- Choose New Organization… and sign in with you ABM Apple ID
- Choose Generate a New Supervision Identity and click Next
- Leave Configure iOS Setup Assistant to defaults and click Next
- On Choose Network Profile, click on Choose… and browse to the profile you created earlier, then, click on Prepare
We now have a blueprint we can use to add devices to ABM. I created a blueprint instead of preparing the device directly as I want to be able to add other devices in the future. Let’s now add a device to ABM.
1. On the blueprints page, click on Done
2. Connect an iOS/iPadOS device with a cable to the mac running Apple Configurator, it will then show up under All Devices
3. Right-click your device and choose Apply -> {YourBluePrintName}, then click Apply

The device will now factory reset and be updated. A factory reset is required because we are supervising the device. Once this process is done, the device will also be added to ABM. During the process, a new server in ABM is automatically created with the name of Apple Configurator 2. To enroll this device using ABM, we must move it to our server integrated with MEM. To do so, follow the steps below.
1. Sign-in to Apple Business Manager
2. Navigate to Settings -> MDM servers -> Apple Configurator 2 -> Show Devices
3. Click on the device you added via Apple Configurator and choose Edit Device Assignment
4. On Assign to server, choose the server you created in previous steps and click Continue and Continue again
The device is now added to the MEM MDM server and will be synchronized and assigned an enrollment profile.
Enrollment – User perspective
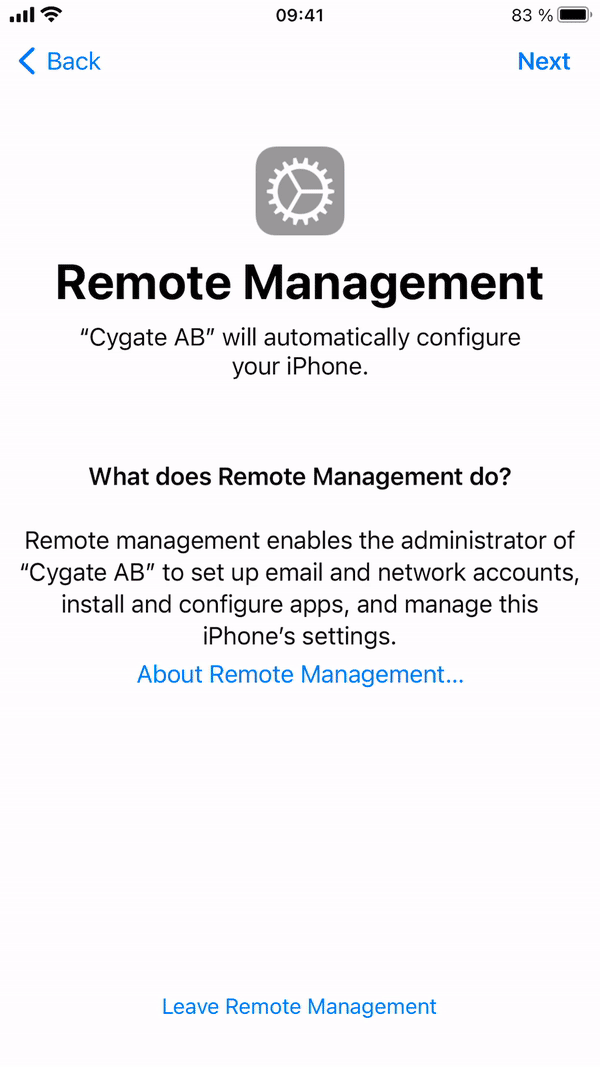
Once you have selected language, country and connected to a network, the device will continue to enroll via ABM.
User Enrollment
With iOS/iPadOS 13, Apple introduced something called User Enrollment. This enrollment method is designed for use with BYOD devices, company and personal data are kept separate on the device by associating personal data with the personal Apple ID and corporate data with the Managed Apple ID. This ensures that personal data is kept and protected when a device is removed from MDM but corporate data is removed. A limited number of actions and queries are supported for devices enrolled with User Enrollment.
A list of these actions can be found here.
When a device is enrolled with User Enrollment, a separate APFS volume is created on the device, it’s an encrypted volume that’s separate from other volumes and only contains corporate data. Data that’s included in this volume:
- Managed Keychains
- Managed apps and app data
- Managed mail, contacts, and calendar data
- Managed iCloud drive downloaded and cached data
- Managed Apple Notes data associated with the Managed Apple ID
When a device is retired or unenrolled from MDM, this volume is deleted along with all the corporate data.
Pre-requisites
- APNs certificate
- iOS/iPadOS 13 or later
- Managed Apple ID
Create the User Enrollment profile
1. Sign-in to the MEM console
2. Go to Devices -> iOS/iPadOS -> iOS/iPadOS Enrollment -> Enrollment Types (preview)
3. On the Enrollment Types page, click on Create Profile and choose iOS/iPadOS
4. Give the profile a name and click Next
5. For Enrollment Type, there are multiple options to choose from
- User Enrollment
- The device will be enrolled as a BYOD device, work and private data will be separated and a few actions and queries will be available to use.
- Device Enrollment
- The device will be enrolled as a fully managed device, i.e. a company owned device.
- Determine based on user choice
- Users must choose whether it’s a personal device or a company owned device. They’ll see an option to choose between I own this device and (Company) owns this device. If they choose the latter, the device will be enrolled by using Device Enrollment. If the user chooses, I own this device, they’ll get another option to secure the entire device or only secure work-related apps and data. The end user’s selection of whether they own the device determines which enrollment type is implemented on their device
- I will use Determine based on user choice to be able to enroll both personal and company devices. Once you’ve picked an option, click on Next
6. Choose to assign the profile to All users or a group of users that should be able to enroll devices, click on Next and then Create
Create a Managed Apple ID
We will walk through manually creating a Managed Apple ID, it is also possible to use federation with Azure AD. This is something we’ll cover in the last part in this series.
To be able to create Managed Apple IDs you first must verify your domain. To verify your domain, follow the steps below.
1. Sign-in to Apple Business Manager
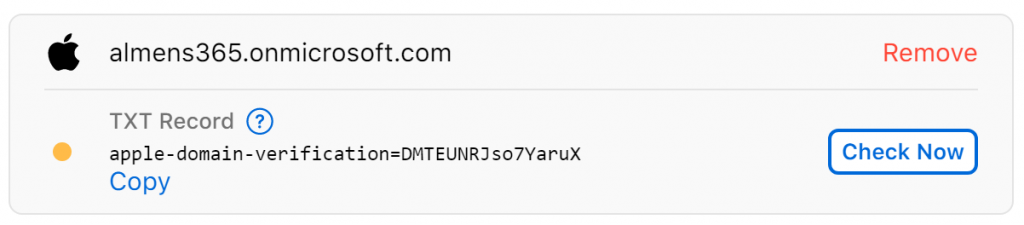
2. Click on Settings -> Accounts -> Add domain…, provide your domain name and click on Add
3. Copy the provided TXT-record and update your DNS
You can check the status on verification by clicking Check Now
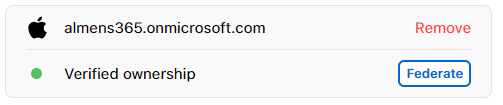
Once your domain is successfully verified, this is what you’ll see
Now we can start creating Managed Apple IDs using our domain. Follow the steps below to create a Managed Apple ID
1. Go to People -> Accounts
2. Click the + sign to the right of the search bar
3. Provide the required information
- First name
- Last name
- Managed Apple ID
- Username@yourdomain.com
- Roles / Location
- Choose Staff
- Choose your location
- Email Adress
- Work email
4. Click Save
5. On the account details page, click on Create Sign-In
- Choose whether you want to download the sign-in information as a PDF/CSV or send as email
- A temporary password is now generated which you can use to sign into your Managed Apple ID
Enrollment – User perspective
After the user has downloaded the Company Portal App, they sign in with corporate credentials and follow the on-screen walkthrough. This will be a BYOD device as I choose “I own this device” and “Secure work-related apps and data only” during enrollment.
Device Enrollment
Using Device Enrollment, the enrollment flow is pretty much the same as for User Enrollment, with the exception that the user does not have to provide a Managed Apple ID and instead of only managing work-related apps and data, the whole device will be managed.
This might be a valid method of enrolling devices if users already have company provided devices and they don’t want to factory reset to enroll. Keep in mind that these devices will not be supervised.
App Protection Policies
App Protection Policies uses the Mobile Application Management framework (MAM) to set policies on an application level instead of device. With App Protection Policies you can ensure data never leaves the protected application on a device which is not managed by MDM. MAM policies work on applications that has the Intune SDK integrated, Microsoft of course provides this in their applications, but we do not have a large third-party application support, but as most applications connecting to and using corporate data will be the Microsoft applications, I don’t think that’s a big deal.
With this option the device will not have to be enrolled to MEM to access data such as Outlook, OneDrive, Teams etc. because we protect the application layer. This is a good option for people that do not want to enroll their personal device to MDM or for contractors that are already enrolled in an MDM. For this to work though you cannot have Conditional Access Policies requiring compliant devices.
Creating an App Protection Policy
To create an App Protection Policy and assign it to users, follow the steps below. These policies can target devices managed by MEM as well but todays focus is on BYOD devices.
1. Sign-in to the MEM console
2. Go to Apps -> App Protection Policies -> Create Policy -> iOS/iPadOS
3. Give the policy a name and click Next
4. On the Apps page we have a lot of different options, let’s walk through them
- Target to apps on all device types
- Yes
- The policy will target devices enrolled to MEM and devices not enrolled to MEM
- No
- Managed
- The policy will target devices enrolled to MEM
- Unmanaged
- The policy will target devices not enrolled to MEM
- Managed
- Yes
- Public Apps
- A list of all public applications that support App Protection Policies
- Custom Apps
- If you have an application not listed in Public Apps, you can specify this app by its Bundle ID
- I will use the following configuration, here I’m only protecting the Outlook application on unmanaged devices. For production you’d want to add more applications
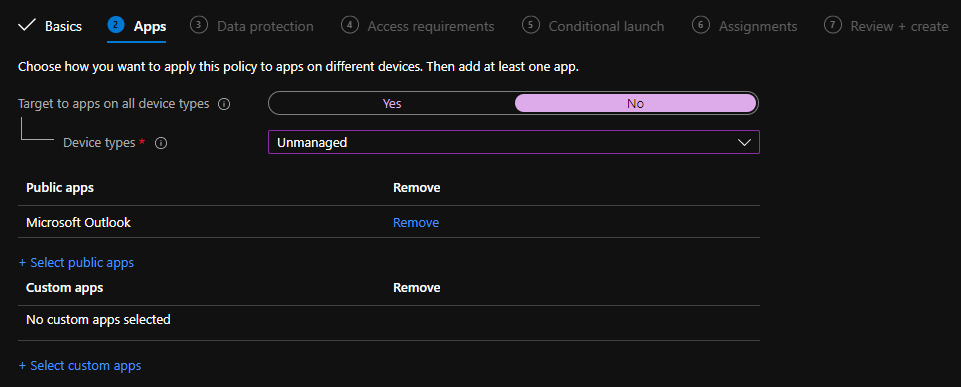
- Once you’re happy with your configuration, click Next
Important: Remember to protect the new Microsoft Office application. This app includes the ability to edit files in Word, PowerPoint, Excel etc and access other Microsoft 365 data. If this app is not protected, you’re vulnerable to data loss
5. Data Protection include the most important settings, here we will configure how data can be transferred between applications, if it should be encrypted and many more settings, let’s have a look at what we can configure
- Backup org data to iTunes and iCloud backups
- Select Block to prevent backup of org data to iTunes or iCloud
- Select Allow to permit backup of org data to iTunes or iCloud. Personal or unmanaged data is not affected
- Send org data to other apps
- Options
- None: Do not allow sending org data to any app
- Policy managed apps: Only allow sending org data to other policy managed apps
- Policy managed apps with OS sharing: Only allow sending org data to other policy managed apps and sending org documents to other MDM managed apps on enrolled devices
- Policy managed apps with Open-In/Share filtering: Only allow sending org data to other policy managed apps and filter OS Open-in/Share dialogs to only display policy managed apps
- All apps: Allow sending org data to any app
- Save copies of org data
- Select Block to prevent saving a copy of org data to a new location, other than the selected storage services, using “Save As”. Select Allow to permit saving a copy of org data to a new location using “Save As”
- Allow user to save copies to selected services
- Select the storage services users can save copies of org data to. All other services are blocked. Selecting no services will prevent users from saving a copy of org data. Services you can allow include, OneDrive For Business, SharePoint, Local Storage
- Allow user to save copies to selected services
- Select Block to prevent saving a copy of org data to a new location, other than the selected storage services, using “Save As”. Select Allow to permit saving a copy of org data to a new location using “Save As”
- Transfer telecommunication data to
- Typically, when a user selects a hyperlinked phone number in an app, a dialer app will open with the phone number prepopulated and ready to call. For this setting, choose how to handle this type of content transfer when it’s initiated from a policy-managed app. Additional steps may be necessary in order for this setting to take effect. First, verify that tel and telprompt have been removed from the Select apps to exempt list. Then, ensure the application is using a newer version of Intune SDK (Version 12.7.0+)
- Options
- Receive data from other apps
- Options
- None: Do not allow receiving data in org documents or accounts from any app
- Policy managed apps: Only allow receiving data in org documents or accounts from other policy managed apps
- Any app with incoming org data: Allow receiving data in org documents or accounts from from any app and treat all incoming data without an user account as org data
- All apps: Allow receiving data in org documents or accounts from any app
- Open data into Org documents
- Select Block to disable the use of the Open option or other options to share data between accounts in this app. Select Allow if you want to allow the use of Open and other options to share data between accounts in this app
- When set to Block, you can configure the following setting, Allow user to open data from selected services, to specify which services are allowed for Org data locations
- Note: This setting is only enforced if the setting “Receive data from other apps” is set to “Policy managed apps”
- Options
- Restrict cut, copy and paste between other apps
- Cut, copy, and paste data between your app and other approved apps installed on the device. Choose to block these actions completely between apps, allow these actions for use with any app, or restrict use to apps that your organization manages
- Policy-managed apps with paste in gives you the option to accept incoming content pasted from another app. However, it blocks users from sharing content outwardly, unless sharing with a managed app
- Third party keyboards
- Block or Allow the use of third party keyboards in protected apps
- Encryption
- Encrypt org data
- Choose Require to enable encryption of work or school data in this app. Intune enforces iOS/iPadOS device encryption to protect app data while the device is locked. Applications may optionally encrypt app data using Intune APP SDK encryption. Intune APP SDK uses iOS/iPadOS cryptography methods to apply 128-bit AES encryption to app data
- When you enable this setting, the user may be required to set up and use a PIN to access their device. If there’s no device PIN and encryption is required, the user is prompted to set a PIN with the message “Your organization has required you to first enable a device PIN to access this app.”
- Encrypt org data
- Functionality
- Sync policy managed app data with native apps
- Choose Block to prevent policy managed apps from saving data to the native Contacts and Calendar apps on the device. If you choose Allow, the app can save data to the native Contacts and Calendar apps on the device, when those features are enabled within the policy managed app.
- Outlook provides additional control capability within app configuration policies for synchronizing to the native Contacts and Calendar apps
- Printing org data
- If blocked, the app cannot print protected data
- Restrict web content transfer with other apps
- Intune Managed Browser: Allow web content to open only in Intune Managed Browser
- Unmanaged browser: Allow web content to open only in the unmanaged browser defined by “Unmanaged browser protocol” setting
- Any app: Allow web links in any app
- Org data notifications
- Block: Do not share notifications
- Block org Data: Do not share org data in notifications. If not supported by the application, notifications are blocked
- Allow: Share all notifications
- Sync policy managed app data with native apps
- Once you’ve gone through this overload of information and are finished with your configuration, click Next
6. On the Access requirements page, we can decide if the user must enter a PIN when the application is opened, I would advise to set this requirement as we cannot force the user to set a PIN on their device. As we’ve done with previous settings, let’s walk through what we can configure
- PIN for access
- If required, a PIN must be used to access the policy-managed app. Users must create an access PIN the first time that they open the app from a work or school account
- PIN type
- Numeric (numbers)
- Passcode (alphanumeric)
- Simple Pin
- If blocked, users may not create a simple PIN. A simple PIN is a string of consecutive or repetitive digits, such as 1234, ABCD, or 1111. Please note that blocking simple PIN of type ‘Passcode’ requires the passcode to have at least one number, one letter, and one special character
- Select minimum pin length
- Length requirement for the pin
- Touch ID instead of PIN for access (iOS 8+/iPadOS)
- Touch ID uses fingerprint recognition technology to authenticate users on iOS devices. Intune calls the LocalAuthentication API to authenticate users using Touch ID. If allowed, Touch ID must be used to access the app on a Touch ID capable device
- Face ID instead of PIN for access (iOS 11+/iPadOS)
- Face ID uses facial recognition technology to authenticate users on iOS/iPadOS devices. Intune calls the LocalAuthentication API to authenticate users using Face ID. If allowed, Face ID must be used to access the app on a Face ID capable device
- PIN reset after number of days
- Specify the number of days that must pass before the user must reset the PIN
- App PIN when device PIN is set
- If not required, an app PIN does not need to be used to access the app if the device PIN is set on an MDM enrolled device
- Note: Intune cannot detect device enrollment with a third-party EMM solution on iOS
- Work or school account credentials for access
- If required, work or school credentials must be used to access the policy-managed app. If PIN or biometric methods also required for access to the app, the work or school account credentials will be required on top of those prompts
- Recheck the access requirements after (minutes of inactivity)
- If the policy-managed app is inactive for longer than the number of minutes of inactivity specified, the app will prompt the access requirements (i.e PIN, conditional launch settings) to be rechecked after the app is launched
- When you’re done with your Access requirements configuration, click Next
7. On the Conditional Launch page, we can configure how the application should behave when the user launches the app. We have two categories we can configure, application and device conditions. You can for example require the user to reset their pin after X number of failed attempts and check if the device has been jailbroken before allowing access.
One new feature for device conditions is that we can integrate Mobile Threat Defense (MTD) systems to block devices if they are under a certain threat level. This way, you can ensure devices does not have an application with malicious code before granting them access to data.
Look through the settings and configure them to your liking, once done, click Next
8. Assign the policy to the group of users you want to be affected by this policy, then click Next and then Create
You have successfully created an Application Protection Policy. When an assigned user signs into the application you specified with their corporate credentials, the policy will take affect and data will be protected.
Wrapping up
This has been a lengthy post, I’m happy you made it to the end. But I hope it gave a good overview of the different management methods we have available for both BYOD and company owned devices. In part three we will cover how to distribute configurations and applications to devices. Stay tuned.