
At Ignite Microsoft announced a highly requested feature, a tunnel for full/per-app VPN on Android and iOS. This is probably the one argument I have heard most times in terms of features lacking in MEM compared to other vendors.
I think most of us wish it could have gotten here sooner. But I’ll be damned if Microsoft did not do a very good job with this one. It truly gives end users a seamless experience. All the way from enrolling the device with ABM/KME/Zero Touch, getting the tunnel app and profile and boom, They’re connected and able to connect to internal systems.
The solution is built on Docker containers running on Linux so no installing a Windows server that you have to maintain over time. A key feature is that Conditional Access is built in to the Tunnel so you can rest assured only compliant and enrolled devices can access your environment.
Let’s dig into Microsoft Tunnel architecture, configurations and installation.
Before we begin
I am doing this is my Hyper-V lab on my machine The lab consists of
- Two NICs, internal and external
- PFX certificate created with Let’s Encrypt in Powershell
- A record for Tunnel
- CentOS 7.8 – MS Tunnel server
- CentOS 7.8 – Internal server with a static Apache website for demo
- PuTTY for SSH to my server
- FileZilla for easier file transfer
If you’re interested in more details of the lab setup, shoot me an email as I won’t be covering how to set this up in this post. If this is highly requested I might write a separate post on how to do it.
Also consider that it is in public preview.
Architecture
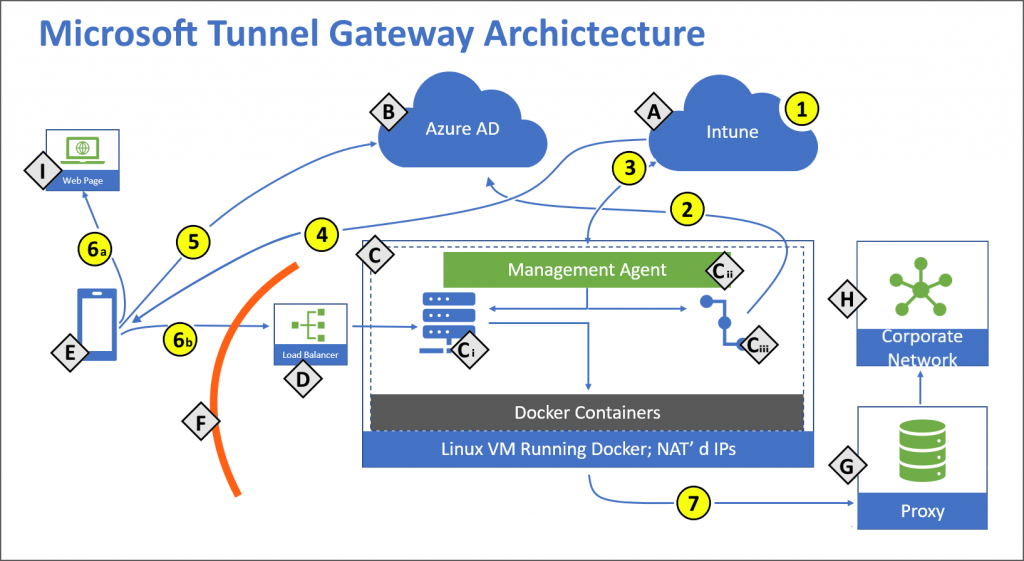
The Microsoft Tunnel Gateway runs in Docker containers that run on Linux servers. All configurations are made in the MEM console from which the tunnel servers pull their configurations. It also uses rolling automatic updates.
Components:
- A – Microsoft Intune.
- B– Azure Active Directory (AD).
- C – Linux server with Docker.
- Ci – Microsoft Tunnel Gateway.
- Cii – Management Agent.
- Ciii – Authentication plugin – Authorization plugin, which authenticates with Azure AD.
- D – Public facing IP or FQDN of the Microsoft Tunnel. This can represent a load balancer.
- E – Mobile Device Management (MDM) enrolled device.
- F – Firewall
- G – Internal Proxy Server (optional).
- H – Corporate Network.
- I – Public internet.
Actions:
- 1 – Intune administrator configures Server configurations and Sites, Server configurations are associated with Sites.
- 2 – Intune administrator installs Microsoft Tunnel Gateway and the authentication plugin authenticates Microsoft Tunnel Gateway with Azure AD. Microsoft Tunnel Gateway server is assigned to a site.
- 3 – Management Agent communicates to Intune to retrieve your server configuration policies, and to send telemetry logs to Intune.
- 4 – Intune administrator creates and deploys VPN profiles and the Tunnel app to devices.
- 5 – Device authenticates to Azure AD. Conditional Access policies are evaluated.
- 6 – With split tunnel:
- 6a – Some traffic goes directly to the public internet.
- 6b – Some traffic goes to your public facing IP address for the Tunnel.
- 7 – The Tunnel routes traffic to your internal proxy (optional) and your corporate network.
Prerequisites
The following Linux distributions are supported
- CentOS 7.4+(CentOS 8+ isn’t supported)
- Red Hat (RHEL) 7.4+ (RHEL 8+ isn’t supported)
- Ubuntu 18.04
- Ubuntu 20.04
CPU
- 64bit AMD or Intel
Sizing guide
| # Devices | # CPUs | Memory GB | # Servers | # Sites | Disk Space GB |
|---|---|---|---|---|---|
| 1,000 | 4 | 4 | 1 | 1 | 30 |
| 2,000 | 4 | 4 | 1 | 1 | 30 |
| 5,000 | 8 | 8 | 2 | 1 | 30 |
| 10,000 | 8 | 8 | 3 | 1 | 30 |
| 20,000 | 8 | 8 | 4 | 1 | 30 |
| 40,000 | 8 | 8 | 8 | 1 | 30 |
Support scales linearly. While each Microsoft Tunnel supports up to 64,000 concurrent connections, individual devices can open multiple connections.
Install Docker (version 19.03 CE or later)
The description shows how to install docker on CentOS. Please refer to these links for the other supported Linux distributions:
Step 1: Set up the repository
user@computer$ sudo yum install -y yum-utils
user@computer$ sudo yum-config-manager \

–add-repo \

https://download.docker.com/linux/centos/docker-ce.repo
Step 2: Install Docker engine
user@computer$ sudo yum install docker-ce docker-ce-cli containerd.io
Step 3: Start Docker
user@computer$ sudo systemctl start docker
Step 4: Verify that Docker engine is installed
user@computer$ sudo docker run hello-world
Certificate
- The TLS certificate used to secure the Tunnel Gateway endpoint must have the IP address or FQDN of the Tunnel Gateway server in the SAN.
- TLS certificate can’t have an expiration date longer than two years. If the date is longer than two years, it won’t be accepted on iOS devices.
- Use of wildcards has limited support. For example, *.contoso.com is supported. cont*.com isn’t supported.
- During installation of the Tunnel Gateway server, you must copy the entire trusted certificate chain to your Linux server. The installation script provides the location where you copy the certificate files and prompts you to do so.
- If you use a TLS certificate that’s not publicly trusted, you must push the entire trust chain to devices using an Intune Trusted certificate profile.
- The TLS certificate can be in PEM or pfx format.
Network
Though optional, it is recommended to use two NICs
- NIC 1 – This NIC handles traffic from your managed devices and should be on a public network with public IP address. This IP address is the address that you configure in the Site configuration. This address can represent a single server or a load balancer.
- NIC 2 – This NIC handles traffic to your on-premises resources and should be on your private internal network without network segmentation.
If you run Linux as a VM in a cloud, you’ll need to ensure the server can access to your on-premises network. For example, if your VM runs in Azure, you can use Azure ExpressRoute or something similar to provide access. If you run the server in a VM on-premises, ExpressRoute isn’t necessary.
If you choose to add a load balancer, consult your vendors documentation for configuration details. Take into consideration network traffic and firewall ports specific to Intune and the Microsoft Tunnel.
Firewall
By default, the Microsoft Tunnel and server use the following ports:
Inbound ports:
- TCP 443 – Required by Microsoft Tunnel.
- UDP 443 – Required by Microsoft Tunnel.
- TCP 22 – Optional. Used for SSH/SCP to the Linux server.
Outbound ports:
- TCP 443 – Required to access Intune services. Required by Docker to pull images.
- TCP – 80 – Required to access Intune services.
When you create a Server configuration for the tunnel, you can specify a different port than the default of 443. If you specify a different port, be sure to configure firewalls to support your configuration.
Additional requirements:
- The Tunnel shares the same requirements as Network endpoints for Microsoft Intune, with the addition of port TCP 22, as noted above.
- Configure firewall rules to support the configurations detailed in Microsoft Container Registry (MCR) Client Firewall Rules Configuration.
Proxy
You can use a proxy server with Microsoft Tunnel. The following considerations can help you configure the Linux server and your environment for success:
- If you use an internal proxy, you might need to configure the Linux host to use your proxy server by using environment variables. To use the variables, edit the /etc/environment file on the Linux server, and adding the following lines:
http_proxy=[address]https_proxy=[address]
- Authenticated proxies aren’t supported.
- The proxy can’t perform break and inspect. This is because the Linux server uses TLS mutual authentication when connecting to Intune.
- Configure Docker to use the proxy to pull images.
- To do so, edit the /etc/systemd/system/docker.service.d/http-proxy.conf file on the Linux server and add the following lines:
[Service] Environment="HTTP_PROXY=http://your.proxy:8080/"Environment="HTTPS_PROXY=http://your.proxy:8080/"Environment="NO_PROXY=127.0.0.1,localhost
- To do so, edit the /etc/systemd/system/docker.service.d/http-proxy.conf file on the Linux server and add the following lines:
Note: Microsoft Tunnel doesn’t support Azure AD App Proxy, or similar proxy solutions
Devices
Only devices that are enrolled to Intune are supported with Microsoft Tunnel. The following device platforms are supported:
- Android Enterprise (Fully managed, Corporate-Owned Work Profile, Work profile)
- iOS/iPadOS
The following functionality is supported by all platforms:
- Azure Active Directory (Azure AD) authentication to the Tunnel using either username and password, or certificates.
- Per-app support.
- Manual full-device tunnel through a Tunnel app, where the user launches VPN and selects Connect.
- Split tunneling. However, on iOS split tunneling rules are ignored when your VPN profile uses per app VPN.
Support for a Proxy is limited to the following platforms:
- Android 10 and later
- iOS/iPadOS
Run readiness tool
Before installing the tunnel a recommended task is to run the readiness tool on your server. It’s a script that performs the following actions
- Confirms that your network configuration allows Microsoft Tunnel to access the required Microsoft endpoints.
- Validates that the Azure Active Directory (Azure AD) account you’ll use to install Microsoft Tunnel has the required roles to complete enrollment.
The tool has a dependency jq, so before we begin lets install jq. Below is a description how to do this on CentOS, if you user another distribution please refer to the documentation for the Linux you use.
Step 1: Install pre-requisite
user@computer$ sudo yum -y install https://dl.fedoraproject.org/pub/epel/epel-release-latest-7.noarch.rpm
Step 2: Install
user@computer$ sudo yum install jq -y
Step 3: Verify
user@computer$ jq -Version
You can get the readiness tool using three methods:
- Download the tool directly by using a web browser. Go to https://aka.ms/microsofttunnelready to download a file named mst-readiness.
- Sign in to Microsoft Endpoint Manager admin center > Tenant administration > Microsoft Tunnel Gateway, select the Servers tab, select Create to open the Create a server pane, and then select Download readiness tool.
- Use a Linux command to get the readiness tool directly. For example, you can use wget or curl to open the link https://aka.ms/microsofttunnelready.For example, to use wget and preserve the file name during the download, run
wget https://aka.ms/microsofttunnelready -o mst-readiness
This tool can be run from any Linux server on the same network where the tunnel is to be installed, allowing network admins to run the tool and troubleshoot issues.
In my case I first had to make script executable by running this in the terminal:
user@computer$ chmod +x ./mst-readiness
Validate network configuration
To validate network configuration, run the following in the terminal:
user@computer$ ./mst-readiness network
The script runs the following actions and reports on success or error for both:
- Tries to connect to each Microsoft endpoint the tunnel will use.
- Checks that the required ports are open in your firewall.
Validate account
To validate the account you will use to install the tunnel has the correct roles and permissions, run the following in the terminal:
user@computer$ ./mst-readiness account
The script prompts you to use a different machine with a web browser, which you use to authenticate to Azure AD and to Intune. The tool will report success or an error.
Ones you’ve made sure all the tests are successful, move on to the next section.
Create server configuration
We’re now ready to add configurations that the server will use. To create a configuration:
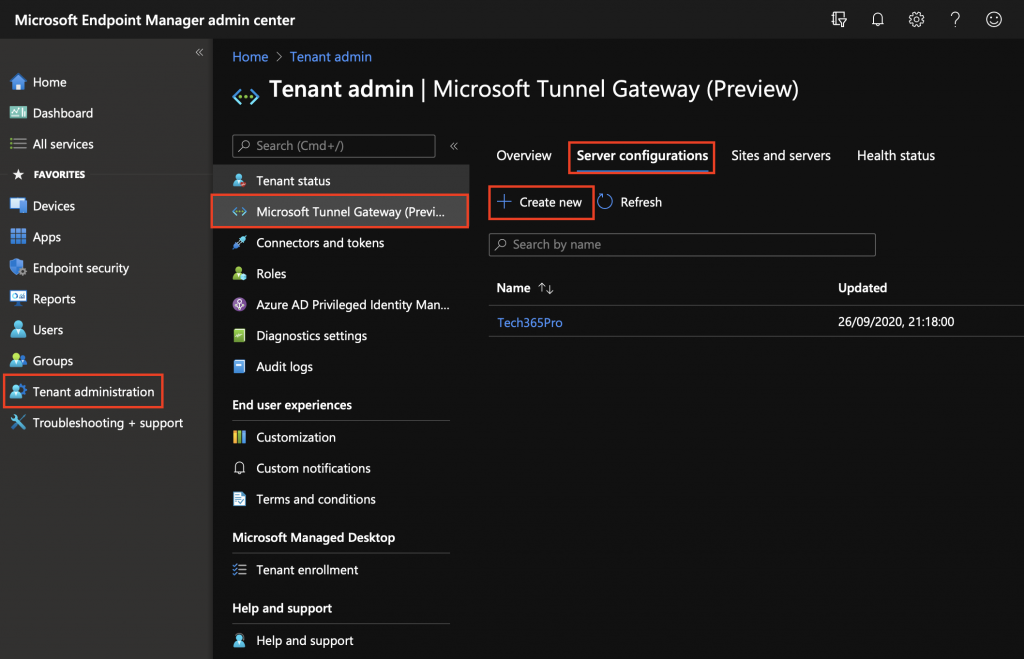
- Go to the MEM console and click on > Tenant administration > Microsoft Tunnel Gateway > select the Server configurations tab > Create new
- Enter a name for the configuration and click Next
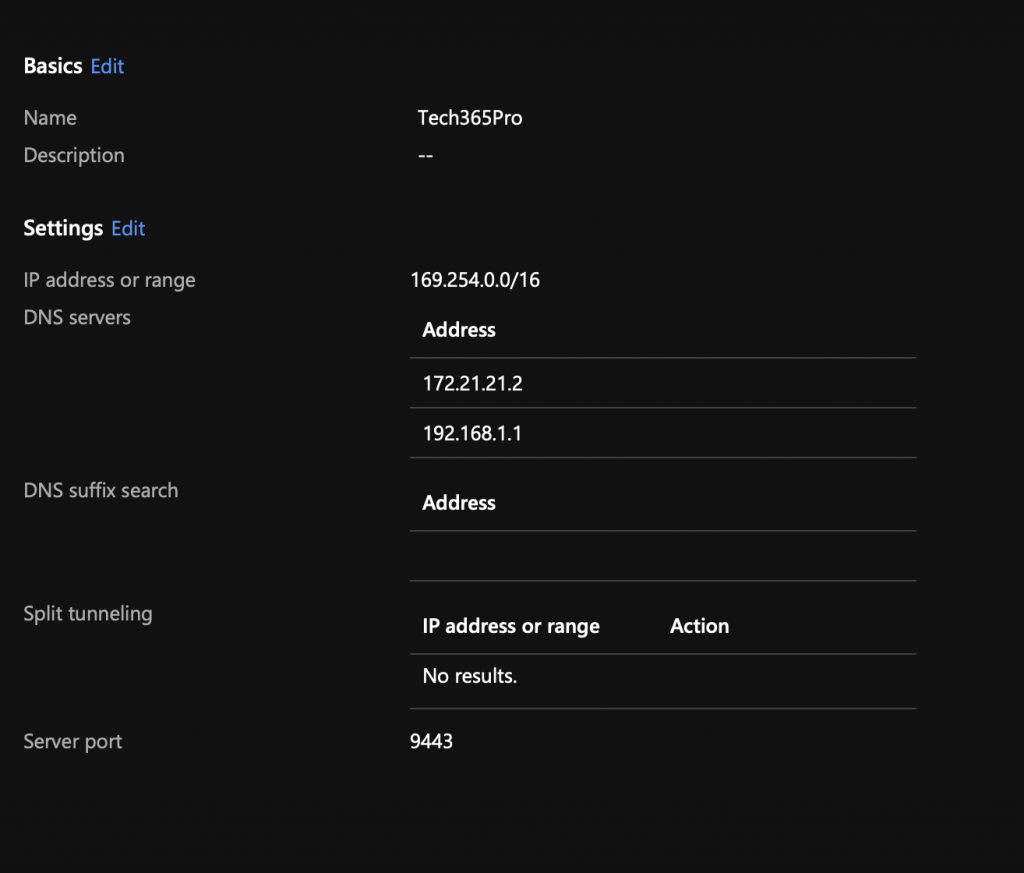
- Configure settings
- IP address range: IP addresses within this range are leased to devices when they connect to Tunnel Gateway. For example, 169.254.0.0/16.
- DNS servers: These servers are used when a DNS request comes from a device that’s connected to Tunnel Gateway.
- DNS suffix search (optional): This domain is provided to clients as the default domain when they connect to Tunnel Gateway.
- Split tunneling (optional): Include or exclude addresses. Included addresses are routed to Tunnel Gateway. Excluded addresses aren’t routed to Tunnel Gateway. For example, you might configure an include rule for 255.255.0.0* or 192.168.0.0/16.Split tunneling supports a total of 500 rules between both include and exclude rules. For example, if you configure 300 include rules, you can only have 200 exclude rules.
- Server port: Enter the port that the server listens to for connections.
- Click Next, review your configuration and click Create
In my case I used port 9443 for the server
Create a site
Sites are groups of servers to which you assign configurations. The configuration is applied to each server that joins the site. Next we will create a site and add the configuration we just created.
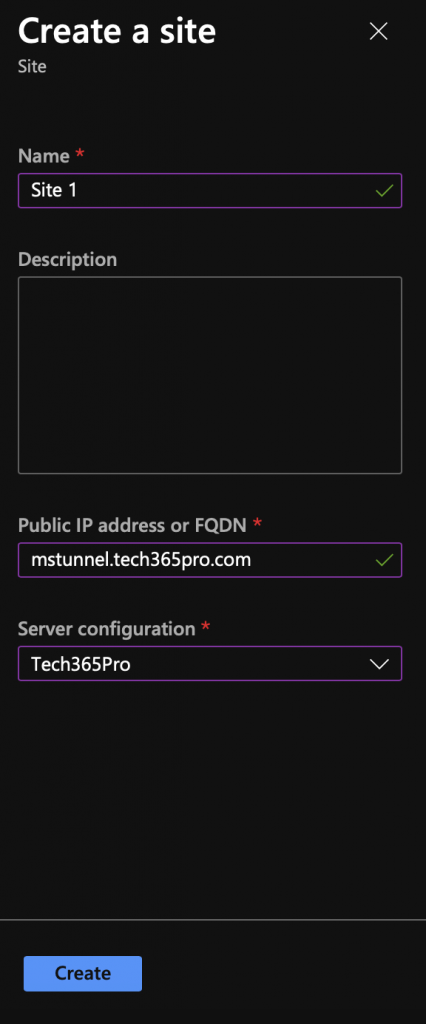
- On the Microsoft Tunnel page in MEM go to Sites and Server > Create > New site
- Enter a name for the site
- Enter public IP or FQDN
- Select the configuration created in the previous step and then click Create
Install Microsoft Tunnel
Finally we are ready to install Microsoft Tunnel. The installation is done by using a script which you can get in three ways:
- Download the tool directly by using a web browser. Go to https://aka.ms/microsofttunneldownload to download the file mstunnel-setup.
- Sign in to Microsoft Endpoint Manager admin center > Tenant administration > Microsoft Tunnel Gateway, select the Servers tab, select Create to open the Create a server pane, and then select Download script.
- Use a Linux command to get the readiness tool directly. For example, on the server where you’ll install the tunnel, you can use wget or curl to open the link https://aka.ms/microsofttunneldownload.
- For example, to use wget and preserve the file name during the download, run
wget https://aka.ms/microsofttunneldownload -o mstunnel-setup
- For example, to use wget and preserve the file name during the download, run
Again I had to make the script executable by running:
user@computer$ chmod +x ./mstunnel-setup
Once you have the script and you are able to execute it we are ready to install. To install Microsoft Tunnel, run the command below in the terminal:
Step 1: Start install script
user@computer$ ./mstunnel-setup
Step 2: Accept EULA
- Keep hitting Enter to scroll through the EULA, at the end hit Q to continue with installation
Step 3: Environment variables
- Review environment variables in Environment file: /etc/mstunnel/env.sh.
- If you do not need to change anything, continue with installation
Step 4: Copy certificate
I used FileZilla to make it easier for myself to copy my .pfx to my server.
- PFX:
- The certificate file name must be site.pfx. Copy the certificate file to /etc/mstunnel/private/site.pfx.
- PEM:
- The full chain (root, intermediate, end-entity) must be in a single file named site.crt. If your using a certificate issued by a public provider like Digicert, you have the option of downloading the complete chain as a single .pem file.
- The certificate file name must be *site.crt. Copy the full chain certificate into /etc/mstunnel/certs/site.crt. For example:
cp [full path to cert] /etc/mstunnel/certs/site.crt- Alternatively, create a link to the full chain cert in /etc/mstunnel/certs/site.crt. For example:
ln -s [full path to cert] /etc/mstunnel/certs/site.crt
- Copy the private key file into /etc/mstunnel/private/site.key. For example:
cp [full path to key] /etc/mstunnel/private/site.key- Alternatively, create a link to the private key file in /etc/mstunnel/private/site.key. For example:
ln -s [full path to key file] /etc/mstunnel/private/site.key- This key shouldn’t be encrypted with a password. The private key file name must be site.key.
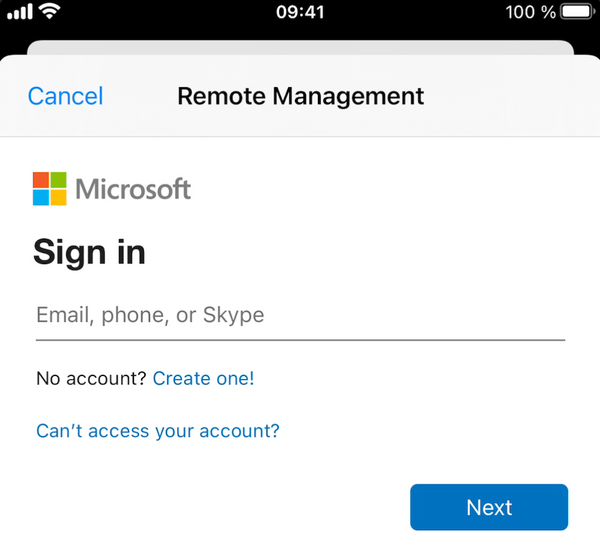
Step 5: Authenticate with MEM
You will now be prompted to authenticate using the account you verified has the correct roles and permissions during the readiness step. To do so go to this link: https://microsoft.com/devicelogin and type the code you get from the installation script
And that’s it. You have now installed Microsoft Tunnel on your server and it should show up in the console.

Enable Conditional Access
Before you can configure Conditional Access policies for tunnel, there are a few pre-requisites.
- Download and install the AzureAD PowerShell module.
- Download the PowerShell script named mst-CA-provisioning.ps1 from aka.ms/mst-ca-provisioning.
- Using credentials that have the Azure Role permissions equivalent to Application Administrator, run the script from any location in your environment, to provision your tenant. The script modifies your tenant by creating a service principle with the following details:
- App ID: 3678c9e9-9681-447a-974d-d19f668fcd88
- Name: Microsoft Tunnel GatewayThe addition of this service principle is required so you can select the tunnel cloud app while configuring Conditional Access policies. It’s also possible to use Graph to add the service principle information to your tenant.
- After the script completes, you can use your normal process to create Conditional Access policies.
Deploy the application
To deploy the application to Android and iOS devices I will use ABM and Managed Google Play, if you are not using any of these. Stop here and set it up now 😉
iOS
Step 1: Go to ABM and get the app
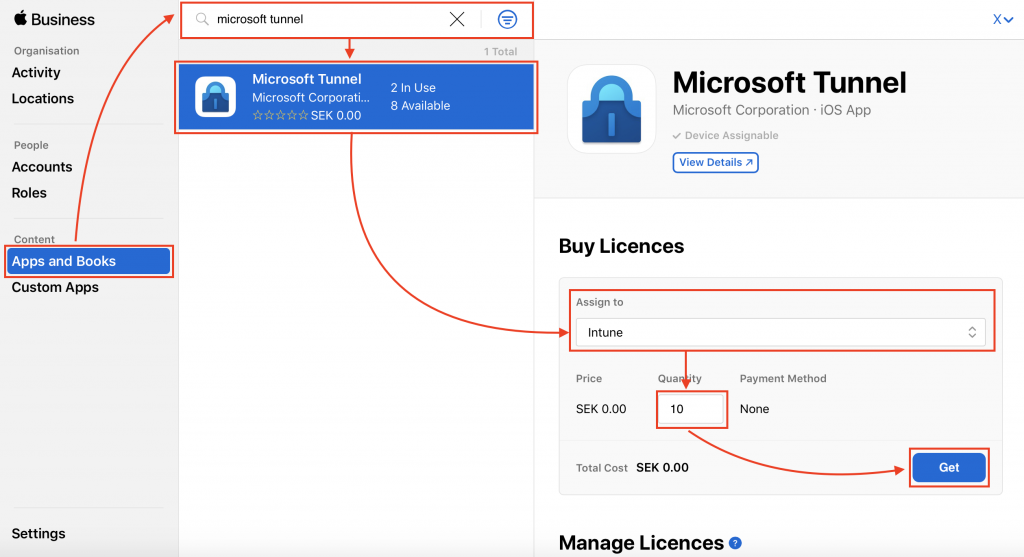
- Sign in to ABM
- Go to Apps & Books and search for Microsoft Tunnel
- Click on the app > choose your MEM environment > specify the number of licenses you need > Click Get
Step 2: Assign to devices
Once the app has synced to MEM we can assign it to the devices.
- In the MEM console, go to Apps > iOS/iPadOS > Click on Microsoft Tunnel > Properties > Assignments > Edit
- Select if you want it as required or available for enrolled devices then click add group and search for the group you want to assign and select the group
- Click on license type and select device licensing
- Click on Review + save > save
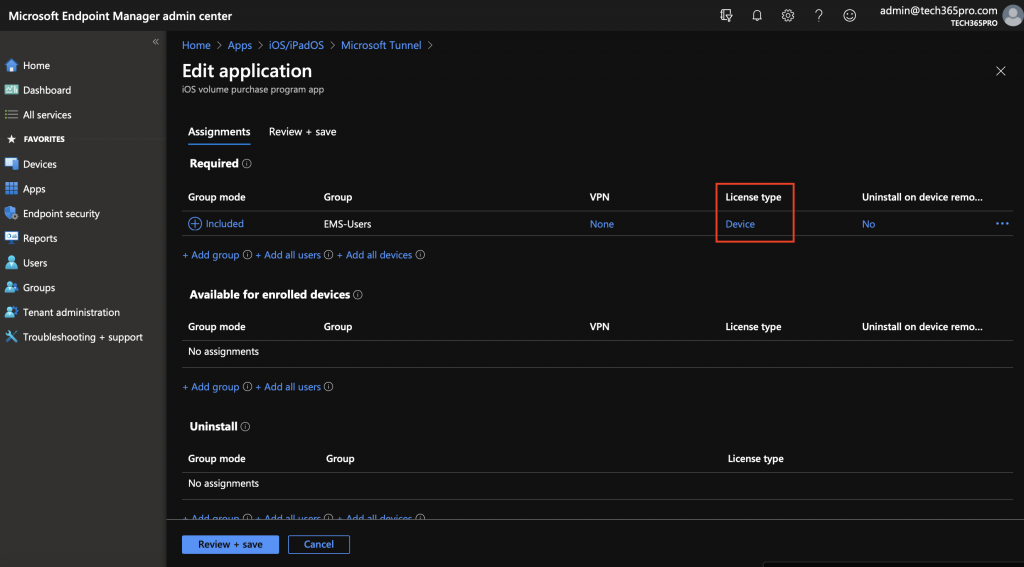
The app will now be available to users without the need for an Apple ID. The app will install silently in the background if devices are supervised.
Android
Step 1: Add app to MEM
- In the MEM console, go to Apps > Android > Add > Managed Google Play App > Select
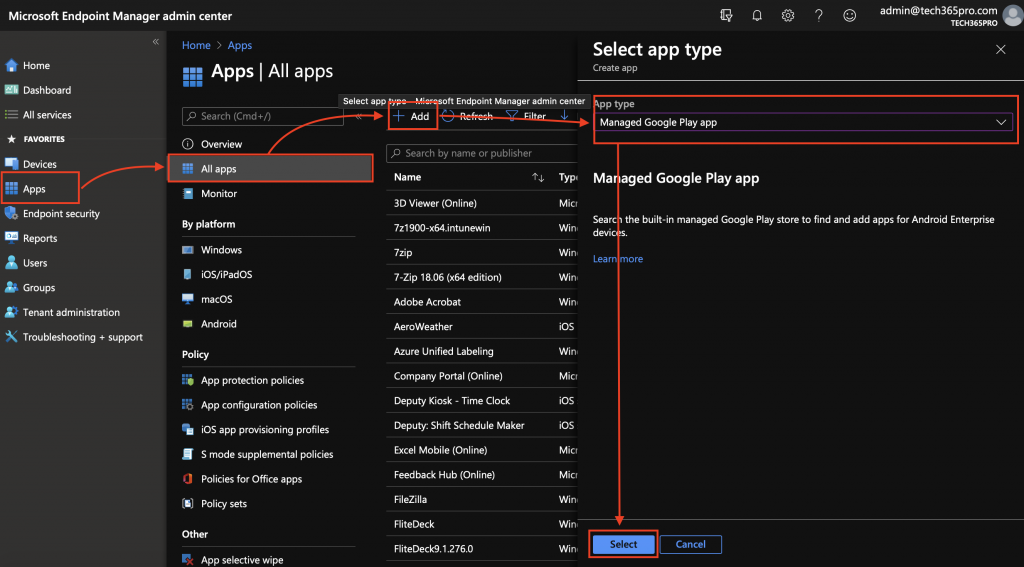
- Search for Microsoft Tunnel > Approve the app > Sync
Step 2: Assign the app
- In the apps list, search for Microsoft Tunnel > Select the with type Managed Google Play store app > go to porperties > Select if you want it as required or available for enrolled devices then click add group and search for the group you want to assign and select the group
- Click on Review + save > save
Create a profile for Android/iOS
iOS
- In the MEM console, go to Devices > Configuration Profiles > Create profile
- Select platform iOS/iPadOS -> Profile > VPN > Create
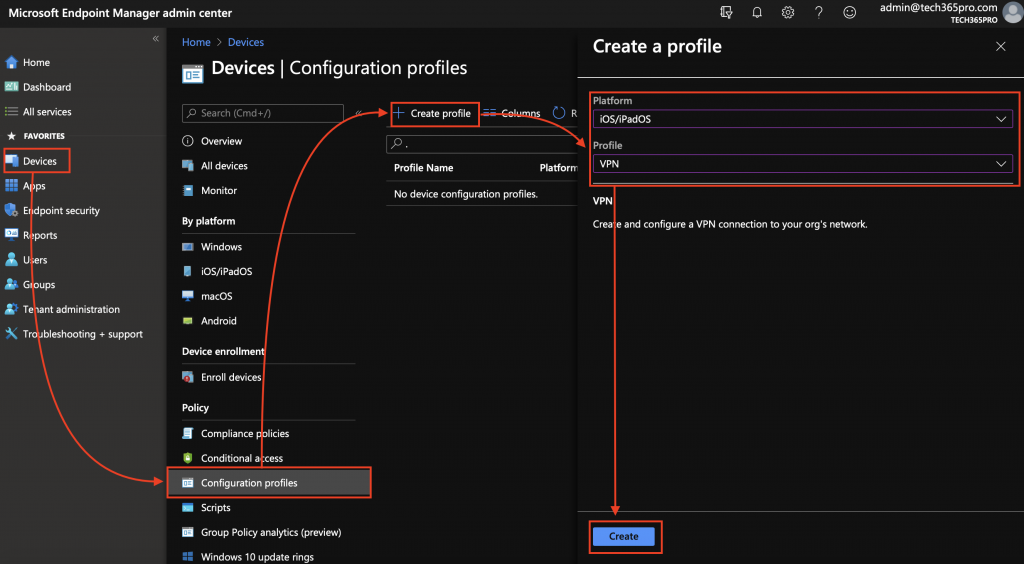
- Give the profile a name and click on Next
- Select Microsoft Tunnel as the connection type
- Base VPN
- Connection name: Prove a friendly name for the connection
- Microsoft Tunnel site: Select the site you configured in previous steps
- Per-App VPN
- Choose if you want the tunnel to connect when an app you specify launches on the device. If you want to follow along with this guide, select enable for Per-App VPN
- Proxy
- If you use a proxy, specify the details here
- Base VPN
- Click Next > Assign to a group > save the profile
Android
- In the MEM console, go to Devices > Configuration Profiles > Create profile
- Select platform Android Enterprise -> Profile > VPN > Create (I will work with Work Profile devices here)
- Give the profile a name and click on Next
- Select Microsoft Tunnel as the connection type
- Base VPN
- Connection name: Prove a friendly name for the connection
- Microsoft Tunnel site: Select the site you configured in previous steps
- Per-App VPN
- Choose if you want the tunnel to connect when an app you specify launches on the device.
- Always on VPN
- Choose if you want the work profile to always be connected to VPN.
- Proxy
- If you use a proxy, specify the details here
- Base VPN
- Click Next > Assign to a group > save the profile
iOS Per-App VPN
For iOS there are additional steps required before you can use Per-App VPN. We have to enable VPN on the application from the MEM console. I will use Edge to connect to a internal intranet site, feel free to test with whatever app you want. To add VPN to the app, do the following:
- In the MEM console, go to Apps > iOS/iPadOS > Click on Microsoft Tunnel > Properties > Assignments > Edit
- Click on VPN and select the profile you created in previous steps

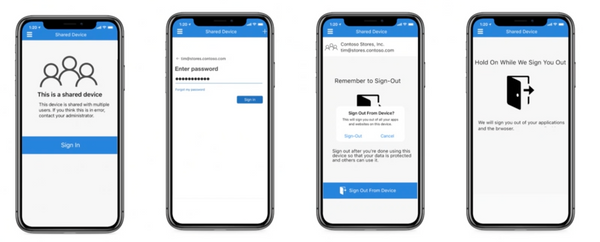
End user experience
This will be the experience for the end user on an iOS device. As soon as I launch Edge, VPN is automatically connected allowing me to browse to internal sites.
Troubleshooting
There are a number of command line tools available for you to troubleshoot issues with Microsoft Tunnel. Look here to see a list of available commands: https://docs.microsoft.com/en-us/mem/intune/protect/microsoft-tunnel-reference
Thats it, we have now successfully configured and deployed Microsoft Tunnel giving the end user a seamless experience. As always, I hope this post was useful!